District System Administrator User Guide
PowerSchool
Student Information System
District System Administrator User Guide
Introduction
© 2004 Apple Computer, Inc. All rights reserved.
2
Document Properties
Copyright
© 2004 Apple Computer, Inc. All rights reserved. This document is the property
of Apple Computer, Inc. and is for reference only. It is not to be reproduced or
distributed in any way without the express written consent of Apple Computer,
Inc. Other brands and names are the property of their respective owners.
Owner
Technical Communication and Documentation
Last Updated
9/2/2004
Version
4.0
Please send comments, suggestions, or requests for this document to manuals@powerschool.com
.
Your feedback is appreciated.
District System Administrator User Guide
Introduction
© 2004 Apple Computer, Inc. All rights reserved.
3
Contents
Introduction ....................................................................................................................................................................13
Legend ..........................................................................................................................................................................................14
Audience..............................................................................................................................................................................14
Security.............................................................................................................................................................................15
Security Permissions ......................................................................................................................................................15
How to Add a New User......................................................................................................................................15
How to Edit Security Permissions ...................................................................................................................17
How to Edit Security Permissions by Group .............................................................................................20
How to Delete a User............................................................................................................................................24
How to Set Page-Level Permissions ..............................................................................................................26
How to Edit Security Groups.............................................................................................................................28
Substitute Login Settings............................................................................................................................................30
How to Set Substitute Login Settings ..........................................................................................................31
Login Attempts Restrictions.......................................................................................................................................31
How to Restrict Login Attempts......................................................................................................................31
How to Reset Disabled IP Addresses.............................................................................................................33
IP Address Restrictions..................................................................................................................................................35
How to Restrict IP Addresses ............................................................................................................................35
How to Edit IP Address Restrictions...............................................................................................................36
How to Delete IP Address Restrictions.........................................................................................................38
Current Users.....................................................................................................................................................................40
How to View a List of Current Users..............................................................................................................40
System Administrator..................................................................................................................................................42
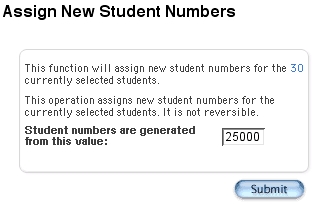
Student Numbers............................................................................................................................................................42
How to Assign New Student Numbers........................................................................................................42
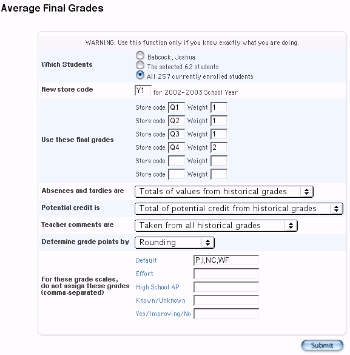
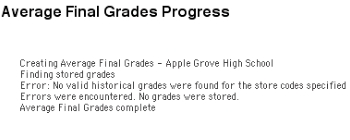
Average Final Grades.....................................................................................................................................................43
How to Modify Average Final Grades Settings........................................................................................44
Honor Roll Administration ..........................................................................................................................................47
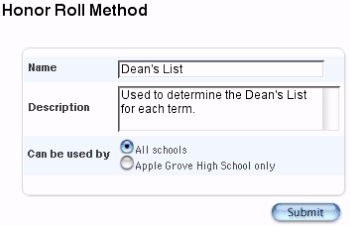
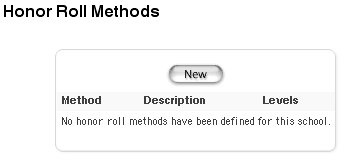
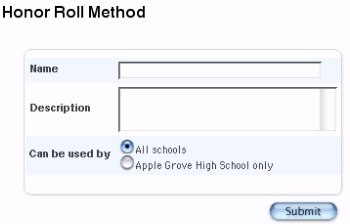
How to Create an Honor Roll Method..........................................................................................................48
How to Edit an Honor Roll Method ...............................................................................................................53
District System Administrator User Guide
Introduction
© 2004 Apple Computer, Inc. All rights reserved.
4
How to Delete an Honor Roll Method..........................................................................................................54
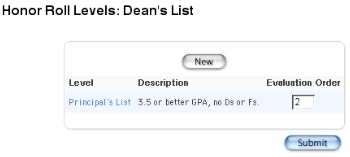
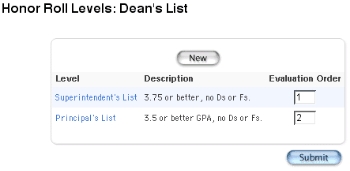
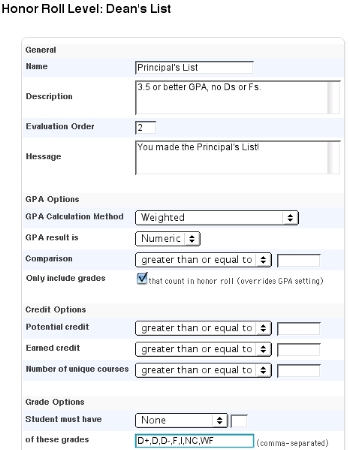
How to Edit Honor Roll Levels..........................................................................................................................56
How to Delete Honor Roll Levels....................................................................................................................58
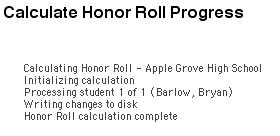
How to Calculate the Honor Roll ....................................................................................................................60
Honor Roll Codes ....................................................................................................................................................61
Course Numbers ..............................................................................................................................................................63
How to Change a Course Number.................................................................................................................64
School Numbers...............................................................................................................................................................65
How to Change School Numbers ...................................................................................................................65
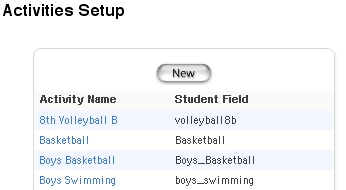
Activities Setup.................................................................................................................................................................66
How to Add an Activity........................................................................................................................................66
How to Edit an Activity ........................................................................................................................................68
How to Delete an Activity...................................................................................................................................70
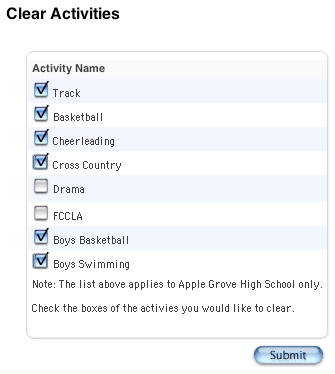
How to Clear Activities for All Students ......................................................................................................71
School Setup Information ...........................................................................................................................................72
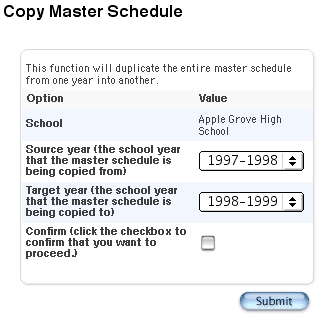
How to Copy the Master Schedule ................................................................................................................72
How to Copy School Setup Information .....................................................................................................73
Custom Fields and Screens Overview...........................................................................................................................74
Custom Student Fields and Screens......................................................................................................................75
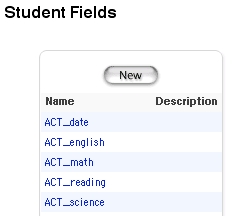
How to Add Custom Student Fields..............................................................................................................75
How to Edit Custom Student Fields ..............................................................................................................77
How to Delete Custom Student Fields ........................................................................................................79
How to Add Custom Student Screens .........................................................................................................81
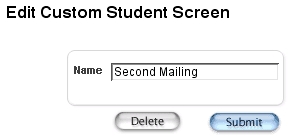
How to Edit Custom Student Screens..........................................................................................................85
How to Delete Custom Student Screens ....................................................................................................87
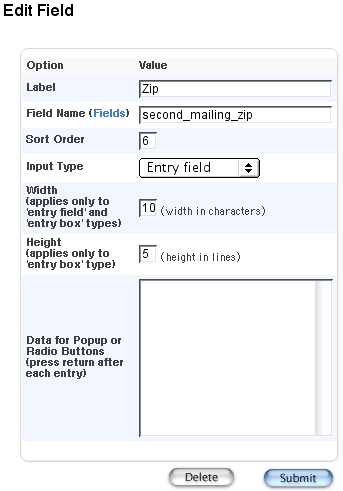
How to Edit Custom Student Screen Fields ..............................................................................................88
How to Delete Custom Student Screen Fields.........................................................................................92
How to Export a Student Screen as a Template .....................................................................................94
Custom Staff Fields and Screens .............................................................................................................................97
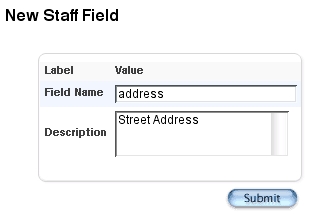
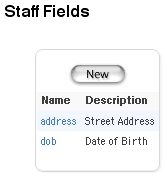
How to Add Custom Staff Fields.....................................................................................................................97
How to Edit Custom Staff Fields......................................................................................................................99
How to Delete Custom Staff Fields............................................................................................................. 101
District System Administrator User Guide
Introduction
© 2004 Apple Computer, Inc. All rights reserved.
5
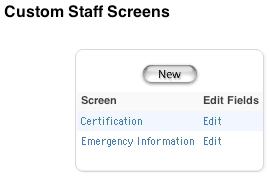
How to Add Custom Staff Screens.............................................................................................................. 103
How to Edit Custom Staff Screens .............................................................................................................. 107
How to Delete Custom Staff Screens......................................................................................................... 109
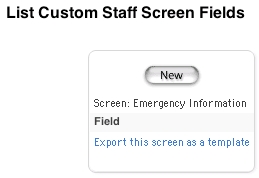
How to Edit Custom Staff Screen Fields................................................................................................... 110
How to Delete Custom Staff Screen Fields............................................................................................. 113
How to Export a Staff Screen as a Template.......................................................................................... 115
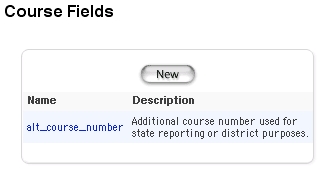
Custom Course Fields ................................................................................................................................................ 117
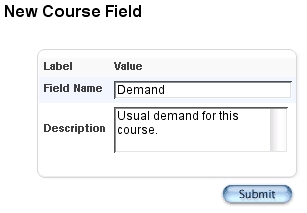
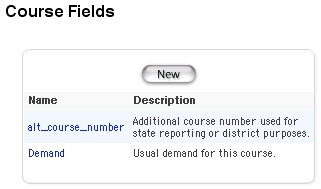
How to Add Custom Course Fields............................................................................................................. 118
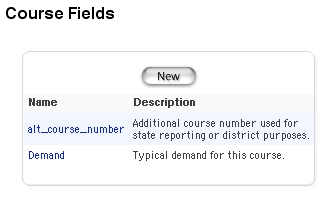
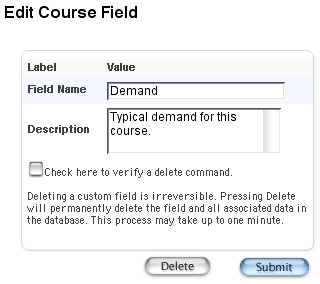
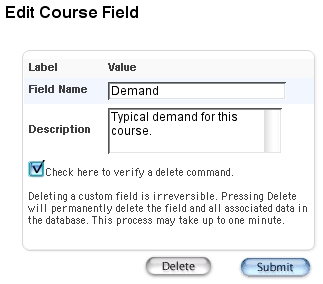
How to Edit Custom Course Fields ............................................................................................................. 119
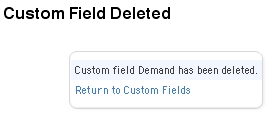
How to Delete Custom Course Fields........................................................................................................ 121
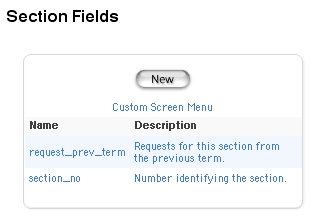
Custom Section Fields ............................................................................................................................................... 124
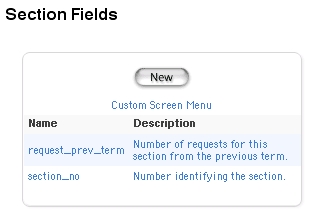
How to Add Custom Section Fields............................................................................................................ 124
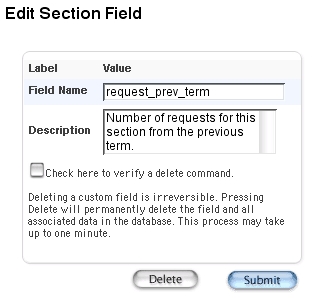
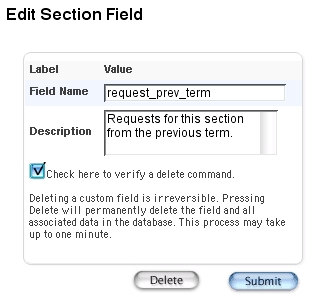
How to Edit Custom Section Fields ............................................................................................................ 126
How to Delete Custom Section Fields....................................................................................................... 128
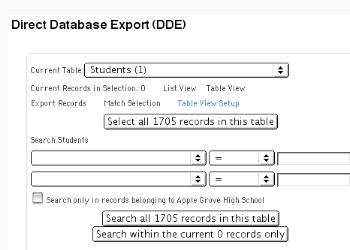
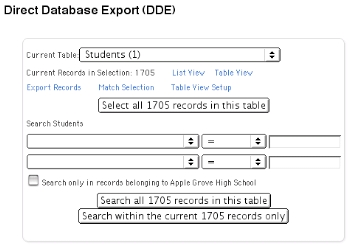
Direct Database Export.............................................................................................................................................. 131
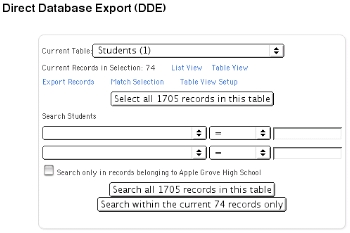
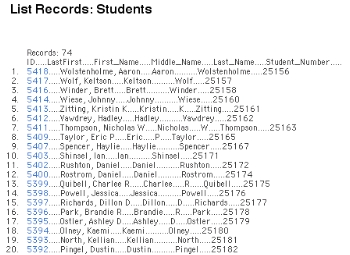
How to Select Records for Export-List View........................................................................................... 131
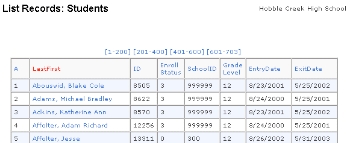
How to Select Records for Export-Table View....................................................................................... 134
How to Format the DDE Table View .......................................................................................................... 136
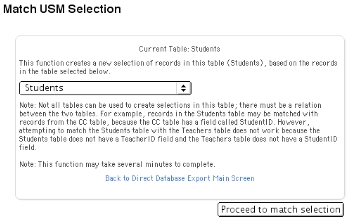
How to Match Selections for Export .......................................................................................................... 138
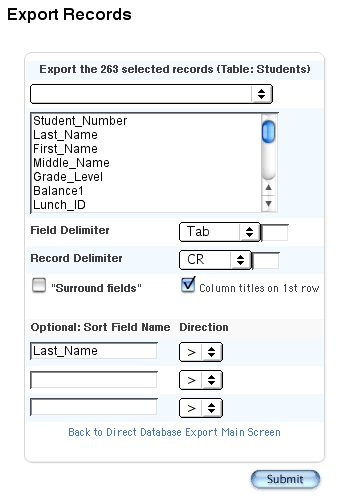
How to Export Records ..................................................................................................................................... 139
End-of-Year Process .................................................................................................................................................... 142
Enroll Status............................................................................................................................................................ 143
Important Notes ................................................................................................................................................... 144
Prepare for End-of-Year Process................................................................................................................... 144
How to Clear Non-Essential Fields ..............................................................................................................
147
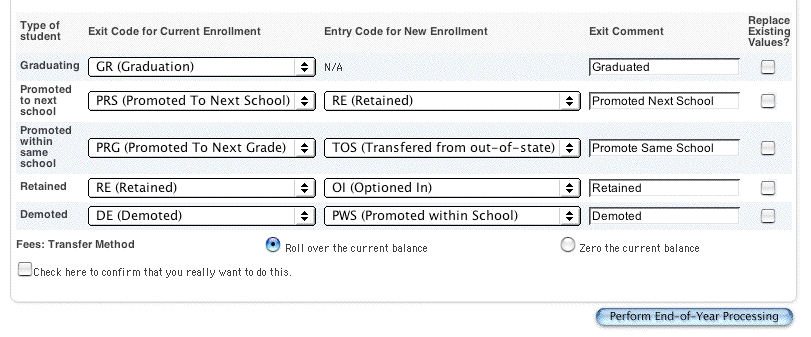
How to Perform the End-of-Year Process................................................................................................ 147
Prepare for the Upcoming School Year............................................................................................................ 152
Transfer Fees................................................................................................................................................................... 152
How to Assess Fees After End-of-Year Process..................................................................................... 153
Export Historical Grades............................................................................................................................................ 153
How to Export Historical Grades .................................................................................................................. 153
Report Templates ......................................................................................................................................................... 155
District System Administrator User Guide
Introduction
© 2004 Apple Computer, Inc. All rights reserved.
6
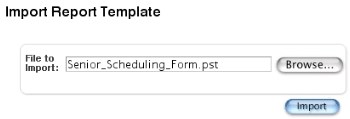
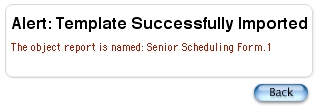
How to Import a Report Template.............................................................................................................. 155
How to Export a Report Template............................................................................................................... 156
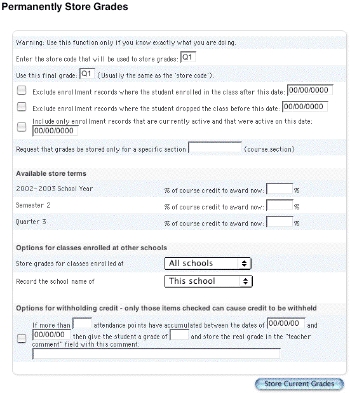
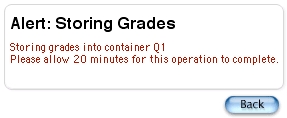
Permanently Store Grades....................................................................................................................................... 158
How to Permanently Store Grades ............................................................................................................. 158
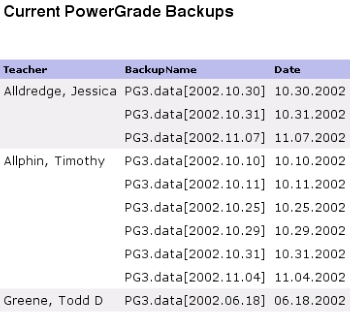
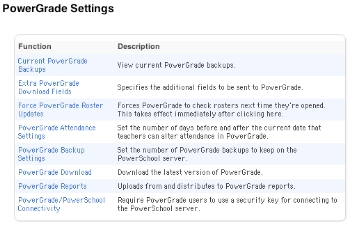
PowerGrade Settings.................................................................................................................................................. 161
How to View Current PowerGrade Backups........................................................................................... 161
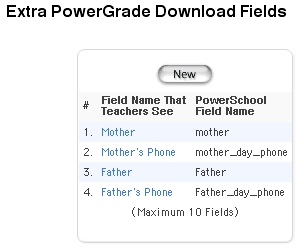
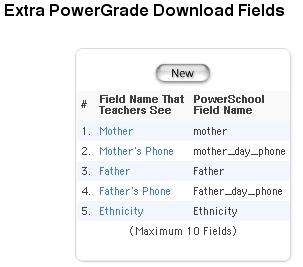
How to Add Extra PowerGrade Download Fields ............................................................................... 162
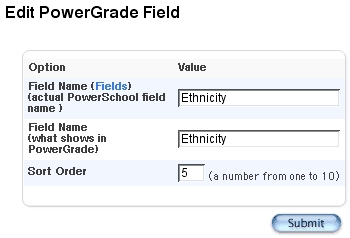
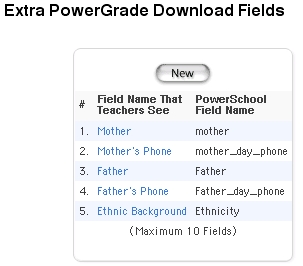
How to Edit Extra PowerGrade Download Fields................................................................................ 165
How to Delete Extra PowerGrade Download Fields .......................................................................... 167
How to Force PowerGrade Roster Updates............................................................................................ 169
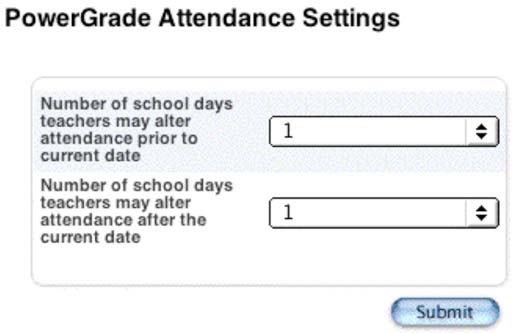
How to Set PowerGrade Attendance Restrictions............................................................................... 170
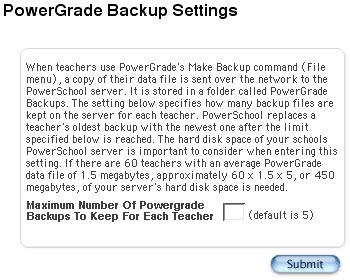
How to Edit PowerGrade Backup Settings.............................................................................................. 170
How to Download and Install PowerGrade............................................................................................ 171
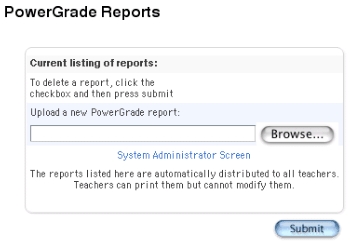
How to Add PowerGrade Reports............................................................................................................... 172
How to Delete PowerGrade Reports.......................................................................................................... 174
How to Edit PowerGrade and PowerSchool Connectivity Settings ........................................... 175
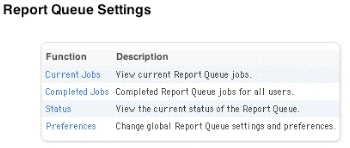
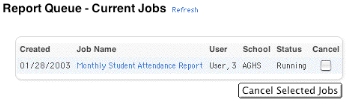
Report Queue................................................................................................................................................................. 177
How to View Report Queue Jobs................................................................................................................. 177
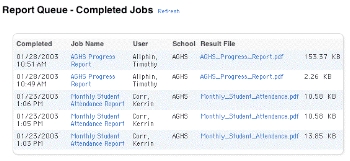
How to View Completed Report Queue Jobs ....................................................................................... 178
How to Understand Report Queue Job Details.................................................................................... 179
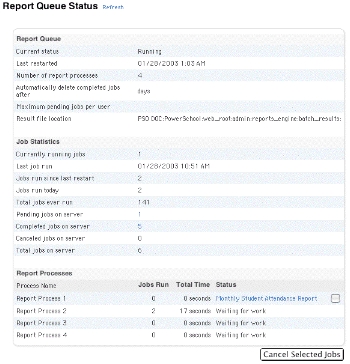
How to View the Report Queue Status..................................................................................................... 182
How to Set Report Queue Preferences ..................................................................................................... 184
Scan Pages....................................................................................................................................................................... 185
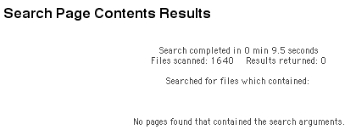
How to Scan for Customized Pages ........................................................................................................... 185
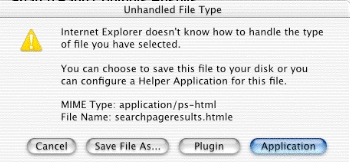
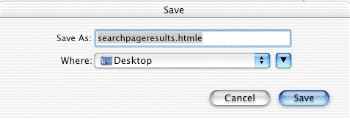
How to View Customized HTML Pages .................................................................................................... 186
How to Edit Customized HTML Pages....................................................................................................... 186
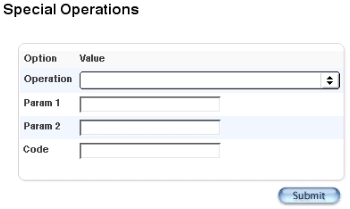
Special Operations....................................................................................................................................................... 187
How to Run a Special Operation..................................................................................................................
187
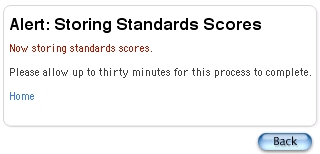
Store Standards Grades............................................................................................................................................. 188
How to Store Standards Grades ................................................................................................................... 188
System Settings ...........................................................................................................................................................191
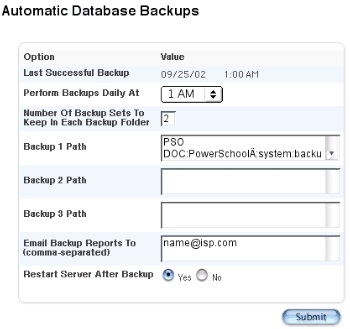
Backups ............................................................................................................................................................................. 191
District System Administrator User Guide
Introduction
© 2004 Apple Computer, Inc. All rights reserved.
7
How to Automatically Back Up PowerSchool........................................................................................ 192
How to Manually Backup PowerSchool.................................................................................................... 193
PowerSchool Updates................................................................................................................................................ 194
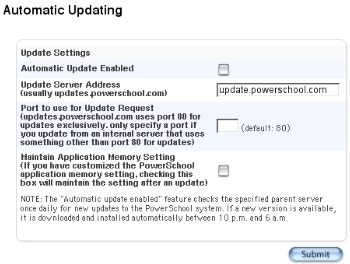
How to Set Auto Update Settings............................................................................................................... 194
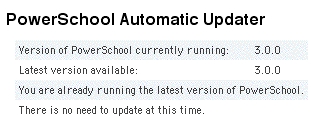
How to Update PowerSchool ........................................................................................................................ 195
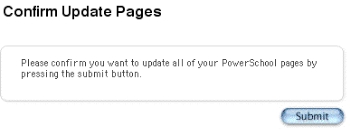
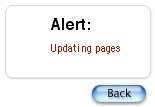
How to Update Pages........................................................................................................................................ 196
Browser Timeout........................................................................................................................................................... 196
How to Set Browser Timeout......................................................................................................................... 197
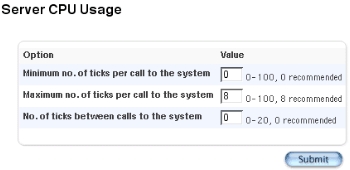
CPU Usage........................................................................................................................................................................ 198
How to Set CPU Usage...................................................................................................................................... 198
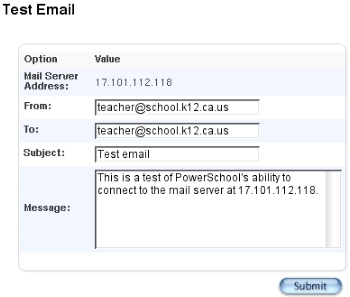
Email Setup...................................................................................................................................................................... 199
How to Set Up Email Addresses ................................................................................................................... 199
How to Test Email................................................................................................................................................ 200
How to View the Outgoing Mail Queue................................................................................................... 201
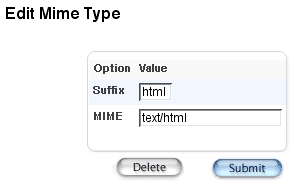
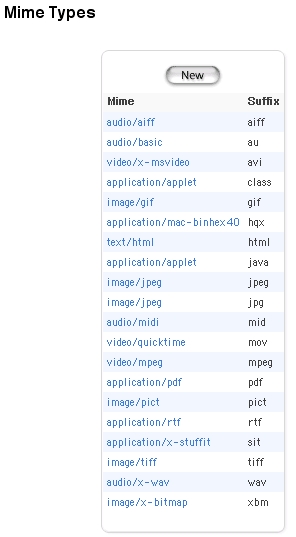
MIME Types ..................................................................................................................................................................... 202
How to Add MIME Types.................................................................................................................................. 202
How to Edit MIME Types .................................................................................................................................. 204
How to Delete MIME Types ............................................................................................................................ 206
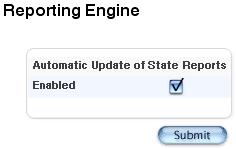
Reporting Engine Settings....................................................................................................................................... 208
How to Modify Reporting Engine Settings............................................................................................. 208
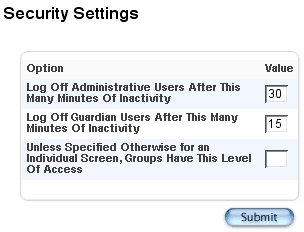
System Security ............................................................................................................................................................. 208
How to Set System Security ........................................................................................................................... 208
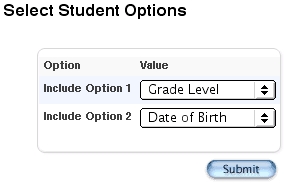
Select Student Options.............................................................................................................................................. 209
How to Modify Select Student Options.................................................................................................... 210
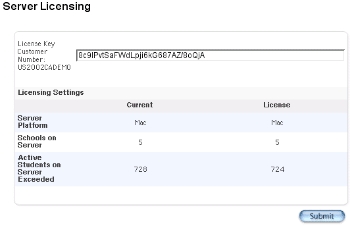
Server Licensing ............................................................................................................................................................ 211
How to Enter the Server License Key......................................................................................................... 212
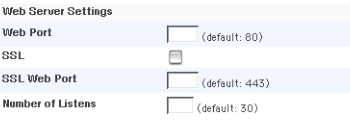
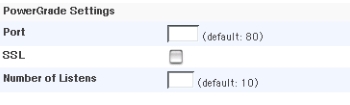
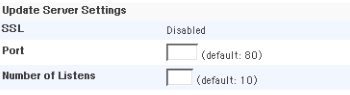
Server Settings............................................................................................................................................................... 212
How to Modify Server Settings..................................................................................................................... 213
How to Set File Permissions............................................................................................................................ 217
Server Settings Information .................................................................................................................................... 219
Server Statistics.............................................................................................................................................................. 220
How to View Server Statistics ........................................................................................................................ 221
District System Administrator User Guide
Introduction
© 2004 Apple Computer, Inc. All rights reserved.
8
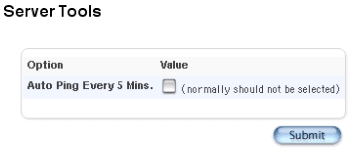
Server Tools..................................................................................................................................................................... 230
How to Use Server Tools .................................................................................................................................. 230
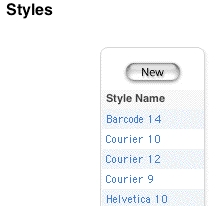
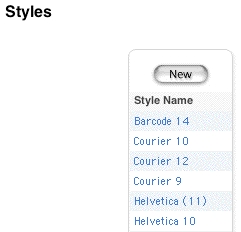
System Styles.................................................................................................................................................................. 231
How to Add Styles............................................................................................................................................... 231
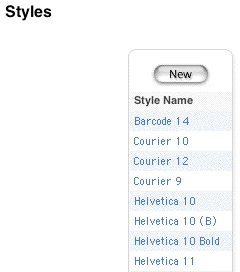
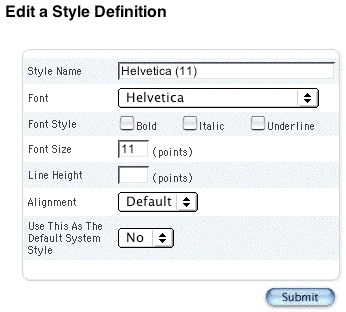
How to Edit Styles................................................................................................................................................ 233
District Setup................................................................................................................................................................236
General....................................................................................................................................................................................... 236
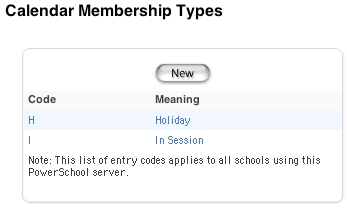
Calendar Membership Types.................................................................................................................................. 236
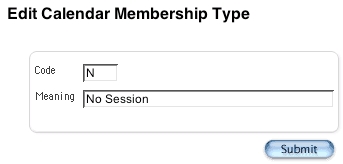
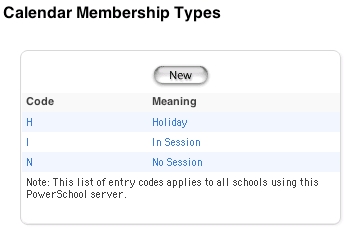
How to Add a Calendar Membership Type............................................................................................ 236
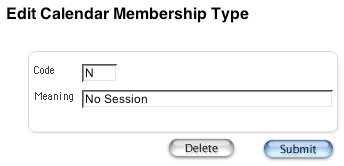
How to Edit a Calendar Membership Type............................................................................................. 237
How to Delete a Calendar Membership Type....................................................................................... 239
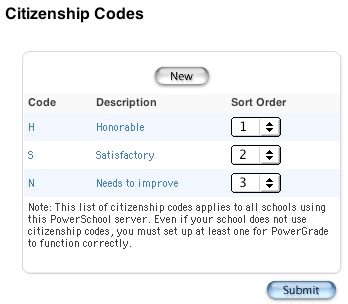
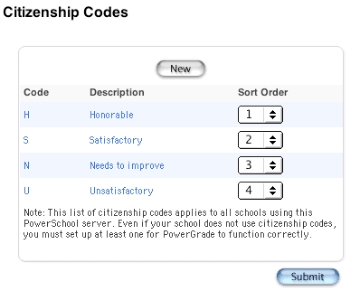
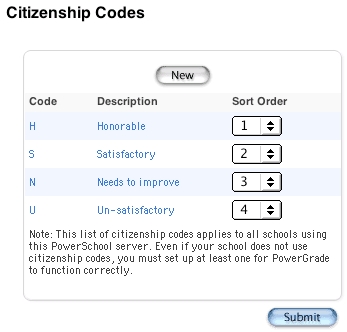
Citizenship Codes......................................................................................................................................................... 240
How to Add a Citizenship Code ................................................................................................................... 240
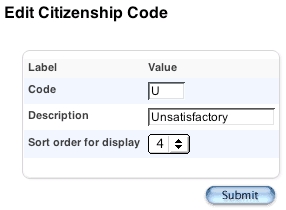
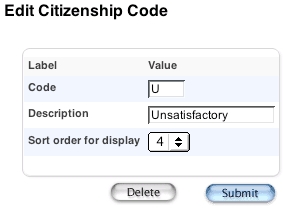
How to Edit a Citizenship Code.................................................................................................................... 242
How to Delete a Citizenship Code .............................................................................................................. 244
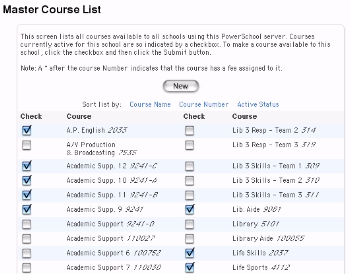
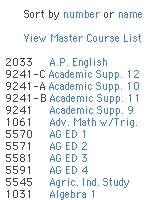
Master Course List........................................................................................................................................................ 245
How to View the Master Course List.......................................................................................................... 245
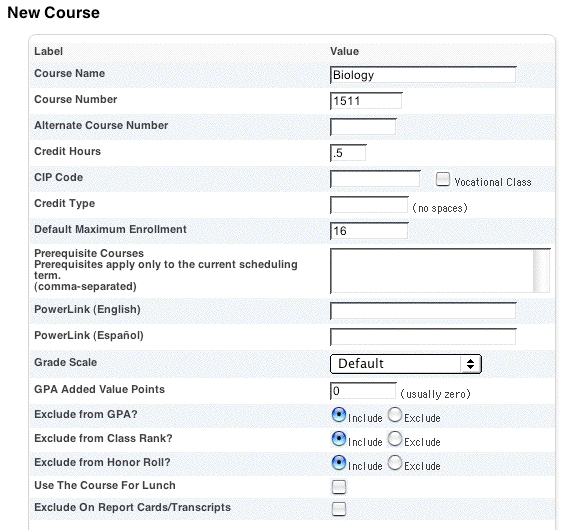
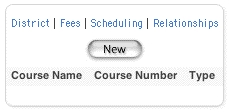
How to Add a Course to the Master Course List ................................................................................. 246
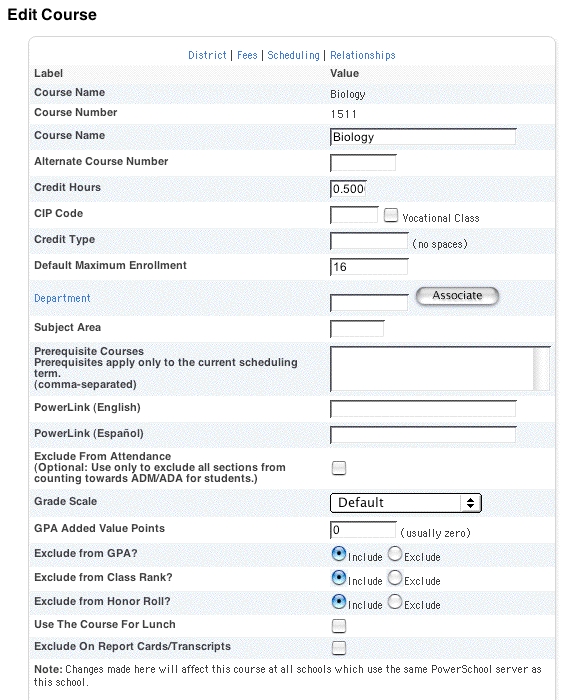
How to Edit Course Information................................................................................................................... 249
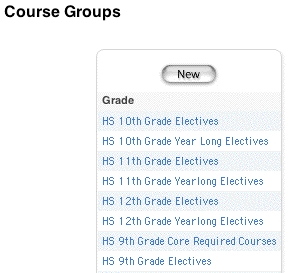
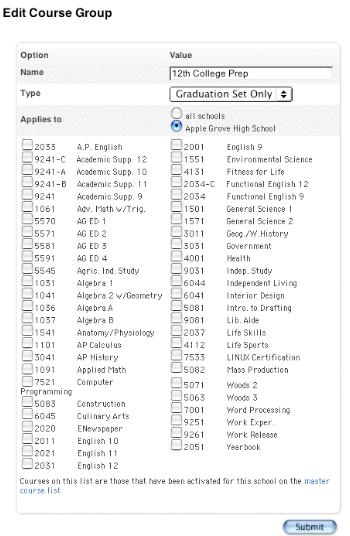
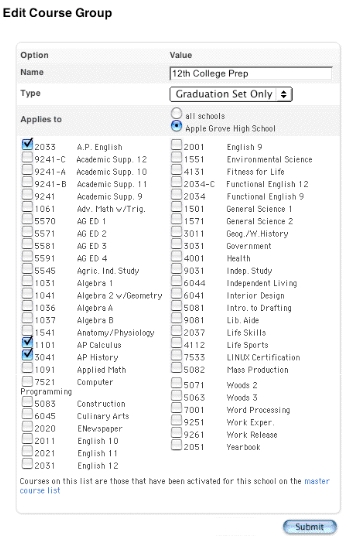
How to Create a Course Group..................................................................................................................... 254
How to Delete a Course Group..................................................................................................................... 258
How to Edit Course Status .............................................................................................................................. 260
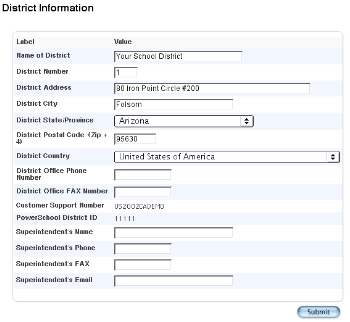
District Information ..................................................................................................................................................... 261
How to Add or Edit District Information .................................................................................................. 261
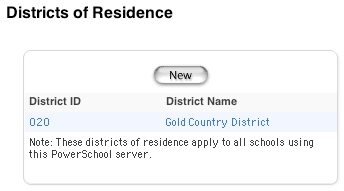
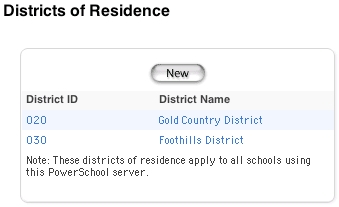
Districts of Residence ................................................................................................................................................. 263
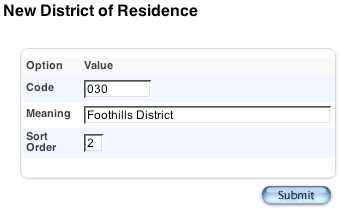
How to Add Districts of Residence..............................................................................................................
263
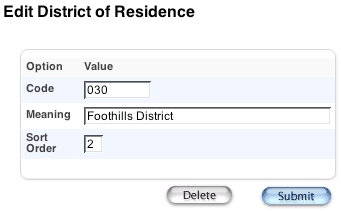
How to Edit Districts of Residence .............................................................................................................. 264
How to Delete Districts of Residence ........................................................................................................ 266
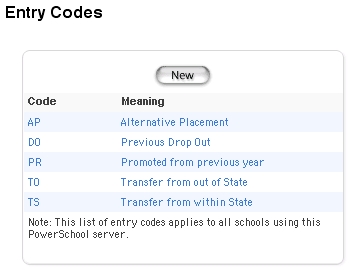
Entry Codes ..................................................................................................................................................................... 267
How to Add an Entry Code............................................................................................................................. 267
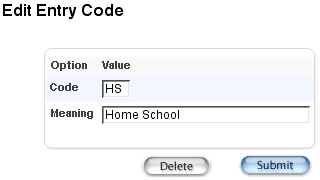
How to Edit an Entry Code.............................................................................................................................. 268
How to Delete an Entry Code........................................................................................................................ 270
District System Administrator User Guide
Introduction
© 2004 Apple Computer, Inc. All rights reserved.
9
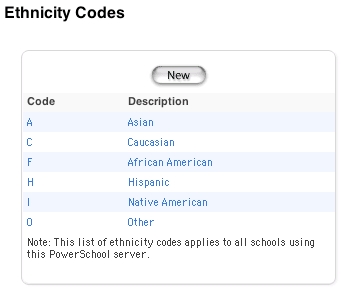
Ethnicity Codes.............................................................................................................................................................. 271
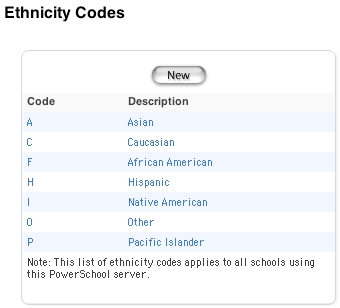
How to Add an Ethnicity Code ..................................................................................................................... 271
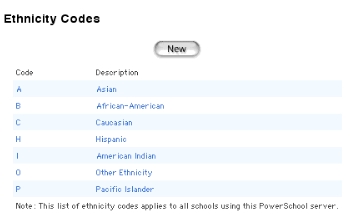
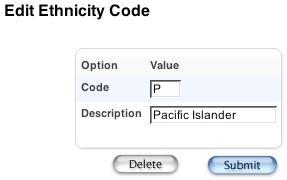
How to Edit an Ethnicity Code...................................................................................................................... 273
How to Delete an Ethnicity Code ................................................................................................................ 274
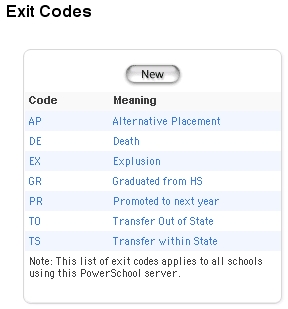
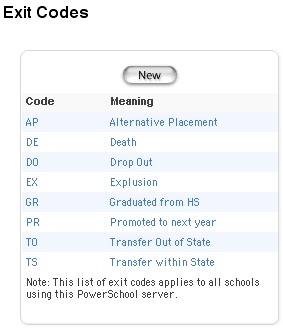
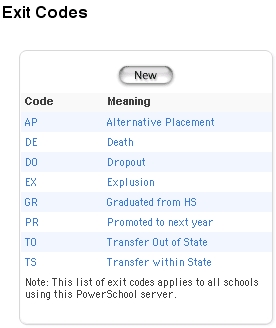
Exit Codes......................................................................................................................................................................... 275
How to Add an Exit Code ................................................................................................................................ 275
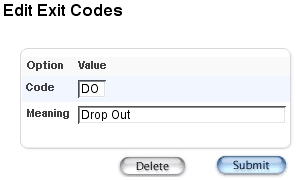
How to Edit an Exit Code................................................................................................................................. 277
How to Delete an Exit Code ........................................................................................................................... 279
Fees Management Overview.................................................................................................................................. 281
Fee Categories....................................................................................................................................................... 281
Payment Methods ............................................................................................................................................... 282
Fee Types ................................................................................................................................................................. 282
School Enrollment Fees .................................................................................................................................... 283
Course Enrollment Fees.................................................................................................................................... 283
Fee Exemption Status........................................................................................................................................ 283
Student Fees........................................................................................................................................................... 284
Fee Transactions................................................................................................................................................... 284
Fee Functions......................................................................................................................................................... 284
End-of-Year Processing ..................................................................................................................................... 284
Reports ...................................................................................................................................................................... 285
PowerSchool Teacher ........................................................................................................................................ 285
PowerSchool Parent ........................................................................................................................................... 285
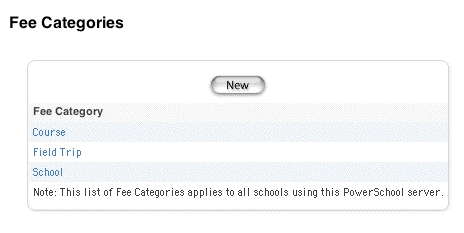
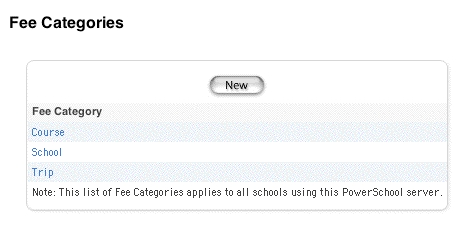
Fee Categories ............................................................................................................................................................... 285
How to View Fee Categories .......................................................................................................................... 286
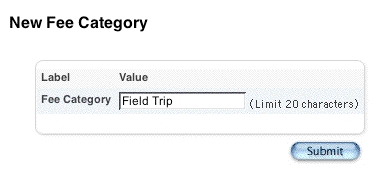
How to Add Fee Categories............................................................................................................................ 286
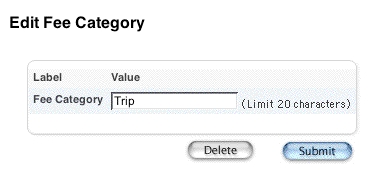
How to Edit Fee Categories ............................................................................................................................ 288
How to Delete Fee Categories....................................................................................................................... 289
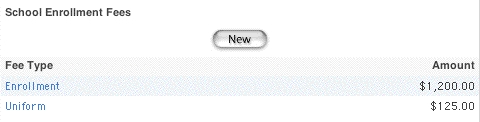
School Enrollment Fees............................................................................................................................................. 290
How to View School Enrollment Fees .......................................................................................................
291
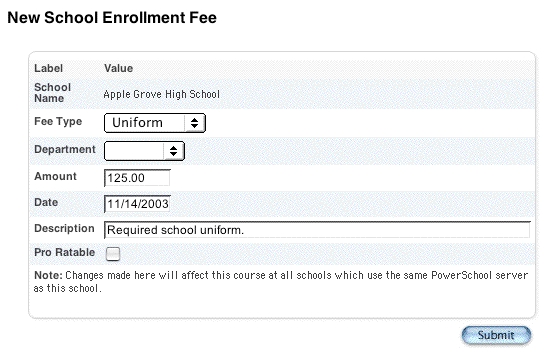
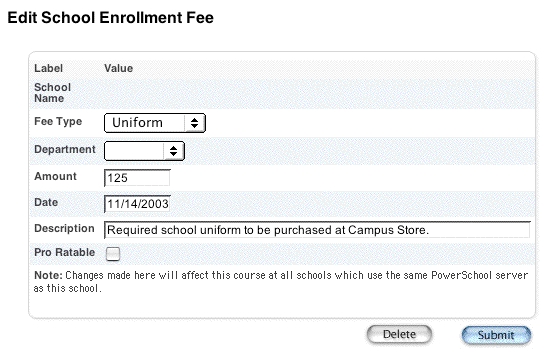
How to Create School Enrollment Fees.................................................................................................... 293
How to Edit School Enrollment Fees ......................................................................................................... 296
How to Delete School Enrollment Fees.................................................................................................... 299
District System Administrator User Guide
Introduction
© 2004 Apple Computer, Inc. All rights reserved.
10
Log Entry Fields............................................................................................................................................................. 301
How to Customize the Log Entries Page ................................................................................................. 301
Log Entry Fields..................................................................................................................................................... 305
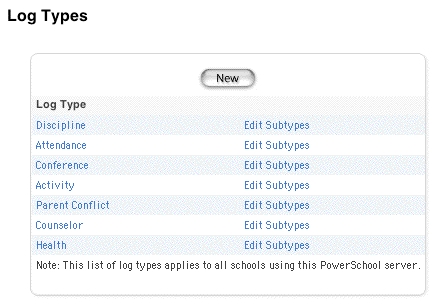
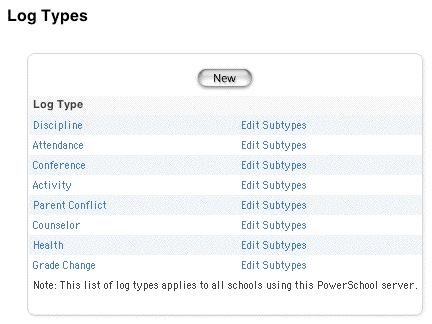
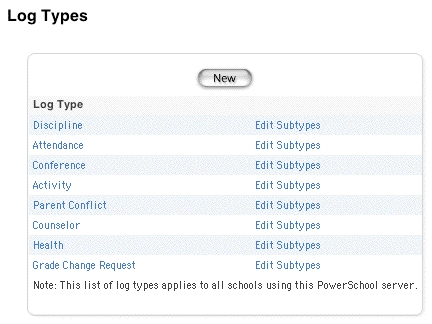
Log Types ......................................................................................................................................................................... 309
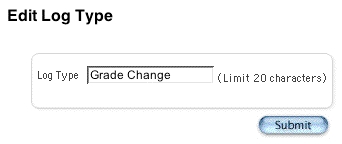
How to Add a Log Type.................................................................................................................................... 309
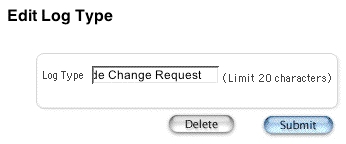
How to Edit a Log Type .................................................................................................................................... 311
How to Delete a Log Type............................................................................................................................... 313
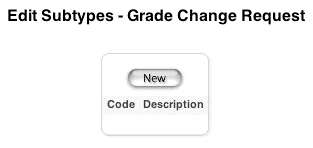
How to Add a Log Subtype ............................................................................................................................ 315
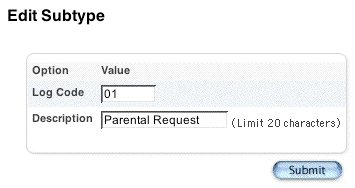
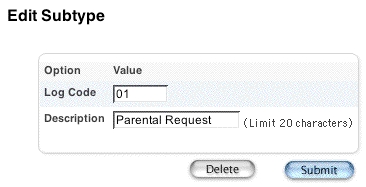
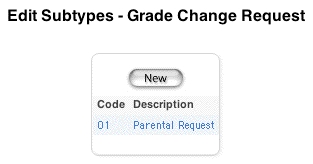
How to Edit a Log Subtype............................................................................................................................. 317
How to Delete a Log Subtype ....................................................................................................................... 318
Payment Methods........................................................................................................................................................ 319
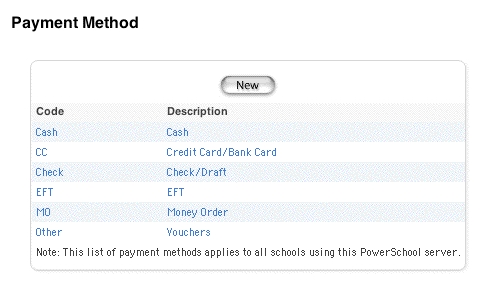
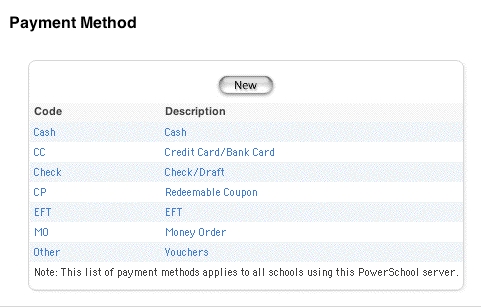
How to View Payment Methods................................................................................................................... 320
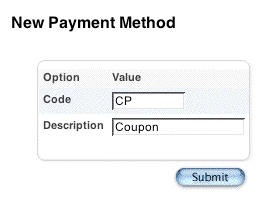
How to Add Payment Methods.................................................................................................................... 320
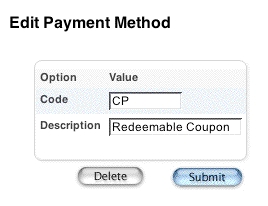
How to Edit Payment Methods..................................................................................................................... 322
How to Delete Payment Methods............................................................................................................... 323
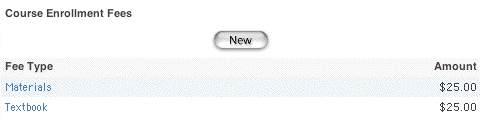
Course Enrollment Fees ............................................................................................................................................ 324
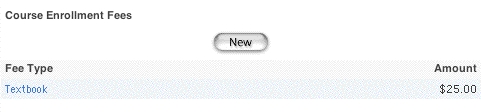
How to View Course Enrollment Fees....................................................................................................... 325
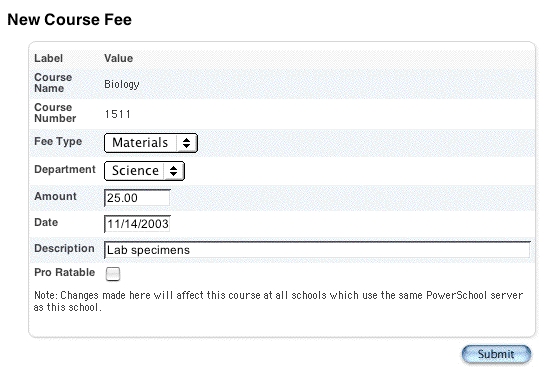
How to Add Course Enrollment Fees ........................................................................................................ 327
How to Edit Course Enrollment Fees......................................................................................................... 329
How to Delete Course Enrollment Fees ................................................................................................... 331
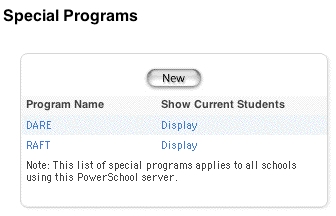
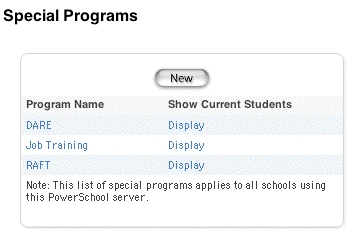
Special Program Setup .............................................................................................................................................. 333
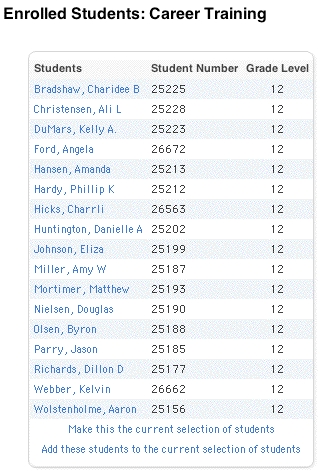
How to View Students in a Special Program ......................................................................................... 333
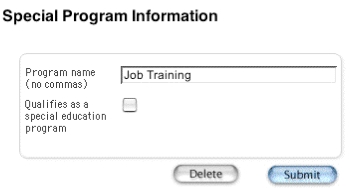
How to Add a Special Program..................................................................................................................... 334
How to Edit a Special Program ..................................................................................................................... 336
How to Delete a Special Program................................................................................................................ 337
School Information......................................................................................................................................................
338
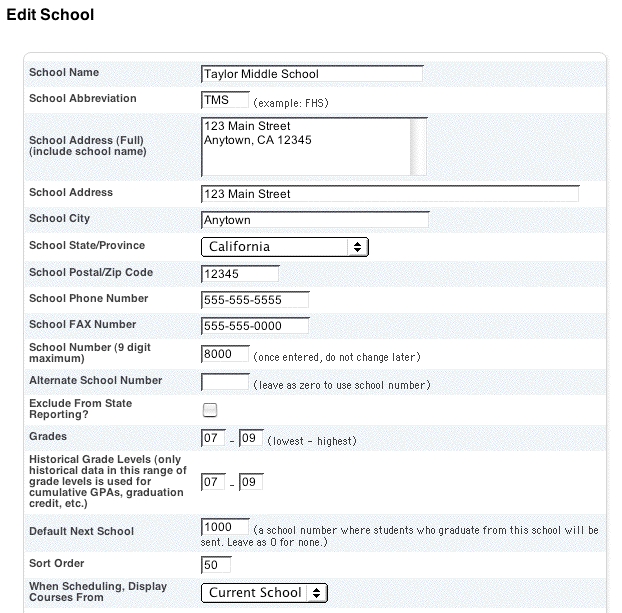
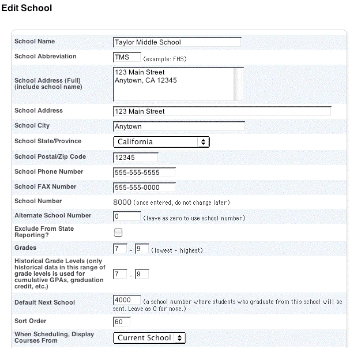
How to Add a School......................................................................................................................................... 338
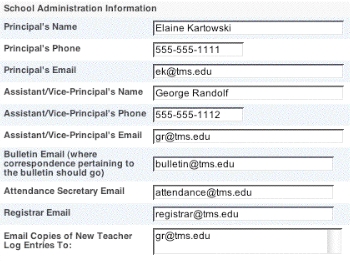
How to Edit School Information................................................................................................................... 344
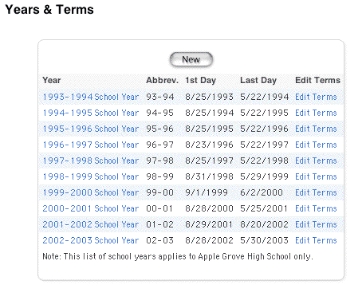
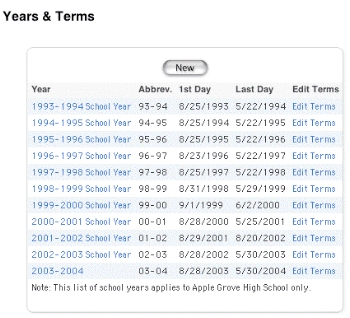
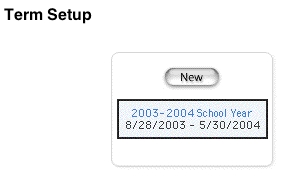
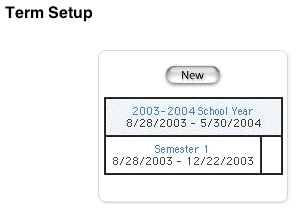
Years and Terms............................................................................................................................................................ 349
How to Add a School Year .............................................................................................................................. 349
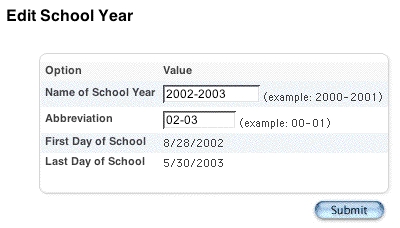
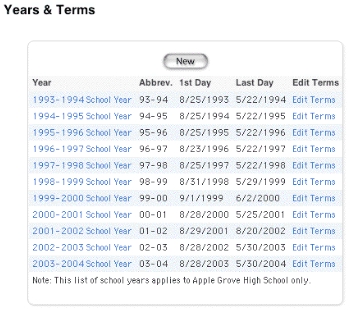
How to Edit a School Year............................................................................................................................... 351
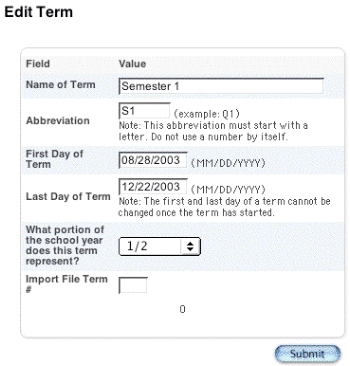
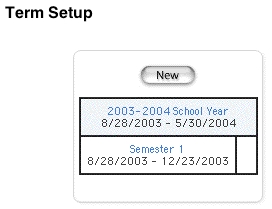
How to Define Terms......................................................................................................................................... 353
District System Administrator User Guide
Introduction
© 2004 Apple Computer, Inc. All rights reserved.
11
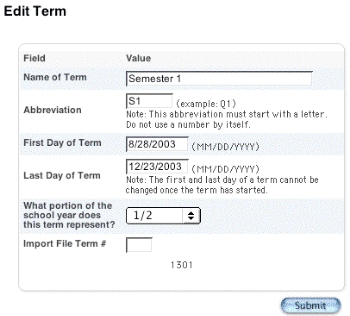
How to Edit Terms............................................................................................................................................... 356
Grading ...................................................................................................................................................................................... 359
District Web Assignments........................................................................................................................................ 359
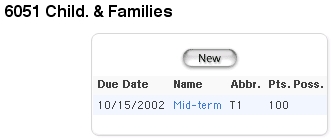
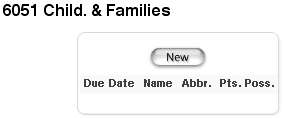
How to Add a District Web Assignment .................................................................................................. 360
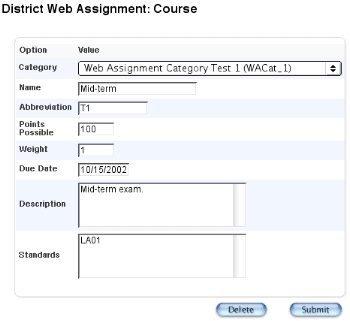
How to Edit a District Web Assignment................................................................................................... 361
How to Delete a District Web Assignment ............................................................................................. 363
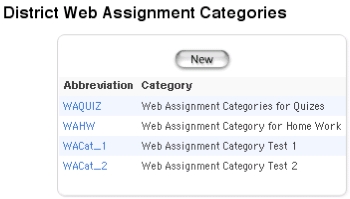
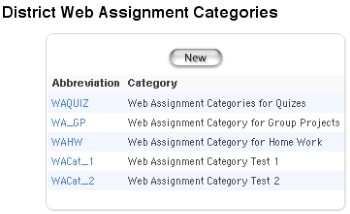
How to Add a District Web Assignment Category.............................................................................. 364
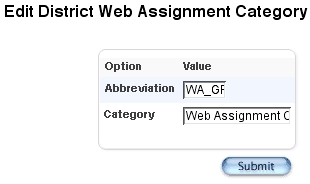
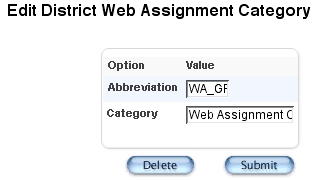
How to Edit a District Web Assignment Category .............................................................................. 366
How to Delete a District Web Assignment Category ........................................................................ 367
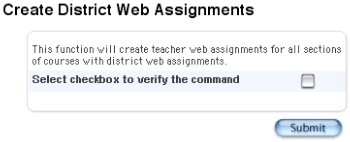
How to Create Teacher Web Assignments ............................................................................................. 368
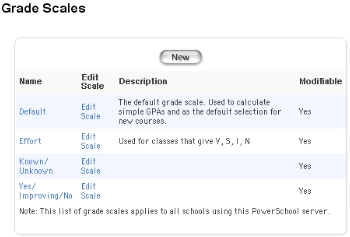
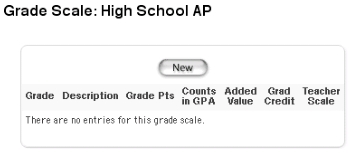
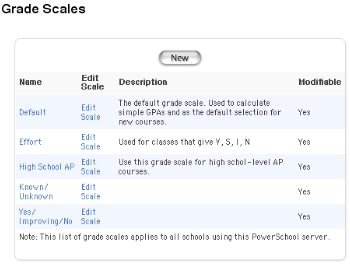
Grade Scales.................................................................................................................................................................... 369
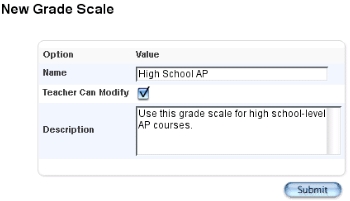
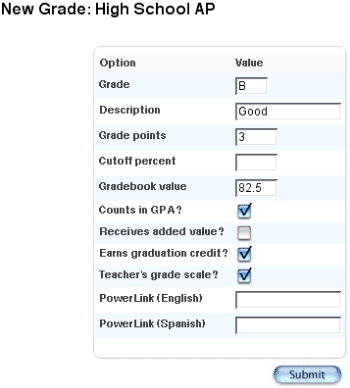
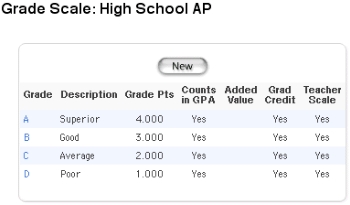
How to Create a Grade Scale ......................................................................................................................... 369
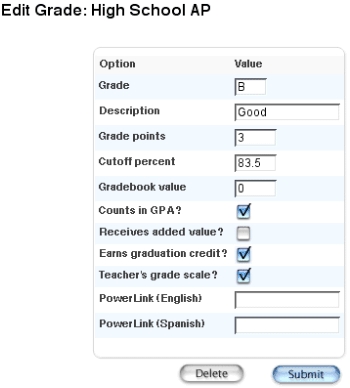
How to Edit a Grade Scale Grade................................................................................................................. 374
How to Delete a Grade Scale Grade........................................................................................................... 376
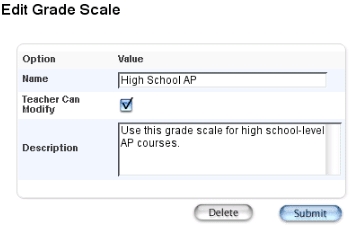
How to Edit a Grade Scale............................................................................................................................... 378
How to Delete a Grade Scale......................................................................................................................... 380
GPA Calculations................................................................................................................................................................... 381
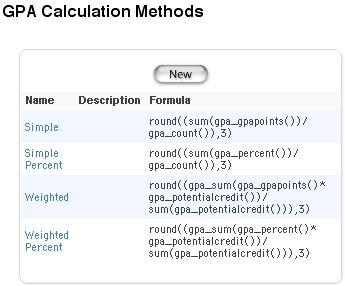
GPA Calculation Methods ........................................................................................................................................ 381
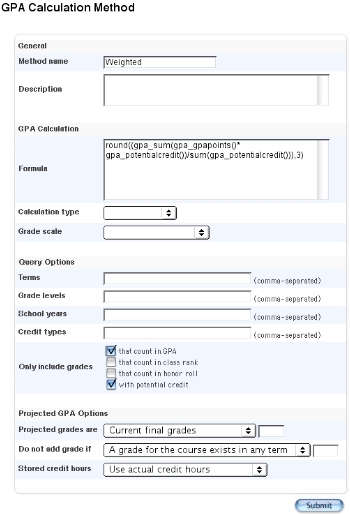
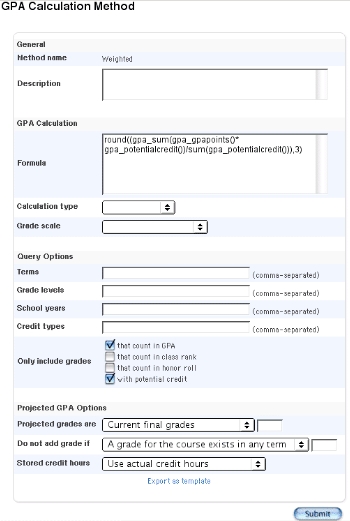
How to Add GPA Calculation Methods..................................................................................................... 383
How to Edit GPA Calculation Methods ..................................................................................................... 389
How to Export GPA Calculation Methods................................................................................................ 391
Formulas for Calculation Methods ...................................................................................................................... 393
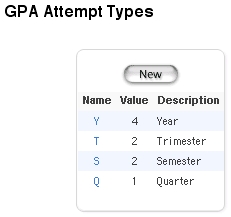
GPA Attempt Types..................................................................................................................................................... 394
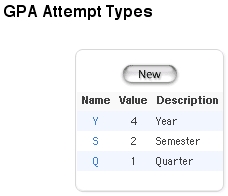
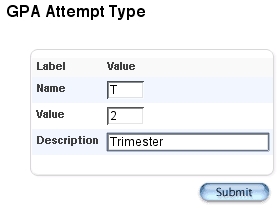
How to Add GPA Attempt Types................................................................................................................. 395
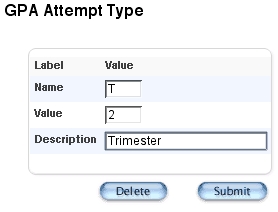
How to Edit GPA Attempt Types.................................................................................................................. 396
How to Delete GPA Attempt Types............................................................................................................
398
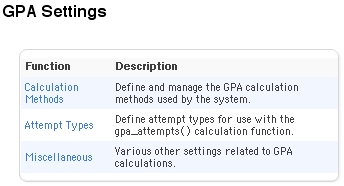
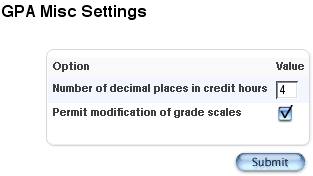
How to Set Other GPA Settings.................................................................................................................... 400
Functions .................................................................................................................................................................................. 401
GPA Samples................................................................................................................................................................... 401
Numerical Functions................................................................................................................................................... 402
Logical Functions.......................................................................................................................................................... 405
Statistical Functions .................................................................................................................................................... 407
District System Administrator User Guide
Introduction
© 2004 Apple Computer, Inc. All rights reserved.
12
Text Functions................................................................................................................................................................ 413
GPA Functions................................................................................................................................................................ 415
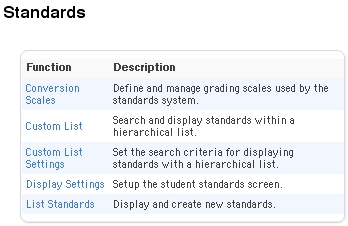
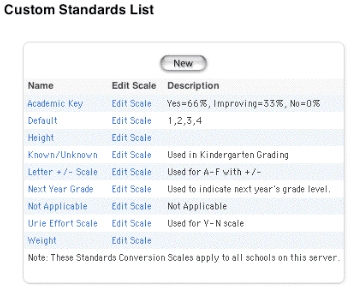
Standards Setup............................................................................................................................................................ 420
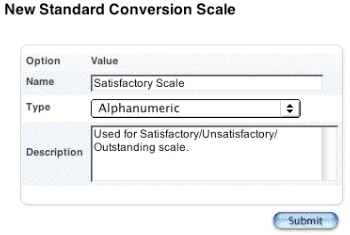
How to Create a Conversion Scale.............................................................................................................. 421
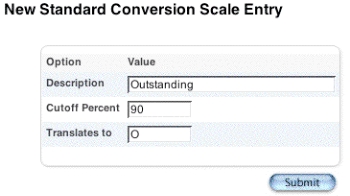
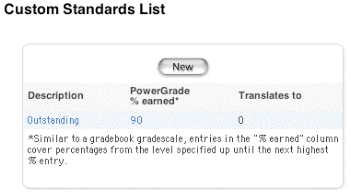
How to Enter Cutoffs.......................................................................................................................................... 423
Enter Standards............................................................................................................................................................. 425
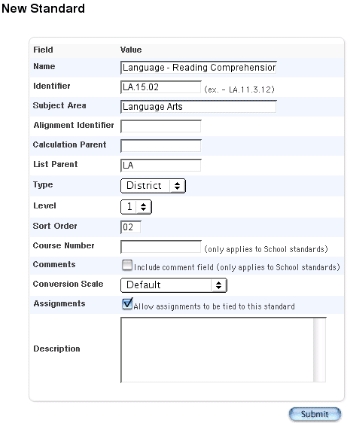
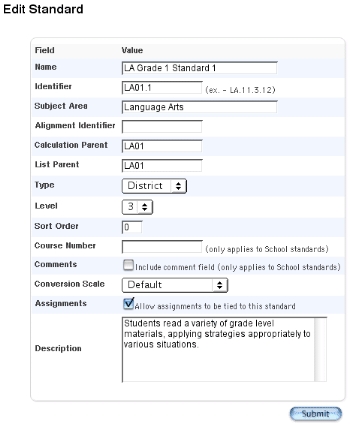
How to Manually Enter Standards............................................................................................................... 425
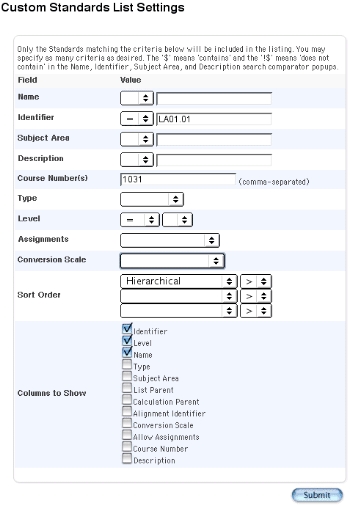
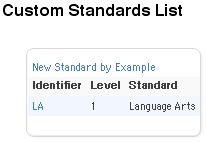
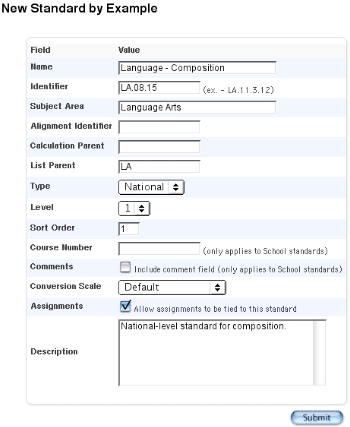
How to Manually Enter Standards by Example .................................................................................... 428
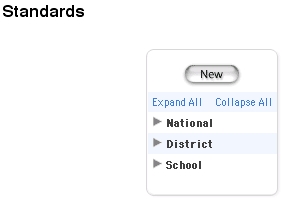
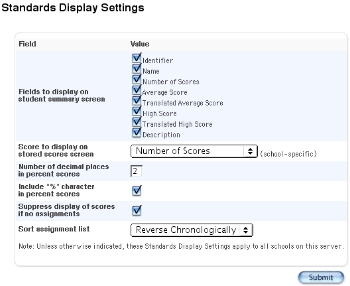
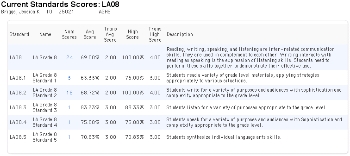
How to View Standards..................................................................................................................................... 433
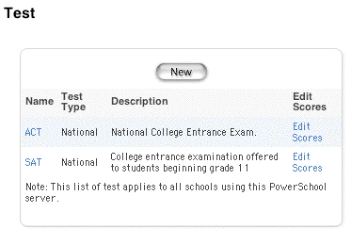
Tests Setup ...................................................................................................................................................................... 435
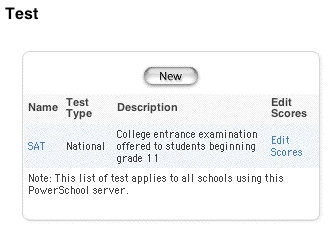
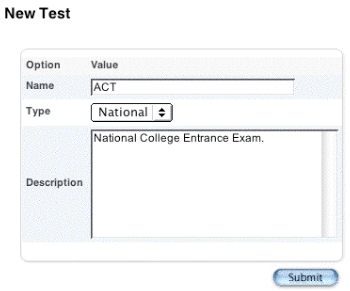
How to Create New Tests ................................................................................................................................ 435
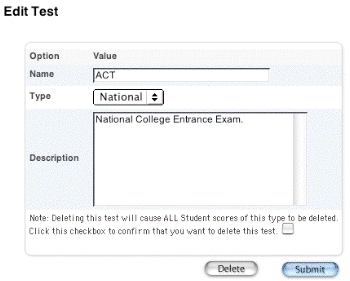
How to Edit Tests ................................................................................................................................................. 437
How to Delete Tests ........................................................................................................................................... 438
Single Student Standards Report......................................................................................................................... 439
How to Set Up the Single Student Standards Report ....................................................................... 440
How to Access the Single Student Standards Report ....................................................................... 441
Test Scores Setup ......................................................................................................................................................... 443
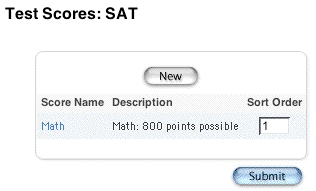
How to Create Test Scores .............................................................................................................................. 443
How to Edit Test Scores.................................................................................................................................... 444
How to Delete Test Scores .............................................................................................................................. 446
Other........................................................................................................................................................................................... 447
Other District Setup Functions.............................................................................................................................. 447
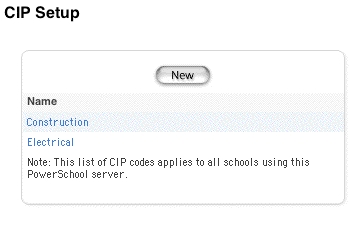
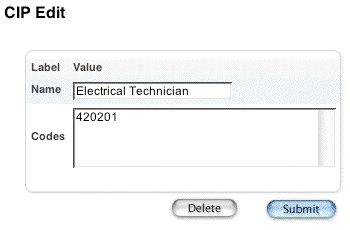
How to Add a CIP Code.................................................................................................................................... 448
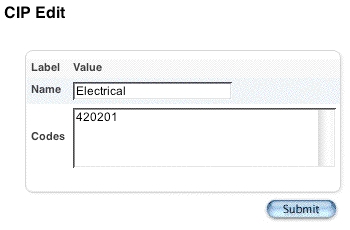
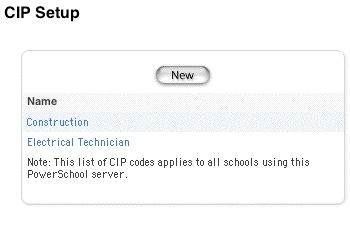
How to Edit a CIP Code..................................................................................................................................... 449
How to Delete a CIP Code............................................................................................................................... 450
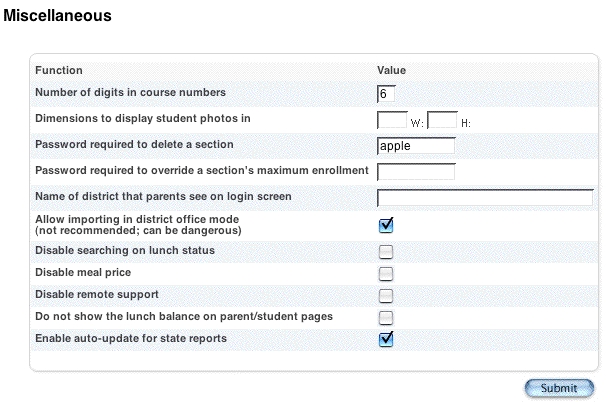
How to Set Up Miscellaneous District Settings .................................................................................... 450
District System Administrator User Guide
Introduction
© 2004 Apple Computer, Inc. All rights reserved.
13
Introduction
Use PowerSchool Help to learn the PowerSchool Student Information System (SIS) and to serve as a
reference for your daily work. However, before you can begin using PowerSchool, the PowerSchool
administrator at your school must set up the system and import the data from your previous
system. Once those steps are complete, you can start using PowerSchool. Use PowerSchool Help to
assist you in navigating in PowerSchool.
PowerSchool Help is updated as PowerSchool is updated. Not all versions of PowerSchool Help are
available in a printable guide. For the most up-to-date information, click Help on any page in
PowerSchool.
There are user guides available that include the same information as PowerSchool Help for each
major release of PowerSchool. These user guides include instructions for certain user roles, though
these roles will vary depending on your school or district's circumstances. For the most recent
version of the printable guides, visit the PowerSchool Customer Support web site at
https://www.powerschool.com/support/documentation/userguides/
. This URL is case-
sensitive.
Note: You need a username and password to view anything on the PowerSchool Customer Support
web site. Contact your PowerSchool administrator for access.
You are encouraged to read each section of the help that pertains to you. While the introductory
sections build a foundation of knowledge that you will use every time you log on to PowerSchool,
the remaining sections are independent of each other and can be read in any order. However, if
you have never used PowerSchool before, it will be most helpful if you start with the section
"
Introduction to PowerSchool
." Whenever you read this guide, keep the following points in
mind:
•
The actions you can perform in PowerSchool depend on your job responsibilities and
subsequently on your level of access to PowerSchool. Some users only have viewing rights
to some pages. Others can view or edit any page. Still other users can view or edit any page,
and create new ones as well. Finally, some pages are view-only for everyone. This guide
outlines viewing, editing, and creating options for most pages. Depending on your needs
and your level of access, only certain options will be applicable and available to you. If you
find that your work requires a greater level of access, contact the system administrator at
your school.
•
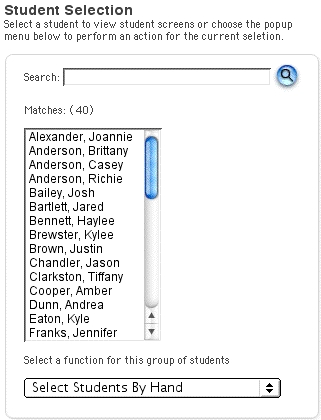
Almost all of the activities described in this guide begin by selecting the appropriate
student or group; thus, it is imperative that you understand how to search for and select a
student. For detailed instructions on how to do this, refer to the section "
Search and
Select
."
•
The school and student records used in this guide differ from those displayed on your page
as you work. You will work with real data based on student records at your school. The
graphics in this guide are only examples.
•
In PowerSchool, different pages provide some of the same information because you view
the same data from a different place each time. If you add, change, or delete data on one
District System Administrator User Guide
Introduction
© 2004 Apple Computer, Inc. All rights reserved.
14
page, it will be added, changed, or deleted on other pages that contain the same field(s) of
data.
•
The reporting features described in this guide are some of the most important you will use
in the system. A PowerSchool report is a statement of student or staff records that is
produced for viewing or printing and can include information text in addition to the report
listings. PowerSchool reports include report cards, lists of class schedules, lunch balance
sheets, mailing labels, lists of current staff members, and attendance records.
•
Use PowerSchool to create numerous types of reports that pull selected data quickly and
easily. Select from a list of pre-configured reports that have preset parameters or create a
custom report to include parameters needed for a specific task. You should read the
sections "
Custom Reports
" and "
Pre-Configured Reports
" before creating a report.
Legend
•
This guide uses the > symbol to move down a menu path. Thus, if instructed to Click File >
New > Window, begin by clicking the File menu. Then, click New and Window. The option
noted after the > symbol will always be on the menu that results from your previous
selection.
•
It is easy to identify notes because they are indented and prefaced by the text Notes:.
Audience
This document is intended for district system administrators.
Note: For school system administration, see the School System Administrator User Guide.
District System Administrator User Guide
Security
© 2004 Apple Computer, Inc. All rights reserved.
15
Security
Everyone who uses PowerSchool, PowerGrade, and PowerSchool Teacher must have a username
and confidential password. Users can belong to user groups to make page permissions easier to
manage. In addition, you can restrict access to PowerSchool by specific IP addresses to further
promote security.
For more information on PowerSchool security, see the following sections:
•
"
Security Permissions
"
•
"
Substitute Login Settings
"
•
"
Login Attempts Restrictions
"
•
"
IP Address Restrictions
"
Security Permissions
In PowerSchool, system users are considered staff members. Add new staff members and assign
permissions to them, if necessary. You can assign permissions by user group or set permissions at
the page level.
Those using PowerSchool Teacher will need appropriate security permissions. Not every staff
member needs security permissions to PowerSchool. For example, maintenance workers must be
set up as staff members before you can enter their contact information. However, all PowerSchool
system users, including attendance clerks and teachers, must be set up as staff members before you
can assign security permissions.
How to Add a New User
Set up new system users by enrolling new staff members.
1. On the start page, click Staff.
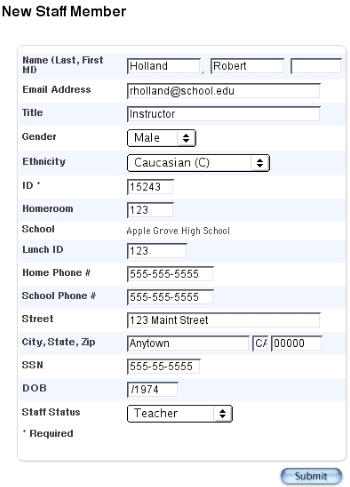
2. On the Search Staff page, click New Staff Entry. The New Staff Member page appears.
District System Administrator User Guide
Security
© 2004 Apple Computer, Inc. All rights reserved.
16
3. Use the following table to enter information in the fields:
Field
Description
Name
Enter the user's last, first, and middle name.
Email Address
Enter the user's email address.
Title
Enter the user's user role or professional title.
Gender
Choose Male or Female from the pop-up menu.
Ethnicity
Choose the user's ethnicity from the pop-up menu.
ID
Enter the user's identification number. This is a required field.
Homeroom
Enter the user's homeroom number.
District System Administrator User Guide
Security
© 2004 Apple Computer, Inc. All rights reserved.
17
Field
Description
School
The selected school appears.
Lunch ID
The user's PowerLunch identification number appears.
Home Phone #
The user's home telephone number appears.
School Phone #
The user's school telephone number appears.
Street
The user's address appears.
City, State, Zip
The user's city, state abbreviation, and postal code appear.
SSN
The user's Social Security number appears.
DOB
The user's birth date appears.
Staff Status
Choose the user's status from the pop-up menu. It is
recommended that a status be assigned to each staff member.
This makes searching for and selecting staff members more
efficient.
4. Click Submit.
5. On the Staff page, assign permissions to the new user. For instructions and more
information, see the section "
How to Edit Security Permissions
."
How to Edit Security Permissions
Edit the permissions of staff members and PowerSchool users.
1. On the start page, click Staff.
2. On the Search Staff page, search for and select a staff member.
Note: For more information on selecting staff members, see the section "
Select Staff
."
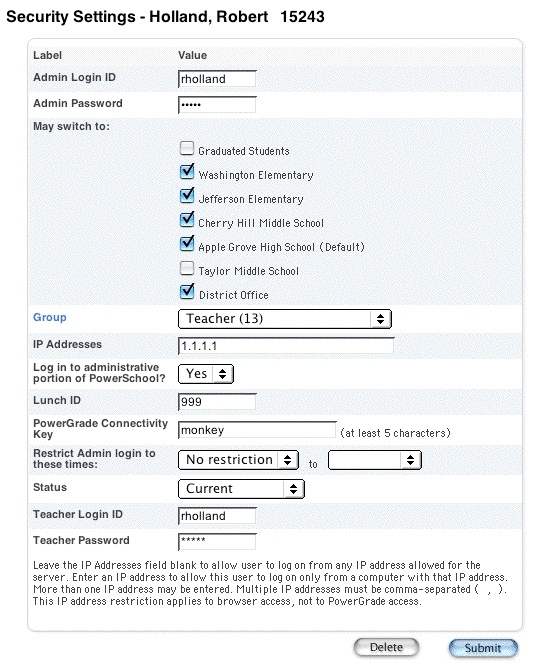
3. On the Staff page, click Security Settings. The Security Settings page appears.
District System Administrator User Guide
Security
© 2004 Apple Computer, Inc. All rights reserved.
18
4. Use the following table to enter information in the fields:
Field
Description
Admin Login ID
If you want this staff member to be able to access the entire
PowerSchool student information system, enter a login ID. If
District System Administrator User Guide
Security
© 2004 Apple Computer, Inc. All rights reserved.
19
Field
Description
you do not, leave this field blank.
Note: Usually, only school administrators, PowerSchool
administrators, cafeteria personnel, guidance staff, and
administrative staff members have access to PowerSchool.
Teachers generally only have access to PowerSchool Teacher.
Admin Password
If the staff member has access to the entire PowerSchool
system, enter his or her password.
May Switch To
Use these checkboxes to indicate which schools you want this
staff member to be able to access. At the minimum, select the
staff member's default school, such as Hobble Creek High
School (Default).
Selecting more than one school activates the School link on the
navigation bar at the top of each page in PowerSchool. Click
the School link to display the Change Schools page. Only the
schools selected here appear in the pop-up menu. The staff
member can then choose from the pop-up menu and view
information about the selected school.
Do one of the following:
•
Select only the checkbox indicating the staff member's
default school.
•
Select the checkbox next to each additional school you
want this staff member to be able to access.
To submit a change, be sure that:
•
If the staff member is permitted to switch schools,
select Yes for "Log in to administrative portion of
PowerSchool."
•
If the staff member is not permitted to switch schools,
select No for "Log in to administrative portion of
PowerSchool."
•
If you select one or more schools, also select the staff
member's default school.
Group
To assign the staff member to a security group, choose the
appropriate group from the pop-up menu.
Note: Click the field name to view each group and its
permissions in PowerSchool. For more information, see the
section "
How to Edit Security Groups
."
District System Administrator User Guide
Security
© 2004 Apple Computer, Inc. All rights reserved.
20
Field
Description
IP Addresses
If you want this staff member to be able to use PowerSchool
from certain computers only, enter the IP addresses of those
computers in this field.
Note: If you define more than one IP address, separate each
address with a comma.
If you want this staff member to be able to access PowerSchool
from any computer, leave this field blank.
Log in to administrative
portion of PowerSchool?
If you want this staff member to be able to log in to
PowerSchool, choose Yes from the pop-up menu. Otherwise,
choose No.
Lunch ID
Enter the user's PowerLunch identification number.
PowerGrade
Connectivity Key
If this staff member is a teacher and uses PowerGrade, define a
connectivity key for PowerGrade.
Restrict Logon to These
Times
Either select No Restriction, or use the pop-up menus to choose
the time range that the user is allowed to log in to
PowerSchool.
Status
Choose whether the staff member is Current or "No longer
here" from the pop-up menu. If you choose "No longer here,"
the staff member’s PowerSchool account is inactive, and he or
she cannot access the system.
Teacher Login ID
If this staff member can use PowerSchool Teacher, define a
login ID.
Teacher Password
If this staff member can use PowerSchool Teacher, define a
password.
5. Click Submit. The Changes Recorded page appears.
How to Edit Security Permissions by Group
Edit the permissions of staff members and PowerSchool users. Though users have the default
permissions of the user group to which they belong, you can modify these permissions per user.
1. On the start page, choose System from the main menu.
2. Click Security.
3. On the Security page, click "Users by Group." The "Users by Group" page appears.
District System Administrator User Guide
Security
© 2004 Apple Computer, Inc. All rights reserved.
21
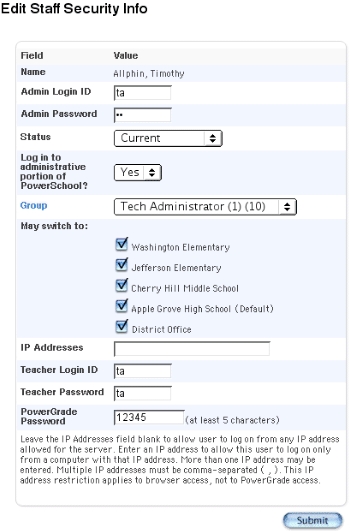
4. Click the name of the user in the User Name column. The Edit Staff Security Info page
appears.
District System Administrator User Guide
Security
© 2004 Apple Computer, Inc. All rights reserved.
22
5. Use the following table to enter information in the fields:
Field
Description
Name
The name of the selected staff member appears.
Admin Login ID
If you want this staff member to be able to access the entire
PowerSchool student information system, enter a login ID. If
you do not, leave this field blank.
Note: Usually, only school administrators, PowerSchool
administrators, cafeteria personnel, guidance staff, and
administrative staff members have access to PowerSchool.
Teachers generally only have access to PowerSchool Teacher.
District System Administrator User Guide
Security
© 2004 Apple Computer, Inc. All rights reserved.
23
Field
Description
Admin Password
If the staff member has access to the entire PowerSchool
system, enter a password.
Status
Choose whether the staff member is Current or "No longer
here" from the pop-up menu. If you choose "No longer here,"
the staff member’s PowerSchool account is inactive, and he or
she cannot access PowerSchool.
Log in to administrative
portion of PowerSchool?
If you want this staff member to be able to log in to the
PowerSchool, choose Yes from the pop-up menu. Otherwise,
choose No.
Group
To assign the staff member to a security group, choose the
appropriate group from the pop-up menu.
Note: Click the field name to view each group and its
permissions in PowerSchool. For more information, see the
section "
How to Edit Security Groups
."
May Switch To
Use these checkboxes to indicate which schools you want this
staff member to be able to access. At the minimum, select the
staff member's default school, such as Hobble Creek High
School (Default).
Selecting more than one school activates the School link in the
navigation bar at the top of each page in PowerSchool. Click
the School link to display the Change Schools page. Only the
schools selected here appear in the pop-up menu. The staff
member can then choose from the pop-up menu and view
information about the selected school.
Do one of the following:
•
Select only the checkbox indicating the staff member's
default school.
•
Select the checkbox next to each additional school you
want this staff member to be able to access.
To submit a change, be sure that:
•
If the staff member is permitted to switch schools,
select Yes for "Log in to administrative portion of
PowerSchool."
•
If the staff member is not permitted to switch schools,
select No for "Log in to administrative portion of
PowerSchool."
•
If you select one or more schools, also select the staff
District System Administrator User Guide
Security
© 2004 Apple Computer, Inc. All rights reserved.
24
Field
Description
member's default school.
IP Addresses
If you want this staff member to be able to use PowerSchool
only from certain computers, enter the IP addresses of those
computers in this field.
Note: If you define more than one IP address, separate each
address with a comma.
If you want this staff member to be able to access PowerSchool
from any computer, leave this field blank.
Teacher Login ID
If this staff member can use PowerSchool Teacher, define a
login ID.
Teacher Password
If this staff member can use PowerSchool Teacher, define a
password.
PowerGrade Password
If this staff member is a teacher and uses PowerGrade, define a
password for PowerGrade.
6. Click Submit. The Changes Recorded page appears.
How to Delete a User
Remove a PowerSchool user from the system.
1. On the start page, choose Staff from the main menu.
2. On the Search Staff page, search for and select a staff member.
Note: For more information on selecting staff members, see the section "
Select Staff
."
3. On the Staff page, click Security Settings. The Security Settings page appears.
District System Administrator User Guide
Security
© 2004 Apple Computer, Inc. All rights reserved.
25
4. Click Delete. The Selection Deleted page appears.
District System Administrator User Guide
Security
© 2004 Apple Computer, Inc. All rights reserved.
26
How to Set Page-Level Permissions
To define each user group’s access to individual pages within PowerSchool, use this page to
activate the page permissions function. The "Modify Access Privileges for this Page" link appears on
every page when the page permissions are activated.
By clicking the link, you can define the access level for only that page (None, View Only, View and
Modify) for each user group. If you do not define the page-level access for each group, the system
uses the default access level you originally defined for the group on the Edit Group page. For more
information, see the section "
How to Edit Security Permissions
."
After defining the access level for every group on every page, return to this page to deactivate the
page permissions function.
1. On the start page, choose System from the main menu.
2. Click Security.
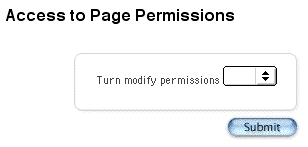
3. On the Security page, click "Access to Page Permissions." The "Access to Page Permissions"
page appears.
4. Choose On from the "Turn modify permissions" pop-up menu.
5. Click Submit.
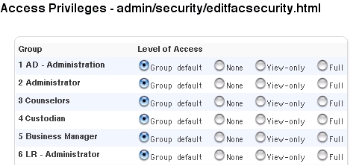
6. On the Security page, click "Modify access privileges for this page" on each page for which
you want to define permissions. The Access Privileges page appears.
District System Administrator User Guide
Security
© 2004 Apple Computer, Inc. All rights reserved.
27
7. Select the option to determine the level of permissions:
•
Group default: Level determined as the group default on the Edit Group page for
each group. For more information, see the section "
How to Edit Security
Groups
."
•
None: No access to the page.
•
View-only: Can read but not modify the information on the page.
•
Full: Can read and modify information on the page.
8. Click Submit. The page reappears.
9. Click Home.
10. Click System Administrator.
11. Click Security. The Security page appears.
12. Click "Access to Page Permissions." The "Access to Page Permissions" page appears.
13. Choose Off from the "Turn modify permissions" pop-up menu.
District System Administrator User Guide
Security
© 2004 Apple Computer, Inc. All rights reserved.
28
14. Click Submit. The Security page appears.
How to Edit Security Groups
Use security groups to identify related users and their security permissions. You can set up to 50
user groups.
1. On the start page, choose System from the main menu.
2. On the System Administrator page, click Security. The Security page appears.
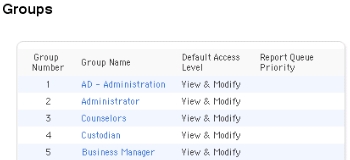
3. Click Groups. The Groups page appears.
4. Click a name in the Group Name column. The Edit Group page appears.
District System Administrator User Guide
Security
© 2004 Apple Computer, Inc. All rights reserved.
29
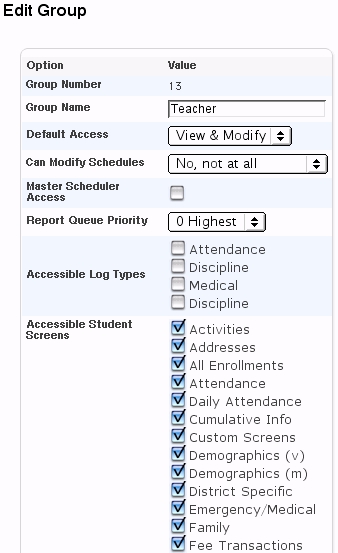
5. Use the following table to enter information in the fields:
Field
Description
Group Number
The number of the group appears.
Group Name
Edit the name of the group.
Default Access
Use the pop-up menu to choose a level of permission used as
the default permissions for users in this group:
•
No Access
•
View Only
District System Administrator User Guide
Security
© 2004 Apple Computer, Inc. All rights reserved.
30
Field
Description
•
View & Modify
Can Modify Schedules
Use the pop-up menu to choose a level of permission for
modifying schedules:
•
Yes, in any year
•
No, not at all
•
Only for [school years]
Master Scheduler Access
Select this checkbox if users in this group can use the master
scheduler features.
Report Queue Priority
Select the report queue priority level for this group. The report
queue priority determines which reports run first, based on the
user who submitted the report request.
For example, a group with the priority level of 10 is the near-
highest level of priority for running reports. Only groups with
the level of zero would have higher priority.
Accessible Log Types
Select the checkbox next to each log type that you want to be
accessible to users in this group.
Accessible Student
Screens
Select the checkbox next to each student screen that you want
to be accessible to users in this group.
The gateway to the student screens is the Quick Lookup page.
Only the student screen checkboxes selected here appear as
links in the main menu. If a user group is denied all access to
the student screens, then the system displays a message
indicating access denied.
If you disable access to a student screen, which a user has
already set as his or her default screen, the system generates an
error when the user navigates to the student area. He or she
can remedy this by selecting a new default screen using the
Personalize function.
If a security group was able to access certain student screens
prior to this software update, it will still be able to do so.
6. Click Submit. The Groups page appears.
Substitute Login Settings
Substitute teachers at your school can use PowerSchool Substitute to enter attendance and lunch
counts for the classes they are covering. Provide substitutes with a password so they can access the
District System Administrator User Guide
Security
© 2004 Apple Computer, Inc. All rights reserved.
31
system. For more information on PowerSchool Substitute, see the section "
PowerSchool
Substitute
."
How to Set Substitute Login Settings
1. On the start page, choose School from the main menu.
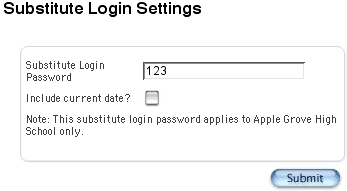
2. Click Sub Login Settings. The Substitute Login Settings page appears.
3. Use the following table to enter information in the fields:
Field
Description
Sub Login Password
Enter the substitute password.
Include current date?
Select this checkbox if you want to include the current date as a
prefix to the password.
4. Click Submit. The School Setup page appears.
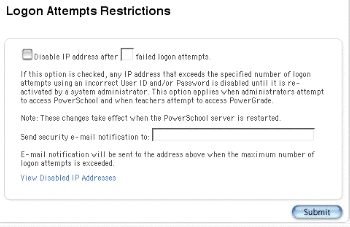
Login Attempts Restrictions
Restrict the number of times an administrative user can unsuccessfully attempt to log in to
PowerSchool. Restricting login attempts is a security precaution to minimize the risk of
unauthorized persons entering your PowerSchool system. To remove the restriction, reset the user's
disabled IP address.
How to Restrict Login Attempts
1. On the start page, choose System from the main menu.
2. Click Security. The Security page appears.
District System Administrator User Guide
Security
© 2004 Apple Computer, Inc. All rights reserved.
32
3. Click Logon Attempts Restrictions. The Logon Attempts Restrictions page appears.
4. Use the following table to enter information in the fields:
Field
Description
Disable IP address
Select this checkbox to activate the feature.
failed logon attempts
Enter the number of failed login attempts possible.
Send security e-mail
notification to
Enter the email address of the person monitoring security.
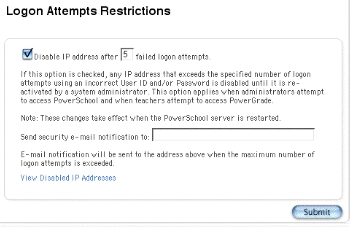
5. Click Submit. The Logon Attempts Restrictions page displays the new settings.
District System Administrator User Guide
Security
© 2004 Apple Computer, Inc. All rights reserved.
33
6. Restart the server to activate the settings.
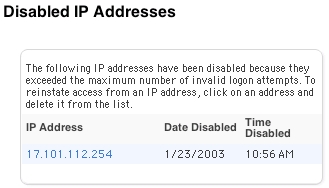
How to Reset Disabled IP Addresses
Reset a user's IP address after being disabled from too many unsuccessful login attempts.
1. On the start page, choose System from the main menu.
2. Click Security. The Security page appears.
3. Click Logon Attempts Restrictions. The Logon Attempts Restrictions page appears.
District System Administrator User Guide
Security
© 2004 Apple Computer, Inc. All rights reserved.
34
4. Click View Disabled IP Addresses. The Disabled IP Addresses page appears.
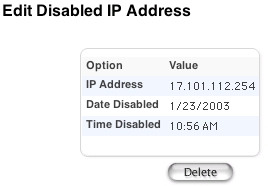
5. Click an IP address to reset that address and enable additional login attempts. The Edit
Disabled IP Address page appears.
6. Click Delete. The Selection Deleted page appears.
District System Administrator User Guide
Security
© 2004 Apple Computer, Inc. All rights reserved.
35
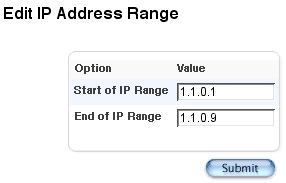
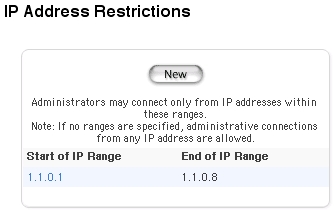
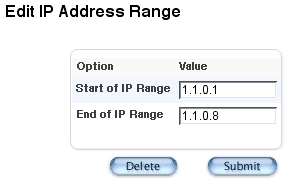
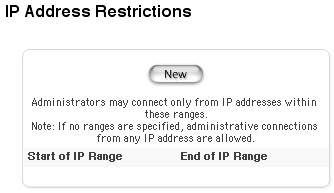
IP Address Restrictions
Use this feature to restrict PowerSchool permissions to certain IP addresses. Depending on the
network used to access PowerSchool, this can limit the PowerSchool permissions to only certain
computers.
How to Restrict IP Addresses
1. On the start page, choose System from the main menu.
2. Click Security. The Security page appears.
3. Click IP Address Restrictions. The IP Address Restrictions page appears.
4. Click New. The Edit IP Address Range page appears.
District System Administrator User Guide
Security
© 2004 Apple Computer, Inc. All rights reserved.
36
5. Use the following table to enter information in the fields:
Field
Description
Start of IP Range
Enter the starting IP address in the range.
End of IP Range
Enter the ending IP address in the range.
6. Click Submit. The IP Address Restrictions page appears.
7. Repeat Step 4 through Step 6 for each IP address range.
How to Edit IP Address Restrictions
1. On the start page, choose System from the main menu.
2. Click Security. The Security page appears.
District System Administrator User Guide
Security
© 2004 Apple Computer, Inc. All rights reserved.
37
3. Click IP Address Restrictions. The IP Address Restrictions page appears.
4. Click the IP address to be edited in the "Start of IP Range" column. The Edit IP Address
Range page appears.
District System Administrator User Guide
Security
© 2004 Apple Computer, Inc. All rights reserved.
38
5. Use the following table to edit information in the fields:
Field
Description
Start of IP Range
Edit the starting IP address in the range.
End of IP Range
Edit the ending IP address in the range.
6. Click Submit. The IP Address Restrictions page displays the edited IP address range.
How to Delete IP Address Restrictions
1. On the start page, choose System from the main menu.
2. Click Security. The Security page appears.
District System Administrator User Guide
Security
© 2004 Apple Computer, Inc. All rights reserved.
39
3. Click IP Address Restrictions. The IP Address Restrictions page appears.
4. Click the IP address to be deleted in the "Start of IP Range" column. The Edit IP Address
Range page appears.
District System Administrator User Guide
Security
© 2004 Apple Computer, Inc. All rights reserved.
40
5. Click Delete. The IP Address Restrictions page displays without the deleted IP address range.
Current Users
The Current Users page displays information about users that are currently logged in to
PowerSchool, including their name, IP address, and time they last logged in to the system.
How to View a List of Current Users
The list of current users is view-only for all users.
1. On the start page, choose Special Functions from the main menu.
2. Click Current Users. The Current Users page appears.
3. Use the following table to understand the information in the fields:
District System Administrator User Guide
Security
© 2004 Apple Computer, Inc. All rights reserved.
41
Field
Description
Type
The user group that this user belongs to appears.
User
The name of the user appears.
Login
The time the user last logged in to the system appears.
Hits
The number of page item requests since the user last logged in
to the system appears.
Last
The time of user's last hit appears.
IP Address
The user's computer IP address appears. This field also displays
the user's operating system and web browser type and version.
District System Administrator User Guide
System Administrator
© 2004 Apple Computer, Inc. All rights reserved.
42
System Administrator
Student Numbers
Assign new student ID numbers to a group of students. If you import student numbers from a
different system and want to change those numbers in PowerSchool, use this procedure.
Important: This process is not reversible.
How to Assign New Student Numbers
1. On the start page, select a group of students.
Note: Depending on the selection method you used, the Group Functions page appears
either immediately or after selecting students from the Student Selection page.
2. Click the PowerSchool logo.
3. On the PowerSchool start page, choose System from the main menu.
4. On the System Administrator page, click Assign New Student Numbers. The Assign New
Student Numbers page appears.
5. Enter the starting number from which you want the system to assign student numbers in
the "Student numbers are generated from this value" field.
6. Click Submit. The Operation Completed page appears.
District System Administrator User Guide
System Administrator
© 2004 Apple Computer, Inc. All rights reserved.
43
Note: If the system displays the alert that some duplicates were found, click Back and start
the student numbering from a different number.
Average Final Grades
In most cases, final grades are determined by the classroom teacher based on rules defined in the
teacher's PowerGrade gradebook. This leaves the control over students' grade reporting, and the
calculation methodology of those grades, in the hands of the most authoritative source. However,
there are times when PowerGrade cannot meet the requirements of special classes (such as those
taught by multiple teachers), or this kind of classroom control may not be appropriate. The final
grade averaging function provides school administrators an alternative means of calculating final
grades.
The Process
The final grade averaging function can be run periodically by the PowerSchool administrator after
storing grades. Final grades are calculated using up to six existing stored grades from each unique
course taken during the current school year. Unique courses are identified by course number, not
course name or section. Consequently, only grades that have been stored via the store grades
process or hand-entered with a course number may be used in the calculation.
Once the stored grades for each course have been identified, the GPA points from each grade are
averaged and the resulting value is used to create a new stored grade record. The averaging
method can either be a simple arithmetic average, which is used by default, or may be weighted
using a user-specified method. Each store code may receive a different weight. The weighting
scheme used (20/30/50, 1/1/2, 0.2/0.2/0.6) is left up to the user.
The GPA point value is compared against the grade scale for the course. If an exact match is found,
the letter grade corresponding to that value is used. For example, if the three grades A (4.0), B (3.0),
and C (2.0) are used, with each having a weight of 1, the result would be 3. This 3 is looked up in
the course's grade scale. An exact match of 3.000 is found, and a new stored grade is created using
the letter grade B. However, if the C had a weight of 2, the result would be 2.75. In this case, there
District System Administrator User Guide
System Administrator
© 2004 Apple Computer, Inc. All rights reserved.
44
might not be an exact match, so the result would be rounded to the nearest value. In this case, 2.75
would be closer to 2.667 for a letter grade of B-. The user can change the rounding behavior to
always round up, always round down, or find the nearest value.
Since multiple letter grades may have identical GPA point values (for example F, I, NC, WF all have
zero GPA points), the user can exclude certain letter grades from being used. This prevents a zero
average from matching to NC on the grade scale. This is necessary because only the GPA point
values, not the letter grades themselves, are looked at. The list of excluded letter grades must be
recorded for each unique grade scale used.
Once the appropriate letter grade has been identified, absences, tardies, potential credit, earned
credit (if the letter grade earns graduation credit), and teacher comments are calculated based on
user-defined options. The resulting new grades are stored alongside the student's existing grades
and can be printed on report cards and transcripts.
How to Modify Average Final Grades Settings
1. On the start page, choose System from the main menu. The System Administrator page
appears.
2. Click Final Average Grades. The Average Final Grades page appears.
3. Enter information based on the following table:
District System Administrator User Guide
System Administrator
© 2004 Apple Computer, Inc. All rights reserved.
45
Field
Description
Which Students
The students for whom you want to calculate average final
grades.
Do one of the following:
•
Select the single student option. This option is useful for
testing.
•
Select the "current selection of students" option. This is
useful when calculating final grades for a specific group
of students, such as all current seniors.
•
Select the "all enrolled students in the current school"
option.
New Store Code
Indicates the new store code to use when storing the resulting
final grade. Enter a valid store code (a letter followed by a
single number).
Note: The store code does not need to be defined in the Final
Grade Setup section of School Setup.
Use These Final Grades
Enter the store codes for up to six existing stored grades. You
may optionally enter a weight value for each grade in the
Weight field. This value is used in the calculation of the final
letter grade, but will not affect attendance or credit
calculations. If no value is entered, 1 is used.
Absences and Tardies
Are
The method by which you want absences and tardies
calculated. Choose one of the following from the pop-up menu:
•
"Totals of values from historical grades" to record the
cumulative total of absences and tardies from all final
grades used.
•
"Averages of values from historical grades" to record the
simple average of the absences and tardies from all final
grades used.
•
"The value of the last record processed" to copy the
absence and tardy numbers from the last final grade in
the list.
•
"Do not calculate attendance" to record zeros for
absences and tardies.
Potential Credit Is
The method by which you want potential credit hours
determined. Choose one of the following from the pop-up
menu:
District System Administrator User Guide
System Administrator
© 2004 Apple Computer, Inc. All rights reserved.
46
Field
Description
•
"Total of potential credit from historical grades" to
record the cumulative total of potential credit from all
final grades used.
•
"Average of potential credit from historical grades" to
record the simple average of the potential credit from
all final grades used.
•
"The value of the last record processed" to copy the
potential credit amount from the last final grade in the
list.
•
"Potential credit from course record" to record the
potential credit amount of the parent course record.
•
"Do not award credit" to record zero for potential credit.
Teacher Comments Are
The method by which you want teacher comments to be
included. Choose one of the following from the pop-up menu:
•
"Taken from all historical grades" to copy the teacher
comments from all final grades used. Comments are
prefixed with the store code.
•
"Taken from the last record processed" to copy the
teacher comment from the last final grade in the list.
•
"Do not include comments" to not include teacher
comments.
Determine Grade Points
By
The method by which you want grade points determined.
Choose one of the following from the pop-up menu:
•
Rounding: To find the closest match for the calculated
value.
•
Rounding up: To always round up to the nearest value.
•
Rounding down: To always round down to the nearest
value .
For These Grade Scales,
Do Not Assign These
Grades
Enter a comma-separated list of letter grades that you want to
exclude from the calculation, such as WF (withdraw fail), I
(incomplete), etc.
4. Click Submit. PowerSchool calculates the average final grades for the requested group of
students. Progress is indicated in the browser window.
District System Administrator User Guide
System Administrator
© 2004 Apple Computer, Inc. All rights reserved.
47
The system creates new historical grades for the selected students and stores them using
the specified store code.
Honor Roll Administration
The ability to calculate your honor roll based on grading, behavior, or attendance information is
vitally important to a school. Every school has its own way of calculating or determining who is on
the honor roll and who is eligible for extracurricular activities.
First, define the various honor roll lists used by a school or district. Within those lists, set up the
different honor levels that may be attained and the criteria for meeting each level. Once the setup
is complete, the PowerSchool administrator will run the calculation function periodically
throughout the school year. The results of the calculation are stored in a separate table in the
database. These results can be viewed as a summary for a single student, a group report, or as
individual components of a custom page, export, or custom report using report codes.
Honor Roll Methods
Honor roll methods define the various honor roll lists used by a school or district. You can create as
many different honor roll methods as needed. Honor roll methods can be school-specific or shared
among all schools on a server.
Honor Roll Levels
Every honor roll method will contain one or more honor roll levels. The evaluation order of honor
roll levels is significant. Typically, the highest honor with the most stringent criteria is evaluated
first. If a student does not meet the criteria for that level, the criteria for the next highest honor will
be evaluated, and so on. If a student meets the criteria for an honor roll level, a record of that honor
is created and the remaining levels are skipped. The evaluation of the criteria within each honor
roll level is cumulative, meaning a student must meet all of the specified options to receive that
honor. You can create as many different honor roll levels as needed.
Honor Roll Calculations
Once the honor roll methods and levels have been set up, you can calculate an honor roll at any
time.
District System Administrator User Guide
System Administrator
© 2004 Apple Computer, Inc. All rights reserved.
48
How to Create an Honor Roll Method
1. On the start page, choose School from the main menu.
2. On the School Setup page, click Honor Roll. The Honor Roll Methods page appears.
3. Click New. The Honor Roll Method page appears.
4. Use the following table to enter information in the fields:
Type
Description
Name
Enter the name of the honor roll method. This is the name that
will be referred to in honor roll report codes and on other menu
pages.
Description
Enter a description of the honor roll method.
Can be used by
Specifies whether the honor roll method can be used by all
schools on the server, or only the current school. Do one of the
following:
•
Select the current school option.
•
Select the all schools option.
District System Administrator User Guide
System Administrator
© 2004 Apple Computer, Inc. All rights reserved.
49
5. Click Submit. The Honor Roll Methods page displays the new honor roll method.
6. Click Levels next to the method you just created. The Honor Roll Levels page appears.
7. Click New. The Honor Roll Level detail page appears.
District System Administrator User Guide
System Administrator
© 2004 Apple Computer, Inc. All rights reserved.
50
8. Use the following table to enter general information:
Type
Description
Name
Enter the name of the honor roll level. This is the level name
that appears on report pages and is the default value returned
by the honor roll report code. This name does not need be
unique, allowing you to define multiple sets of criteria for a
given level.
Description
Enter a description of the honor roll level.
Evaluation Order
Enter a value specifying the order in which the various honor
roll levels will be evaluated. Lower numbers are evaluated first.
Message
Enter the text message you want to appear on report cards and
transcripts.
Note: The message should be longer than the level name.
District System Administrator User Guide
System Administrator
© 2004 Apple Computer, Inc. All rights reserved.
51
9. Use the following table to enter GPA options:
Type
Description
GPA Calculation Method
Choose the GPA calculation method to use when evaluating
this honor roll level from the pop-up menu. The GPA
calculation method is used for two things: determining a GPA
value that may be compared against a specified cutoff value,
and building a list of letter grades that will be used in the Grade
Options settings described below. Every honor roll level must
specify a GPA calculation method.
GPA result is
Since GPA calculation methods can return alphanumeric results,
choose whether the comparison should be numeric or text
from the pop-up menu.
Comparison
Choose the comparator to use when comparing the result of
the GPA calculation from the pop-up menu. Enter the cutoff
value in the provided field. If you do not want to compare the
value of the GPA calculation, leave the cutoff value field blank.
Only include grades
If selected, this checkbox setting allows you to override the
settings used in the GPA calculation method so that any grades
that have been flagged to be excluded from honor roll are not
used in the calculation or returned in the list of grades for the
grade options.
Do one of the following:
•
Select this checkbox to allow you to override the
settings used in the GPA calculation method.
•
Deselect this checkbox to not allow you to override the
settings used in the GPA calculation method.
10. Use the following table to enter credit options information:
Type
Description
Potential Credit
Use the pop-up menu to choose the comparator to use when
comparing the total of the potential credit hours from the list of
grades returned by the GPA calculation. Enter the cutoff value
in the provided field. If you do not want to compare the value
of the potential credit hours, leave the cutoff value field blank.
Earned Credit
Use the pop-up menu to choose the comparator to use when
comparing the total of the earned credit hours from the list of
grades returned by the GPA calculation. Enter the cutoff value
in the provided field. If you do not want to compare the value
District System Administrator User Guide
System Administrator
© 2004 Apple Computer, Inc. All rights reserved.
52
Type
Description
of the earned credit hours, leave the cutoff value field blank.
Number of unique
courses
Use the pop-up menu to choose the comparator to use when
comparing the number of unique course numbers found in the
list of grades returned by the GPA calculation. Enter the cutoff
value in the provided field. If you do not want to compare the
number of unique course numbers, leave the cutoff value field
blank.
11. Use the following table to enter grade options information:
Type
Description
Student must have
These four groups of grade options allow you to do
comparisons on the list of letter grades returned by the GPA
calculation. Choose a comparison from the pop-up menu:
•
At least: There must be at least <the specified number>
of any of the grades below in the list of grades returned
by the GPA calculation
•
No more than: There cannot be any more than <the
specified number> of any of the grades below in the list
of grades returned by the GPA calculation
•
Exactly: There must be no more than and no less than
<the specified number> of any of the grades below in
the list of grades returned by the GPA calculation
•
None: There cannot be any of the grades below in the
list of grades returned by the GPA calculation
•
Only: There must be only the grades below in the list of
grades returned by the GPA calculation.
Of the grades
Enter a comma-separated list of letter grades to use with the
"Student must have" comparison. If you do not want to
compare letter grades in one or more of the grade options,
leave this field blank.
And
Choose additional comparisons from the pop-up menu. For
each additional comparison, enter the "Students must have"
and "Of these grades" information.
12. Click Submit. The Honor Roll Methods page displays the new honor roll level.
District System Administrator User Guide
System Administrator
© 2004 Apple Computer, Inc. All rights reserved.
53
13. Repeat Step 7 through Step 12 for each level you want to create.
14. Verify the evaluation order.
15. Click Submit. The Honor Roll Methods page appears.
How to Edit an Honor Roll Method
1. On the start page, choose School from the main menu.
2. On the School Setup page, click Honor Roll. The Honor Roll Methods page appears.
District System Administrator User Guide
System Administrator
© 2004 Apple Computer, Inc. All rights reserved.
54
3. Click the method you want to edit. The Honor Roll Method page appears.
4. Edit the method. See the section "
How to Create an Honor Roll Method
."
5. Click Submit. The Honor Roll Methods page displays the edited honor roll method.
How to Delete an Honor Roll Method
1. On the start page, choose School from the main menu.
2. On the School Setup page, click Honor Roll. The Honor Roll Methods page appears.
District System Administrator User Guide
System Administrator
© 2004 Apple Computer, Inc. All rights reserved.
55
3. Click the method you want to delete. The Honor Roll Method page appears.
4. Click Delete. The Selection Deleted page appears.
5. Click Back. The Honor Roll Methods page appears.
District System Administrator User Guide
System Administrator
© 2004 Apple Computer, Inc. All rights reserved.
56
How to Edit Honor Roll Levels
1. On the start page, choose School from the main menu.
2. On the School Setup page, click Honor Roll. The Honor Roll Methods page appears.
3. Click the levels of the honor roll you want to edit. The Honor Roll Level page appears.
4. Click the level you want to edit. The Honor Roll Levels detail page appears.
District System Administrator User Guide
System Administrator
© 2004 Apple Computer, Inc. All rights reserved.
57
5. Edit the General, GPA Options, Credit Options, and Grade Options sections. See the section
"
How to Create an Honor Roll Method
."
6. Click Submit. The Honor Roll Levels detail page reappears.
District System Administrator User Guide
System Administrator
© 2004 Apple Computer, Inc. All rights reserved.
58
How to Delete Honor Roll Levels
1. On the start page, choose School from the main menu.
2. On the School Setup page, click Honor Roll. The Honor Roll Methods page appears.
3. Click the levels of the honor roll you want to edit. The Honor Roll Level page appears.
District System Administrator User Guide
System Administrator
© 2004 Apple Computer, Inc. All rights reserved.
59
4. Click the level you want to delete. The Honor Roll Levels detail page appears.
5. Click Delete. The Selection Deleted page appears.
District System Administrator User Guide
System Administrator
© 2004 Apple Computer, Inc. All rights reserved.
60
6. Click Back. The Honor Roll Methods page appears.
How to Calculate the Honor Roll
1. On the start page, choose System from the main menu.
2. On the System Administrator page, click Calculate Honor Roll. The Calculate Honor Roll page
appears.
3. Use the following table to enter information in the fields:
District System Administrator User Guide
System Administrator
© 2004 Apple Computer, Inc. All rights reserved.
61
Type
Description
Which Students
The students for whom you want to calculate honor roll.
Do one of the following:
•
Select the single student option. This option is useful for
testing.
•
Select the current selection of students option. This
selection is useful when calculating honor roll for a
specific group of students, such as all current seniors.
•
Select the all enrolled students in the current school
option.
Store Code
Indicates the new store code to use when storing the resulting
honor roll. Enter a valid store code (a letter followed by a single
number).
Note: Results of the honor roll calculation will be stored using
this store code for the current school year.
Honor Roll Method
The method by which you want honor roll calculated. Use the
pop-up menu to make your choice.
Note: Only one honor roll method can be calculated at a time.
4. Click Submit. PowerSchool calculates the specified honor roll method for the selected
student(s).
The results of honor roll calculations may be viewed for a single student or for a group of
students.
Honor Roll Codes
The honor roll code returns data based on honor roll calculations that are periodically run by the
PowerSchool administrator. The honor roll code provides an easy way to access the stored data
when working with a single student, such as a custom student page, quick export, or object report.
The basic syntax of the honor roll code is illustrated by the examples below. The code always starts
with *honorroll and is followed by several parameters (name/value pairs). These parameters are
District System Administrator User Guide
System Administrator
© 2004 Apple Computer, Inc. All rights reserved.
62
always of the form name=value. Certain parameters are required. All other parameters are optional
and default values will be used if omitted.
~(*honorroll method=High School term=Q2) ~(*honorroll method=NHS term=S1 year=2002
result=gpa) ~(*honorroll method=Honors term=Q2 grade=11)
The following table lists the parameters, values, and examples for the honor roll code. Parameters
and values can be included in the code in any sequence.
Parameter
Description
Example
method
Specifies the name of the honor roll method to
return. These methods are predefined by the
user in the Honor Roll section of school setup.
The method parameter is required. If omitted,
an error message is returned.
method=High School
method=NHS
term
A single term abbreviation. Specifies the store
code of the appropriate honor roll record. The
term parameter is required. If omitted, an error
message is returned.
term=S1 term=Q3
grade
A single grade level. For KG, PK, use the numeric
code 0, -1, and so forth. Specifies the historical
grade level of the appropriate honor roll record.
Note that grade and year are often mutually
exclusive and the use of both parameters in the
code may cause no record to be found. If no
grade or year parameter is specified, will find an
honor roll record from the current school year.
grade=12 grade=8
year
A single four-digit school year. Remember that
school years in PowerSchool are specified using
the start year. For example, for the 2003-2004
school year, use 2003. Specifies the school year
of the appropriate honor roll record. Note that
grade and year are often mutually exclusive and
the use of both parameters in the code may
cause no record to be found. If no grade or year
parameter is specified, will find an honor roll
record from the current school year.
year=2003 year=2004
result
The type of data to return as the result. Valid
options are level, message, gpa, schoolname,
and date. Level means return the name of the
honor roll level met. Message means return the
text message for the honor roll level. GPA
means return the GPA used to determine the
honor roll level. Schoolname means return the
result=level
result=message
result=gpa
result=schoolname
result=date
District System Administrator User Guide
System Administrator
© 2004 Apple Computer, Inc. All rights reserved.
63
Parameter
Description
Example
name of the school where the student earned
the honor roll. Date means return the date the
honor roll was calculated. If omitted, level is
returned. Note that if no honor roll is found that
matches the parameters specified, no text will
be returned regardless of the result setting.
The following are annotated examples of various honor roll codes.
High school honor roll from Q3 of the student's junior year: ~(*honorroll method=High School
term=Q3 grade=11)
The GPA used to determine that honor roll level: ~(*honorroll method=High School term=Q3
grade=11 result=gpa)
The NHS honor roll message from S2 of the current school year: ~(*honorroll method=NHS term=S2
result=message)
The date the Q1 Honors honor roll was calculated for this student in the 2002-2003 school year:
~(*honorroll method=Honors term=Q1 year=2002 result=date)
Course Numbers
Change the number of an existing course in your master course list to another number in your
master course list. The master course list is the list of courses available to all schools on your
PowerSchool system. When changing a course number, the system updates that number in
courses, enrollments, sections, and historical data.
For example, assume two high schools on your server offer U.S. History. The course number for U.S.
History at School A is 1000; at School B, it is 2000. Assume your district decides that the two schools
should share the same course number. You need to change the course number for U.S. History at
both schools to 1200.
First, you must create the new course, 1200. Then, change both course 1000 and 2000 to 1200,
using the Change Course Number function.
Before changing a course number for a particular school, use the navigation bar at the top of the
page to be sure you are working in the school in which you want to change the course number. If
you are changing a course number for all schools on your system, it does not matter which school
is currently selected.
Prerequisites
•
Import the data from both schools.
•
Create a new course with a unique course number for one school's courses.
District System Administrator User Guide
System Administrator
© 2004 Apple Computer, Inc. All rights reserved.
64
How to Change a Course Number
Before changing a course number, retrieve the existing course number from the master course list.
For more information, see the section "
Master Course List
."
1. On the start page, choose System from the main menu.
2. Click Change Course Number. The Change Course Number page appears.
3. Use the following table to enter information in the fields:
Field
Description
Current Course Number
Enter the existing course number.
Change to New Course
Number
Enter the new course number.
This change affects only
[school name]
This change affects all
schools on this server
Select an option to determine the scope of the course number
change.
Note: If you are changing course numbers because of
duplicates, select the "This change affects only this school"
option. The school name displayed is the school for which you
created the new course number.
4. Click Submit.
District System Administrator User Guide
System Administrator
© 2004 Apple Computer, Inc. All rights reserved.
65
School Numbers
Change your school number only if your PowerSchool system is used by more than one school and
you need to change one of the school numbers. For example, assume your district numbered the
schools 1, 2, 3, and 4 during the initial installation. Change those numbers to state-specific numbers
mandated by the Department of Education.
Note: Back up all data on your PowerSchool system before changing a school number.
How to Change School Numbers
1. On the start page, choose System from the main menu.
2. Click Change School Number. The Change School Number page appears.
3. Use the following table to enter information in the fields:
Field
Description
Current School Number
Enter the school's existing number.
Change to New School
Number
Enter the school's new number.
Check this box to
confirm that you wish to
change the school
number
Select this checkbox to confirm that you want to change the
number.
4. Click Submit. The system displays the pages that are affected by the school number change.
District System Administrator User Guide
System Administrator
© 2004 Apple Computer, Inc. All rights reserved.
66
5. Click the PowerSchool logo after the process completes.
Note: You may need to log in again after clicking the logo.
Activities Setup
Create, modify, or delete the activities available to students in PowerSchool. You can also clear the
values of the activities field for all students, such as at the end of each school year.
How to Add an Activity
Create an activity so that you and other users can add it to student records as needed. Indicate if
the new activity affects all schools on your system or just your school.
1. On the start page, choose School from the main menu.
2. On the School Setup page, click Activities Setup. The Activities Setup page appears.
District System Administrator User Guide
System Administrator
© 2004 Apple Computer, Inc. All rights reserved.
67
3. Click New. The Edit Activity page appears.
Note: If performing this procedure after selecting or working with a student record, the
student’s name, grade, and student number replace the Invalid Student ID heading in this
example.
4. Use the following table to enter information in the fields:
Field
Description
Activity Name
Enter the name of the activity.
Student Field Name
Enter the activity’s field name. Remember that spelling is
important and that you must use underscores (_) rather than
spaces between words.
Activity Type
Enter the type of activity.
District System Administrator User Guide
System Administrator
© 2004 Apple Computer, Inc. All rights reserved.
68
Field
Description
Required
Select this checkbox to indicate the activity is a requirement.
This Activity Appears For
Select an option to display this activity for only the selected
school or all schools on this server.
5. Click Submit. The Activities Setup page displays the new activity.
Add the activity to a student record. For more information, see the section "
How to Add
or Delete Activities on a Student Record
."
How to Edit an Activity
Changing an activity affects all PowerSchool users for your school or system. It does not change the
activity’s status on individual records, just the information about the activity on the PowerSchool
system.
1. On the start page, choose School from the main menu.
2. On the School Setup page, click Activities Setup. The Activities Setup page appears.
3. Click the name of the activity to be edited. The Edit Activity page appears.
District System Administrator User Guide
System Administrator
© 2004 Apple Computer, Inc. All rights reserved.
69
Note: If performing this procedure after selecting or working with a student record, the
student’s name, grade, and student number replace the Invalid Student ID heading in this
example.
4. Use the following table to edit information in the fields:
Field
Description
Activity Name
Edit the name of the activity.
Student Field Name
Edit the activity’s field name. Remember that spelling is
important and that you must use underscores (_) rather than
spaces between words.
Activity Type
Edit the type of activity.
Required
Select this checkbox to indicate the activity is a requirement.
This Activity Appears For
Select an option to display this activity for only the selected
school or all schools on this server.
5. Click Submit. The Activities Setup page appears.
District System Administrator User Guide
System Administrator
© 2004 Apple Computer, Inc. All rights reserved.
70
Add the activity to a student record. For more information, see the section "
How to Add
or Delete Activities on a Student Record
."
How to Delete an Activity
This action deletes the activity from your school or your system. It also deletes the activity from any
student records that indicate participation in the activity.
Important: This action cannot be undone. Contact other users before deleting an activity from the
PowerSchool system.
1. On the start page, choose School from the main menu.
2. On the School Setup page, click Activities Setup. The Activities Setup page appears.
3. Click the name of the activity to be deleted. The Edit Activity page appears.
District System Administrator User Guide
System Administrator
© 2004 Apple Computer, Inc. All rights reserved.
71
4. Click Delete. The Activities page displays without the deleted activity.
How to Clear Activities for All Students
Clear the values of the activities field for all students. For example, clear the activities for all students
at the end of each school year. This does not remove the activity from PowerSchool. To remove an
activity, see the section "
How to Delete an Activity
."
1. On the start page, choose System from the main menu.
2. On the System Administrator page, click Clear Activities. The Clear Activities page appears.
District System Administrator User Guide
System Administrator
© 2004 Apple Computer, Inc. All rights reserved.
72
3. Select the checkbox(es) next to the activity for which you want to delete the values for all
students in the selected school.
4. Click Submit. The System Administrator page appears.
School Setup Information
Copy the master schedule within the same school or school setup information from one school to
another on your PowerSchool system to save time and minimize errors. Setup information includes
final grade setup information.
How to Copy the Master Schedule
1. On the start page, choose System from the main menu.
2. Click Copy Master Schedule. The Copy Master Schedule page appears.
District System Administrator User Guide
System Administrator
© 2004 Apple Computer, Inc. All rights reserved.
73
3. Use the following table to enter information in the fields:
Field
Description
School
The school in which you are currently working appears. If this is
not the school into which you want to copy master schedule
information, change the school by clicking the School link at
the top of the page.
Source year
Choose the school year from which you want to copy from the
pop-up menu.
Target year
Choose the school year to which you want to copy from the
pop-up menu.
Confirm
Select this checkbox to confirm that you want to copy the
master schedule.
4. Click Submit. The Changes Recorded page appears.
How to Copy School Setup Information
1. On the start page, choose System from the main menu.
2. Click Copy School Setup Info. The Copy School Setup Info page appears.
District System Administrator User Guide
System Administrator
© 2004 Apple Computer, Inc. All rights reserved.
74
3. Use the following table to enter information in the fields:
Field
Description
This School
The school in which you are currently working appears. If this is
not the school into which you want to copy setup information,
change the school by clicking the School link at the top of the
page.
School to Copy From
Choose the school from which you want to copy setup
information from the pop-up menu.
Setup Information to
Copy
Choose grade storage containers and dates from the pop-up
menu. This is the final grade setup information.
4. Click Submit. The system copies the information.
Custom Fields and Screens Overview
Create custom fields to display a variety of information about students, staff, courses, and sections.
There is no limit to the number of custom fields that a school can create. You can also create
custom screens for students and staff. Include custom fields on those screens. For example, create a
page that includes vehicle-related information that you want to track for each student.
First, create the custom fields. Next, create the custom screen. Finally, add the custom fields to the
custom screen. For more information, see the sections "
Custom Student Fields and Screens
,"
"
Custom Staff Fields and Screens
," "
Custom Course Fields
," and "
Custom Section
Fields
."
District System Administrator User Guide
System Administrator
© 2004 Apple Computer, Inc. All rights reserved.
75
Custom Student Fields and Screens
Use custom fields and screens to display a variety of information about students. There is no limit to
the number of custom fields that a school can create. For example, create a page that includes
vehicle-related information that you want to track for each student.
First, create the custom fields. Next, create the custom screen. Finally, add the custom fields to the
custom screen you create.
How to Add Custom Student Fields
1. On the start page, choose System from the main menu.
2. On the System Administrator page, click Custom Fields/Screens. The Custom Fields/Screens
page appears.
3. Click Student Fields. The Student Fields page appears.
District System Administrator User Guide
System Administrator
© 2004 Apple Computer, Inc. All rights reserved.
76
4. Click New. The New Student Field page appears.
5. Use the following table to enter information in the fields:
Field
Description
Field Name
Enter the name of the field.
Description
Enter an explanation of the field and its purpose.
6. Click Submit. The Student Fields page displays the new field.
District System Administrator User Guide
System Administrator
© 2004 Apple Computer, Inc. All rights reserved.
77
How to Edit Custom Student Fields
1. On the start page, choose System.
2. On the System Administrator page, click Custom Fields/Screens. The Custom Fields/Screens
page appears.
3. Click Student Fields. The Student Fields page appears.
District System Administrator User Guide
System Administrator
© 2004 Apple Computer, Inc. All rights reserved.
78
4. Click the name of the field you want to edit. The Edit Student Field page appears.
5. Use the following table to edit information in the fields:
Field
Description
Field Name
Edit the name of the field.
Description
Edit an explanation of the field and its purpose.
6. Click Submit. The Student Fields page displays the edited field.
District System Administrator User Guide
System Administrator
© 2004 Apple Computer, Inc. All rights reserved.
79
How to Delete Custom Student Fields
Deleting a custom field also deletes the field from any custom pages and the values of that field. If
you manually entered the field on a PowerSchool page, you must manually remove the field from
the page.
1. On the start page, choose System from the main menu.
2. On the System Administrator page, click Custom Fields/Screens. The Custom Fields/Screens
page appears.
3. Click Student Fields. The Student Fields page appears.
District System Administrator User Guide
System Administrator
© 2004 Apple Computer, Inc. All rights reserved.
80
4. Click the name of the field you want to delete. The Edit Student Field page appears.
5. Select the checkbox to confirm that you want to delete the field.
Note: If you do not select the checkbox and click Delete, the system displays a message
indicating that the field was not deleted. Click Back to return to the previous page. Select
the checkbox, and then click Delete.
6. Click Delete. Do not leave the page until a message appears indicating that the process is
complete. The Student Field Deleted page appears.
Note: The system lists any PowerSchool pages that include the custom field. If any pages
appear, you must manually remove the fields from those pages.
7. Click "Return to Custom Fields." The Custom Fields page appears.
District System Administrator User Guide
System Administrator
© 2004 Apple Computer, Inc. All rights reserved.
81
How to Add Custom Student Screens
1. On the start page, choose System from the main menu.
2. On the System Administrator page, click Custom Fields/Screens. The Custom Fields/Screens
page appears.
3. Click Custom Student Screens. The Student Custom Screens page appears.
4. Click New. The Edit Custom Student Screen page appears.
District System Administrator User Guide
System Administrator
© 2004 Apple Computer, Inc. All rights reserved.
82
5. Enter the name of the screen in the Name field.
6. Click Submit. The Custom Student Screens page displays the new page.
7. Click Edit Fields next to the new screen. The List Custom Student Screen Fields page
appears.
8. Click New. The Edit Field page appears.
District System Administrator User Guide
System Administrator
© 2004 Apple Computer, Inc. All rights reserved.
83
9. Use the following table to enter information in the fields:
Field
Description
Label
Enter the name you want to appear for the field on the custom
screen.
Field Name
Define the internal PowerSchool field name, such as
License_Plate.
Note: To list the fields, click Fields. To create a custom field, see
the section "
How to Add Custom Student Fields
."
Sort Order
Enter a number to indicate the order in which you want this
field to appear on the custom screen.
Input Type
Use the pop-up menu to choose one of the following to
determine the type of field you are creating:
District System Administrator User Guide
System Administrator
© 2004 Apple Computer, Inc. All rights reserved.
84
Field
Description
determine the type of field you are creating:
•
Entry field: A small field in which the user enters free
text.
•
Static field: A field in which you cannot change the text.
Use static fields to create headers above fields you want
to group together, or to explain a field you place below
it.
•
Checkbox: A checkbox a user clicks to select.
•
Pop-up menu: A pop-up menu from which a user
selects a value.
•
Radio button: A small, round option button a user clicks
to select.
•
Entry box: A large box in which users can enter multiple
lines of free text.
Width
If you chose "Entry field" or "Entry box" at the Input Type field,
enter the width in characters of the field or box.
Height
If you chose "Entry box" at the Input Type field, enter the height
of the box in lines.
Data for Popup or Radio
Buttons
If you chose "Pop-up menu" or "Radio button" at the Input Type
field, enter the options the users can select at the field.
10. Click Submit. The List Custom Student Screen Fields page displays the field.
11. Repeat Step 8 through Step 10 for each field on the custom screen.
District System Administrator User Guide
System Administrator
© 2004 Apple Computer, Inc. All rights reserved.
85
Note: For more information on viewing the custom screen, see the section "
Custom
Screens
."
How to Edit Custom Student Screens
1. On the start page, choose System from the main menu.
2. On the System Administrator page, click Custom Fields/Screens. The Custom Fields/Screens
page appears.
District System Administrator User Guide
System Administrator
© 2004 Apple Computer, Inc. All rights reserved.
86
3. Click Custom Student Screens. The Student Custom Screens page appears.
4. Click the name of the custom screen in the Screen column. The Edit Custom Student Screen
page appears.
5. Edit the name of the custom student screen in the Name field.
6. Click Submit. The Student Custom Screens page displays the edited screen.
District System Administrator User Guide
System Administrator
© 2004 Apple Computer, Inc. All rights reserved.
87
How to Delete Custom Student Screens
1. On the start page, choose System from the main menu.
2. On the System Administrator page, click Custom Fields/Screens. The Custom Fields/Screens
page appears.
3. Click Custom Student Screens. The Student Custom Screens page appears.
4. Click the name of the custom screen in the Screen column. The Edit Custom Student Screen
page appears.
District System Administrator User Guide
System Administrator
© 2004 Apple Computer, Inc. All rights reserved.
88
5. Click Delete. The Selection Deleted page appears.
How to Edit Custom Student Screen Fields
1. On the start page, choose System from the main menu.
2. On the System Administrator page, click Custom Fields/Screens. The Custom Fields/Screens
page appears.
3. Click Custom Student Screens. The Student Custom Screens page appears.
District System Administrator User Guide
System Administrator
© 2004 Apple Computer, Inc. All rights reserved.
89
4. Click Edit Fields next to the screen to be edited. The List Custom Student Screen Fields page
appears.
5. Click the field to be edited. The Edit Field page appears.
District System Administrator User Guide
System Administrator
© 2004 Apple Computer, Inc. All rights reserved.
90
6. Use the following table to edit information in the fields:
Field
Description
Label
Enter the name you want to appear for the field on the custom
screen.
Field Name
Define the internal PowerSchool field name, such as
License_Plate.
Note: To list the fields, click Fields. To create a custom field, see
the section "
How to Add Custom Student Fields
."
Sort Order
Enter a number to indicate the order in which you want this
field to appear on the custom screen.
Input Type
Use the pop-up menu to choose one of the following to
determine the type of field you are creating:
District System Administrator User Guide
System Administrator
© 2004 Apple Computer, Inc. All rights reserved.
91
Field
Description
determine the type of field you are creating:
•
Entry field: A small field in which the user enters free
text.
•
Static field: A field in which you cannot change the text.
Use static fields to create headers above fields you want
to group together, or to explain a field you place below
it.
•
Checkbox: A checkbox a user clicks to select.
•
Pop-up menu: A pop-up menu from which a user
selects a value.
•
Radio button: A small, round option button a user clicks
to select.
•
Entry box: A large box in which users can enter multiple
lines of free text.
Width
If you chose "Entry field" or "Entry box" at the Input Type field,
enter the width in characters of the field or box.
Height
If you chose "Entry box" at the Input Type field, enter the height
of the box in lines.
Data for Popup or Radio
Buttons
If you chose "Pop-up menu" or "Radio button" at the Input Type
field, enter the options the users can select at the field.
7. Click Submit. The List Custom Student Screen Fields page displays the edited field.
District System Administrator User Guide
System Administrator
© 2004 Apple Computer, Inc. All rights reserved.
92
How to Delete Custom Student Screen Fields
1. On the start page, choose System from the main menu.
2. On the System Administrator page, click Custom Fields/Screens. The Custom Fields/Screens
page appears.
3. Click Custom Student Screens. The Student Custom Screens page appears.
District System Administrator User Guide
System Administrator
© 2004 Apple Computer, Inc. All rights reserved.
93
4. Click Edit Fields next to the screen to be edited. The List Custom Student Screen Fields page
appears.
5. Click the field to be edited. The Edit Field page appears.
District System Administrator User Guide
System Administrator
© 2004 Apple Computer, Inc. All rights reserved.
94
6. Click Delete. The Selection Deleted page appears.
How to Export a Student Screen as a Template
Export a custom screen to share with other PowerSchool administrators or to save as a backup for
the custom screen. In addition, by exporting a custom screen and then deleting it, you can remove
a custom screen from the system without losing it permanently.
District System Administrator User Guide
System Administrator
© 2004 Apple Computer, Inc. All rights reserved.
95
1. On the start page, choose System from the main menu.
2. On the System Administrator page, click Custom Fields/Screens. The Custom Fields/Screens
page appears.
3. Click Custom Student Screens. The Student Custom Screens page appears.
4. Click Edit Fields next to the screen to be exported as a template. The List Custom Student
Screen Fields page appears.
District System Administrator User Guide
System Administrator
© 2004 Apple Computer, Inc. All rights reserved.
96
5. Click "Export this screen as a template." The File Download dialog appears.
6. Select Save File As... or "Save this file to disk."
7. Click OK. The Save As dialog appears.
8. Select a file location.
9. Click Save. The custom screen saves as a template, and the List Custom Student Screen
Fields page appears.
District System Administrator User Guide
System Administrator
© 2004 Apple Computer, Inc. All rights reserved.
97
Custom Staff Fields and Screens
Use custom fields and screens to display a variety of information about staff. There is no limit to the
number of custom fields that a school can create. For example, create a page that includes teacher
certification fields to track this information for each teacher.
First, create the custom fields. Then, create the custom screen. Finally, add the custom fields to the
custom screen you created.
How to Add Custom Staff Fields
1. On the start page, choose System from the main menu.
2. On the System Administrator page, click Custom Fields/Screens. The Custom Fields/Screens
page appears.
District System Administrator User Guide
System Administrator
© 2004 Apple Computer, Inc. All rights reserved.
98
3. Click Staff Fields. The Staff Fields page appears.
4. Click New. The New Staff Field page appears.
District System Administrator User Guide
System Administrator
© 2004 Apple Computer, Inc. All rights reserved.
99
5. Use the following table to enter information in the fields:
Field
Description
Field Name
Enter the name of the field, such as DOE Certificate Number.
Description
Enter an explanation of the field and its purpose.
6. Click Submit. The Staff Fields page displays the new field.
How to Edit Custom Staff Fields
1. On the start page, choose System from the main menu.
2. On the System Administrator page, click Custom Fields/Screens. The Custom Fields/Screens
page appears.
3. Click Staff Fields. The Staff Fields page appears.
District System Administrator User Guide
System Administrator
© 2004 Apple Computer, Inc. All rights reserved.
100
4. Click the name of the field you want to edit. The Edit Staff Field page appears.
5. Use the following table to edit information in the fields:
Field
Description
Field Name
Edit the name of the field, such as DOE Certificate Number.
Description
Edit an explanation of the field and its purpose.
6. Click Submit. The Staff Fields page displays the edited field.
District System Administrator User Guide
System Administrator
© 2004 Apple Computer, Inc. All rights reserved.
101
How to Delete Custom Staff Fields
Deleting a custom field also deletes that field and its values from any custom pages. If you manually
entered the field on a PowerSchool page, you must manually remove the field from the page.
1. On the start page, choose System from the main menu.
2. On the System Administrator page, click Custom Fields/Screens. The Custom Fields/Screens
page appears.
3. Click Staff Fields. The Staff Fields page appears.
District System Administrator User Guide
System Administrator
© 2004 Apple Computer, Inc. All rights reserved.
102
4. Click the name of the field you want to delete. The Edit Staff Field page appears.
5. Select the checkbox to confirm that you want to delete the field.
District System Administrator User Guide
System Administrator
© 2004 Apple Computer, Inc. All rights reserved.
103
Note: If you do not select the checkbox and click Delete, the system displays a message
indicating that the field was not deleted. Click Back to return to the previous page. Select
the checkbox, and then click Delete.
6. Click Delete. Do not leave the page until a message indicates that the process is complete.
The Staff Field Deleted page appears.
Note: The system lists any PowerSchool pages that include the custom field. If any pages
appear, you must manually remove the fields from those pages.
7. Click "Return to Custom Fields." The Custom Fields page displays.
How to Add Custom Staff Screens
1. On the start page, choose System from the main menu.
2. On the System Administrator page, click Custom Fields/Screens. The Custom Fields/Screens
page appears.
District System Administrator User Guide
System Administrator
© 2004 Apple Computer, Inc. All rights reserved.
104
3. Click Custom Staff Screens. The Custom Staff Screens page appears.
4. Click New. The Edit Custom Staff Screen page appears.
5. Enter the name of the screen in the Name field.
6. Click Submit. The Custom Staff Screens page displays the new page.
District System Administrator User Guide
System Administrator
© 2004 Apple Computer, Inc. All rights reserved.
105
7. Click Edit next to the new screen. The List Custom Staff Screen Fields page appears.
8. Click New. The Edit Field page appears.
District System Administrator User Guide
System Administrator
© 2004 Apple Computer, Inc. All rights reserved.
106
9. Use the following table to enter information in the fields:
Field
Description
Label
Enter the name you want to appear for the field on the custom
screen.
Field Name
Define the internal PowerSchool field name, such as
License_Plate.
Note: To list the fields, click Fields. To create a custom field, see
the section "
How to Add Custom Staff Fields
."
Sort Order
Enter a number to indicate the order in which you want this
field to appear on the custom screen.
Input Type
Use the pop-up menu to choose one of the following to
determine the type of field you are creating:
•
Entry field: A small field in which the user enters free
text.
•
Static field: A field in which you cannot change the text
that displays. Use static fields to create headers above
fields you want to group together, or to explain a field
you place below it.
District System Administrator User Guide
System Administrator
© 2004 Apple Computer, Inc. All rights reserved.
107
Field
Description
•
Checkbox: A checkbox a user clicks to check.
•
Pop-up menu: A pop-up menu from which a user
selects a value.
•
Radio button: Small, round option button a user clicks
to select.
•
Entry box: A large box in which users can enter multiple
lines of free text.
Width
If you chose "Entry field" or "Entry box" at the Input Type field,
enter the width in characters of the field or box.
Height
If you chose "Entry box" at the Input Type field, enter the height
of the box in lines.
Data for Popup or Radio
Buttons
If you chose "Pop-up menu" or "Radio button" at the Input Type
field, enter the options the users can select at the field.
10. Click Submit. The List Custom Staff Screen Fields page displays the field.
11. Repeat Step 8 through Step 10 for each field on the custom screen.
Note: For more information on viewing the custom screen, see the section "
How to Edit
Custom Staff Screens
."
How to Edit Custom Staff Screens
1. On the start page, choose System from the main menu.
2. On the System Administrator page, click Custom Fields/Screens. The Custom Fields/Screens
page appears.
District System Administrator User Guide
System Administrator
© 2004 Apple Computer, Inc. All rights reserved.
108
3. Click Custom Staff Screens. The Custom Staff Screens page appears.
4. Click the name of the custom screen in the Screen column. The Edit Custom Staff Screen
page appears.
5. Edit the name of the custom staff screen in the Name field.
6. Click Submit. The Custom Staff Screens page displays the edited screen.
District System Administrator User Guide
System Administrator
© 2004 Apple Computer, Inc. All rights reserved.
109
How to Delete Custom Staff Screens
1. On the start page, choose System from the main menu.
2. On the System Administrator page, click Custom Fields/Screens. The Custom Fields/Screens
page appears.
3. Click Custom Staff Screens. The Custom Staff Screens page appears.
District System Administrator User Guide
System Administrator
© 2004 Apple Computer, Inc. All rights reserved.
110
4. Click the name of the custom screen in the Screen column. The Edit Custom Staff Screen
page appears.
5. Click Delete. The Staff Custom Screens page displays without the deleted screen.
How to Edit Custom Staff Screen Fields
1. On the start page, choose System from the main menu.
2. On the System Administrator page, click Custom Fields/Screens. The Custom Fields/Screens
page appears.
District System Administrator User Guide
System Administrator
© 2004 Apple Computer, Inc. All rights reserved.
111
3. Click Custom Staff Screens. The Custom Staff Screens page appears.
4. Click Edit next to the screen to be edited. The List Custom Staff Screen Fields page appears.
5. Click the field to be edited. The Edit Field page appears.
District System Administrator User Guide
System Administrator
© 2004 Apple Computer, Inc. All rights reserved.
112
6. Use the following table to edit information in the fields:
Field
Description
Label
Enter the name you want to appear for the field on the custom
screen.
Field Name
Define the internal PowerSchool field name, such as
License_Plate.
Note: To list the fields, click Fields. To create a custom field, see
the section "
How to Add Custom Staff Fields
."
Sort Order
Enter a number to indicate the order in which you want this
field to appear on the custom screen.
Input Type
Use the pop-up menu to choose one of the following to
determine the type of field you are creating:
•
Entry field: A small field in which the user enters free
text.
•
Static field: A field in which you cannot change the text
that displays. Use static fields to create headers above
fields you want to group together, or to explain a field
you place below it.
District System Administrator User Guide
System Administrator
© 2004 Apple Computer, Inc. All rights reserved.
113
Field
Description
•
Checkbox: A checkbox a user clicks to check.
•
Pop-up menu: A pop-up menu from which a user
selects a value.
•
Radio button: Small, round option button a user clicks
to select.
•
Entry box: A large box in which users can enter multiple
lines of free text.
Width
If you chose "Entry field" or "Entry box" at the Input Type field,
enter the width in characters of the field or box.
Height
If you chose "Entry box" at the Input Type field, enter the height
of the box in lines.
Data for Popup or Radio
Buttons
If you chose "Pop-up menu" or "Radio button" at the Input Type
field, enter the options the users can select at the field.
7. Click Submit. The List Custom Staff Screen Fields page displays the edited field.
How to Delete Custom Staff Screen Fields
1. On the start page, choose System from the main menu.
2. On the System Administrator page, click Custom Fields/Screens. The Custom Fields/Screens
page appears.
District System Administrator User Guide
System Administrator
© 2004 Apple Computer, Inc. All rights reserved.
114
3. Click Custom Staff Screens. The Custom Staff Screens page appears.
4. Click Edit next to the screen to be edited. The List Custom Staff Screen Fields page appears.
5. Click the field to be edited. The Edit Field page appears.
District System Administrator User Guide
System Administrator
© 2004 Apple Computer, Inc. All rights reserved.
115
6. Click Delete. The List Custom Staff Screen Fields page displays without the deleted field.
How to Export a Staff Screen as a Template
Export a custom screen to share with other PowerSchool administrators or to save as a backup. In
addition, by exporting a custom screen and then deleting it, you can remove a custom screen from
the system without losing it permanently.
1. On the start page, choose System from the main menu.
2. On the System Administrator page, click Custom Fields/Screens. The Custom Fields/Screens
page appears.
District System Administrator User Guide
System Administrator
© 2004 Apple Computer, Inc. All rights reserved.
116
3. Click Custom Staff Screens. The Custom Staff Screens page appears.
4. Click Edit Fields next to the screen to be exported as a template. The List Custom Staff
Screen Fields page appears.
District System Administrator User Guide
System Administrator
© 2004 Apple Computer, Inc. All rights reserved.
117
5. Click "Export this screen as a template." The File Download dialog appears.
6. Select "Save this file to disk."
7. Click OK. The Save As dialog appears.
8. Select a file location.
9. Click Save. The custom screen saves as a template, and the List Custom Staff Screen Fields
page appears.
Custom Course Fields
Use custom fields to display a variety of information about courses. There is no limit to the number
of custom fields that a school can create. For example, create a custom field called Demand to track
last year's demand for a particular course.
District System Administrator User Guide
System Administrator
© 2004 Apple Computer, Inc. All rights reserved.
118
Create the custom course fields. Then, either add the custom fields to a page in PowerSchool or
enter values for the fields using the Direct Database Access function, also known as Universal
Search & Modify (USM).
How to Add Custom Course Fields
1. On the start page, choose System from the main menu.
2. On the System Administrator page, click Custom Fields/Screens. The Custom Fields/Screens
page appears.
3. Click Course Fields. The Course Fields page appears.
4. Click New. The New Course Field page appears.
District System Administrator User Guide
System Administrator
© 2004 Apple Computer, Inc. All rights reserved.
119
5. Use the following table to enter information in the fields:
Field
Description
Field Name
Enter the name of the field.
Description
Enter an explanation of the field and its purpose.
6. Click Submit. The Course Fields page displays the new field.
How to Edit Custom Course Fields
1. On the start page, choose System from the main menu.
2. On the System Administrator page, click Custom Fields/Screens. The Custom Fields/Screens
page appears.
District System Administrator User Guide
System Administrator
© 2004 Apple Computer, Inc. All rights reserved.
120
3. Click Course Fields. The Course Fields page appears.
4. Click the name of the field you want to edit. The Edit Course Field page appears.
District System Administrator User Guide
System Administrator
© 2004 Apple Computer, Inc. All rights reserved.
121
5. Use the following table to edit information in the fields:
Field
Description
Field Name
Edit the name of the field.
Description
Edit an explanation of the field and its purpose.
6. Click Submit. The Course Fields page displays the edited field.
How to Delete Custom Course Fields
Deleting a custom field deletes the field and its values. If you manually entered the field on a
PowerSchool page, you must manually remove the field from the page.
1. On the start page, choose System from the main menu.
District System Administrator User Guide
System Administrator
© 2004 Apple Computer, Inc. All rights reserved.
122
2. On the System Administrator page, click Custom Fields/Screens. The Custom Fields/Screens
page appears.
3. Click Course Fields. The Course Fields page appears.
4. Click the name of the field you want to delete. The Edit Course Field page appears.
District System Administrator User Guide
System Administrator
© 2004 Apple Computer, Inc. All rights reserved.
123
5. Select the checkbox to confirm that you want to delete the field.
Note: If you do not select the checkbox and click Delete, the system displays a message
indicating that the field was not deleted. Click Back to return to the previous page. Select
the checkbox, and then click Delete.
6. Click Delete. Do not leave the page until a message appears indicating that the process is
complete. The Custom Field Deleted page appears.
District System Administrator User Guide
System Administrator
© 2004 Apple Computer, Inc. All rights reserved.
124
Note: The system lists any PowerSchool pages that include the custom field. If any pages
appear, you must manually remove the fields from those pages.
7. Click "Return to Custom Fields." The Custom Fields page appears.
Custom Section Fields
Use custom fields to display a variety of information about sections. There is no limit to the number
of custom fields that a school can create. For example, create a custom field called Field Trip to
identify the field trips taken during a particular section.
Create the custom section fields. Then, either add the custom fields to a page in PowerSchool or
enter values for the fields using the Direct Database Access function, also known as Universal
Search & Modify (USM).
How to Add Custom Section Fields
1. On the start page, choose System from the main menu.
2. On the System Administrator page, click Custom Fields/Screens. The Custom Fields/Screens
page appears.
District System Administrator User Guide
System Administrator
© 2004 Apple Computer, Inc. All rights reserved.
125
3. Click Section Fields. The Section Fields page appears.
4. Click New. The New Section Field page appears.
District System Administrator User Guide
System Administrator
© 2004 Apple Computer, Inc. All rights reserved.
126
5. Use the following table to enter information in the fields:
Field
Description
Field Name
Enter the name of the field.
Description
Enter an explanation of the field and its purpose.
6. Click Submit. The Section Fields page displays the new field.
How to Edit Custom Section Fields
1. On the start page, choose System from the main menu.
2. On the System Administrator page, click Custom Fields/Screens. The Custom Fields/Screens
page appears.
District System Administrator User Guide
System Administrator
© 2004 Apple Computer, Inc. All rights reserved.
127
3. Click Section Fields. The Section Fields page appears.
4. Click the name of the field you want to edit. The Edit Section Field page appears.
District System Administrator User Guide
System Administrator
© 2004 Apple Computer, Inc. All rights reserved.
128
5. Use the following table to edit information in the fields:
Field
Description
Field Name
Edit the name of the field.
Description
Edit an explanation of the field and its purpose.
6. Click Submit. The Section Fields page displays the edited field.
How to Delete Custom Section Fields
Deleting a custom field deletes the field and its values. If you manually entered the field on a
PowerSchool page, you must manually remove it from the page.
District System Administrator User Guide
System Administrator
© 2004 Apple Computer, Inc. All rights reserved.
129
1. On the start page, choose System from the main menu.
2. On the System Administrator page, click Custom Fields/Screens. The Custom Fields/Screens
page appears.
3. Click Section Fields. The Section Fields page appears.
4. Click the name of the field you want to delete. The Edit Section Field page appears.
District System Administrator User Guide
System Administrator
© 2004 Apple Computer, Inc. All rights reserved.
130
5. Select the checkbox to confirm that you want to delete the field.
Note: If you do not select this checkbox and click Delete, the system displays a message
indicating that the field was not deleted. Click Back to return to the previous page. Select
the checkbox, and then click Delete.
6. Click Delete. Do not leave the page until a message indicates that the process is complete.
The Section Field Deleted page appears.
District System Administrator User Guide
System Administrator
© 2004 Apple Computer, Inc. All rights reserved.
131
Note: The system lists any PowerSchool pages that include the custom field. If any pages
appear, you must manually remove the fields from those pages.
Direct Database Export
Direct Database Access (DDA), also called Universal Search & Modify (USM), is one of the most
versatile features of your PowerSchool system. Use DDA to search and match data in all of the
internal tables on your PowerSchool server.
Note: Depending on your security settings, you may not be able to perform all functions.
PowerSchool data is stored in a relational database of tables. Each table contains an unlimited
number of fields. When you use DDA, you directly access a table in the relational database.
Use PowerSchool's Direct Database Export (DDE) page when you need to create an export file or
report that contains records from the tables. Use another application, such as a spreadsheet
application, to view or organize the records. Unlike using the Export Using Template page, you can
match and export data from two related tables.
You do not have to access DDA to export data from it. You can export DDA data while you are
logged in to PowerSchool. When you export data from DDA, the system creates an independent
export file that you can open or update using any application you want.
For example, assume you want to export all ninth graders and their current grades to a software
application in which you can create a pie graph. Use the DDE function to match the records in the
student table to the current grades table; then, export both tables of data, open the export file in a
spreadsheet application, and create the graph.
How to Select Records for Export-List View
View a list of all records in a selected table or search for specific records in a table. You can also limit
the export to records for all schools on your system or for just one school. For example, export
student data about California residents in fourth grade or above who attend all schools on the
system.
1. On the start page, choose System from the main menu.
2. Click Direct Database Export. The Direct Database Export (DDE) page appears.
District System Administrator User Guide
System Administrator
© 2004 Apple Computer, Inc. All rights reserved.
132
3. Use the following table to enter information in the fields:
Field
Description
Current Table
Choose the table from which you want to export records from
the pop-up menu.
Note: For a complete list of PowerSchool tables and fields, see
http://your.school.address/admin/home?ac=structure
.
Select all [x] records in
this table
To indicate the records to use in the export, do one of the
following:
•
Click "Select all [number of] records in this table" to
select all records and skip to Step 10.
•
Identify search criteria in the Search Students fields by
continuing to the next step.
Note: Search for students either on the Search Students page
before beginning this procedure or on the Direct Database
Export page. Repeat Step 5 through Step 7 to use the second
search field on the Direct Database Export page, or repeat Step
5 through Step 9 to narrow the search results even further.
Search Students
Choose a field from the first pop-up menu.
Choose an operator from the second pop-up menu:
•
Equals (=)
•
Less than (<)
•
Greater than (>)
District System Administrator User Guide
System Administrator
© 2004 Apple Computer, Inc. All rights reserved.
133
Field
Description
•
Less than or equal to (<=)
•
Greater than or equal to (>=)
•
Does not equal (#)
•
Contains (contains)
•
Does not contain (!Contain)
Enter the value for the field in the last field.
Search only in records
belonging to [school
name]
Select this checkbox to filter your school's records in the search.
4. Click "Search within the current [# of selected] records only." The Direct Database Export
(DDE) page displays the new number of current records in selection.
5. Click List View to make sure you selected the records you want to export. The List Records:
[Table name] page appears with the fields separated by five periods.
District System Administrator User Guide
System Administrator
© 2004 Apple Computer, Inc. All rights reserved.
134
Note: Click the field value to link to the Display Record page.
How to Select Records for Export-Table View
View a report in a table format of all records in a selected table, or search for specific records in a
table. You can also limit the export to records for all schools on your system or just one school. For
example, export student data about California residents in fourth grade or above who attend all
schools on the system.
To modify the format of the table view, see the section "
How to Format the DDE Table View
."
1. On the start page, choose System from the main menu.
2. Click Direct Database Export. The Direct Database Export (DDE) page appears.
3. Use the following table to enter information in the fields:
District System Administrator User Guide
System Administrator
© 2004 Apple Computer, Inc. All rights reserved.
135
Field
Description
Current Table
Choose the table from which you want to export records from
the pop-up menu.
Note: For a complete list of PowerSchool tables and fields, see
http://your.school.address/admin/home?ac=structure
Select all [x] records in
this table
To indicate the records to use in the export, do one of the
following:
•
Click "Select all [number of] records in this table" to
select all records and skip to Step 10.
•
Identify search criteria in the Search Students fields by
continuing to the next step.
Note: Search for students either on the Search Students page
before beginning this procedure or on the Direct Database
Export page. Repeat Step 5 through Step 7 to use the second
search field on the Direct Database Export page, or repeat Step
5 through Step 9 to narrow the search results even further.
Search Students
Choose a field from the first pop-up menu.
Choose an operator from the second pop-up menu:
•
Equals (=)
•
Less than (<)
•
Greater than (>)
•
Less than or equal to (<=)
•
Greater than or equal to (>=)
•
Does not equal (#)
•
Contains (contains)
•
Does not contain (!Contain)
Enter the value for the field in the last field.
Search only in records
belonging to [school
name]
Select this checkbox to filter your school's records in the search.
4. Click "Search within the current [# of selected] records only." The Direct Database Export
(DDE) page displays the new number of current records in selection.
District System Administrator User Guide
System Administrator
© 2004 Apple Computer, Inc. All rights reserved.
136
5. Click Table View to make sure you selected the records you want to export. The List
Records: [Table name] page appears with the records in a table format.
Note: Click the field value to link to the Modify Record page.
How to Format the DDE Table View
1. On the start page, choose System from the main menu.
2. Click Direct Database Export. The Direct Database Export (DDE) page appears.
District System Administrator User Guide
System Administrator
© 2004 Apple Computer, Inc. All rights reserved.
137
3. Click Table View Setup. The DDA/DDE Table View Setup page appears.
4. Use the following table to enter information in the fields:
Field
Description
Maximum number of
records per page
Enter the maximum number of records you want to appear on
each page of the table.
Maximum number of
fields per table
Enter the maximum number of fields you want the table to
display.
Maximum number of
character per field
Enter the maximum number of characters each field in the
table can display.
District System Administrator User Guide
System Administrator
© 2004 Apple Computer, Inc. All rights reserved.
138
Field
Description
Use font tag
Select this checkbox to apply font formats. Otherwise, deselect
this checkbox.
Format data
Select this checkbox if you want the system to format the data
within the table. Otherwise, deselect this checkbox.
Use Gridlines
Select this checkbox if you want the table to separate each field
of data with gridlines. Otherwise, deselect this checkbox.
Alternate colors
Select this checkbox if you want the table to display each row
of data in a different color. Otherwise, deselect this checkbox.
Use Cell padding
Enter a number to indicate how much padding you want each
cell of the table to contain around the text. Most users enter a
number between 1 and 3.
5. Click Submit. The Direct Database Export (DDE) page appears.
How to Match Selections for Export
Match the records you searched for and selected in one table to records in another table to gather
and select information so you can view what you need. For example, match records in the Students
table to records in the CC (current grades) table.
Note: You cannot match tables that do not have a relationship or shared field. For example, you
cannot match the Students table to the Teachers table.
1. On the start page, choose System from the main menu.
2. Click Direct Database Export. The Direct Database Export (DDE) page appears.
District System Administrator User Guide
System Administrator
© 2004 Apple Computer, Inc. All rights reserved.
139
3. Choose one of the tables to match from the Current Table pop-up menu.
4. Click "Select all [#] records in this table." The Direct Database Export (DDE) page displays the
new number of current records in selection.
5. Click Match Selection. The Match USM Selection page appears.
6. Choose the second table to match from the pop-up menu.
7. Click "Proceed to match selection." The Direct Database Export page displays the total
number of records between the two matched tables that you can export. To export the
selected records, see the section "
How to Export Records
."
How to Export Records
Select records before exporting using the Direct Database Export function. For more information,
see "
How to Select Records for Export-List View
," "
How to Select Records for Export-
Table View
," or "
How to Match Selections for Export
."
District System Administrator User Guide
System Administrator
© 2004 Apple Computer, Inc. All rights reserved.
140
1. On the start page, choose System from the main menu.
2. Click Direct Database Export. The Direct Database Export (DDE) page appears.
3. Select records for exporting. For more information, see "
How to Select Records for
Export-List View
," "
How to Select Records for Export-Table View
," or "
How to
Match Selections for Export
."
4. Click Export Records. The Export Records page appears.
District System Administrator User Guide
System Administrator
© 2004 Apple Computer, Inc. All rights reserved.
141
5. Use the following table to enter information in the fields:
Field
Description
Fields
Use the pop-up menu to choose the fields from which you
want to export a copy of the data. After you choose each field,
the system inserts the field name in the text box.
To include fields from another table, manually enter the name
of the table in brackets, then the field name in the field box. For
example, to export fields from the Sections table and include
teachers' names, enter [teachers]lastfirst.
Field Delimiter
Use the pop-up menu to choose how you want the system to
separate each field in the export file:
•
Tab
District System Administrator User Guide
System Administrator
© 2004 Apple Computer, Inc. All rights reserved.
142
Field
Description
•
Comma
•
None
•
Other: Enter the delimiter in the blank field.
Record Delimiter
Use the pop-up menu to choose how you want the system to
separate each record in the export file:
•
CR: Carriage return
•
CRLF: Carriage return and line feed
•
LF: Line feed
•
Other: Enter the delimiter in the blank field.
Surround Fields
Select this checkbox if you want the system to surround each
field with quotation marks in the export file. Otherwise,
deselect this checkbox.
Column titles on 1st row
Select this checkbox if you want the first row of the export file
to have column titles indicating the fields included in each
column. Otherwise, deselect this checkbox.
Sorting Records
Determine the order of the records in the export file. Define a
primary, secondary, and tertiary sort. In the first field in the Sort
Field Name column, enter the field name by which you want to
primarily sort the records in the file. Then, select one of the
following to determine if you want to sort records by this field
in ascending or descending order:
•
< (descending)
•
> (ascending)
6. Click Submit. For Mac users, the results of the export appear. For Windows users, continue
to the next step.
7. Choose File > Save As....
8. In the Save dialog, specify a name, location, and file type.
9. Click Save. Open the file using a spreadsheet or other application.
End-of-Year Process
As the end of the school year approaches, the process of ending the year in PowerSchool becomes
significant. To prepare for the upcoming school year, review PowerSchool's entire end-of-year
process, including the procedures that must be performed before actually executing the end-of-
year function.
District System Administrator User Guide
System Administrator
© 2004 Apple Computer, Inc. All rights reserved.
143
Performing the end-of-year function:
•
Validates that students have Next School set for the current year prior to running this
function.
Note: If students do not have these values set, use the Set Next School Group Function to
enter the values.
•
Validates that a school year term for the next school year has been set up in all schools.
•
Promotes, retains, or demotes students according to each students Next Grade Level.
•
Transfers students from one school to another (in multi-school environments) according to
each student's Next School Indicator.
•
Graduates students from district if Next Grade Level is set to 99 and their Next School is set
to 999999 (Graduating Students School).
•
Sets each student's Exit Date according to the last day of the school year for that school.
•
Sets the Next Grade for the new enrollment to the next highest grade level.
•
Sets the Next School for the new enrollment to the current school for all students not in the
highest grade at the school.
•
Sets the Next School for the new enrollment to the school's default graduating school if
student is enrolled in the school's Highest Grade.
•
Carries forward lunch balances while clearing out all financial lunch activity records,
including:
•
Removes all lunch transactions for all students and staff members
•
Moves the current balances for students and staff into the previous balance field,
and sets the current balance to $0.00
Note: The end-of-year process does not change fee balances and transactions.
•
Removes all records of parental access to student records via Internet and telephone, such
as:
•
Lunch transaction records
•
DBLog records
•
Login records
•
Bulletin records
Enroll Status
When an enrollment record is created, it is assigned one of the following Enroll Status codes:
•
Pre-Registered (-1)
•
Active (0)
District System Administrator User Guide
System Administrator
© 2004 Apple Computer, Inc. All rights reserved.
144
•
Inactive (1)
•
Transferred Out (2)
•
Graduated (3)
•
Imported as Historical (4)
Performing the end-of-year function processes all students with an Enroll Status of Pre-Registered (-
1) and Active (0). It does not process students with an Enroll Status of Inactive (1), Transferred Out
(2), Graduated (3), or Imported as Historical (4).
Important Notes
•
This function processes all students in all schools on your system, not just students in the
current school.
•
This process is irreversible.
•
Your PowerSchool system can become slow or unresponsive at times while performing this
process, which can take up to four hours.
Prepare for End-of-Year Process
Before using this function:
1. Complete the SAIS End-of-Year process. For more information, see section "End-of-Year
Process" in the "Arizona SAIS Membership State Reporting Instruction Guide."
2. Set up your next school year using valid dates for each school.
3. Verify that students graduating from the district have their Next Grade Level set to 99 and
their Next School set to 999999 (Graduating Students School).
4. Shut your PowerSchool server down and make a backup copy of the data file
(PowerSchool.data). Then, store this backup data file in a safe place so it can be accessed if
needed in coming years.
•
Make an initial backup: Either manually back up the PowerSchool data file or use
PowerSchool to force a backup. Though the end-of-year process requires multiple
backups to be made, starting with a backup file helps with the process.
Note: It is suggested that you create a log file to track changes as they are made to
the data file. Include all changes and indicate when backups are made so that if you
are required to use a backup file, you will know the changes that were made.
It is important to note the location of the backup file when you back up your data.
After the backup is made, navigate to that location and verify that the backup file
was created properly. For more information, see the section "
How to Manually
Back Up PowerSchool
."
•
Correct and verify data: It is recommended that you run two reports that check for
possible conflicts with your student data. One is the "Enrollment by Grade" report
District System Administrator User Guide
System Administrator
© 2004 Apple Computer, Inc. All rights reserved.
145
and the other is "Enrollment by Section." For more information, see the section
"
Enrollment Reports
."
Note: You may also want counselors and other staff members to verify stored
grades and student information.
•
Make complete backups: Copy the PowerSchool folder on your server so that you
can restore all of the parameters that were last used to run PowerSchool, if
necessary. By making these complete backups, you will ensure that you can return
to the exact state you left your data before running the end-of-year process.
On your PowerSchool server, copy the entire PowerSchool folder onto a disk, such
as a CD. If necessary, compress the file before copying.
Included in the PowerSchool folder is the PowerSchool and PowerGrade Backups
folder. Encourage teachers to make a final PowerGrade backup. To use the
PowerGrade backup files, you will need a password; contact PowerSchool Technical
Support for a daily password.
•
Print student reports: Print reports you need, such as report cards, transcripts, and
form letters, for the current students you want to archive. For example, print a copy
or save a PDF file of your school's transcripts for this year's graduates.
Note: Some items, such as class rank, cannot be recalculated for graduates. Ensure
that you print and back up appropriate information as described above before
running the end-of-year process.
Produce PDFs of and verify every student report for the previous year. If corrections
are made, make a new backup of the data file and log the changes.
•
Print school, district, and state reports: Run all school, district, and state reports and
make any necessary corrections or additions before running the end-of-year
process. Other reports you may want to copy or print include those concerning
teacher gradebooks, attendance audits, and ADA/ADM. These reports are very
helpful for auditors, even if they are not required at your school. Additionally, print
any available state reports, regardless of when they are due to the state.
You may want to print or export the final lunch balances for students and faculty,
though this information is carried forward by the end-of-year process. Also, since
the end-of-year process removes all parent and student login information, you may
want to print the Parent Access report.
As usual, any changes to the data should be logged and verified.
Note: If you make changes to student data, it is critical that you make backups that
have the same results as any printed reports.
5. If you want a separate, ASCII-export archive copy of your lunch transactions and/or
historical grades, go to Export Data Archives (recommended).
6. Clear all non-essential fields.
Determine which student fields are not essential and clear the values of those fields. For
example, the student Activities field may not be essential since many students’ activities,
District System Administrator User Guide
System Administrator
© 2004 Apple Computer, Inc. All rights reserved.
146
such as basketball, do not carry over from year to year. Therefore, you need to clear the
values in these fields at the end of each year. For more information, see the section "
How
to Clear Non-Essential Fields
."
7. Complete scheduling.
Though it is possible to perform the end-of-year process without a complete schedule for
the following school year, it is recommended that you complete scheduling for students
attending during the next school year. For example, if you complete your schedule for the
next school year, students will use the course request page that is appropriate to their
grade levels.
For more information, see the section "
Checklist to Know Your Student Schedules
are Complete
."
Note: You must define the first and last days of school before running the end-of-year
process. For more information, see the section “
Schedule Years and Terms
.”
8. Enter data in the Next Grade Level and Next School Indicator fields.
Before running the end-of-year process, it is critical that you set the Next School Indicator
field for all students. PowerSchool automatically sets students’ next year grade levels.
By default, each student's Next Grade Level Indicator field is set to one grade level higher
than the current grade level. Use the Scheduling Setup Screen on an individual student’s
page to either promote a student that is graduating early or hold him or her back. For
example, in the latter case, the grade level for next year is the same as the grade level for
this year.
Students in the highest grade level on your server will be automatically set to have their
next grade level as “99”. This includes students who may exit your district from grades other
than grade 12. PowerSchool uses this number to indicate that these students are finished
with school and should be moved to the Graduated Students school. For more information,
see the section "
Next School Indicator
."
9. Make a data backup for the new year.
Make another backup of your PowerSchool data file. For more information, see the section
"
How to Manually Back Up PowerSchool
."
10. Clear PowerGrade fields.
Remove PowerGrade data files from your PowerSchool server. Be sure you made a complete
backup of the files. Teachers must create new data files after you perform the end-of-year
process.
11. Run process without selecting the "Check here to confirm that you really want to do this."
checkbox to make sure no validation errors occur.
12. Be sure that the server is able to run uninterrupted (without being shut down) while this
process runs through to completion (up to 4 hours).
District System Administrator User Guide
System Administrator
© 2004 Apple Computer, Inc. All rights reserved.
147
How to Clear Non-Essential Fields
Consider performing this procedure while logged in to the district office to clear fields for all
schools. Also, consider including inactive students in the student selection.
1. On the start page, select the group of students.
Note: Depending on the selection method you used, the Group Functions page appears
either immediately or after selecting students from the Student Selection page. If the
Student Selection page appears, choose the function in the next step from the group
functions pop-up menu.
2. Click Quick Export.
3. On the Quick Export page, export the student_number field and any non-essential fields.
4. Use a spreadsheet program to open the exported file.
5. Clear the values of all fields except student_number and the column headings.
6. On the start page, choose Special Functions from the main menu.
7. On the Special Functions page, click Importing & Exporting.
8. On the Importing & Exporting page, click Quick Import.
9. On the Quick Import page, import the previously exported file. The non-essential fields are
now blank for all active students.
How to Perform the End-of-Year Process
Each school specifies a grade level that appears in the first column of the End-of-Year Process page;
see the section "
School Information
" to change the grade level. Students at each school who are
below this specified grade level remain at their current school and have their grade level increased
by one. Students who are currently at or above this grade level in that school graduate. The
graduating students' records are either moved to another school on this server or simply moved
out of the current student status, depending on each student's Next School Indicator.
Note: The Next School Indicator field applies only to graduating students and is ignored for all
others. For more information, see the section "
Next School
."
If a student's next school specifies another school on your PowerSchool system, his or her records
are automatically moved to that school and the student is automatically enrolled there. If a
student's next school is not set, PowerSchool uses the default next school specified in the second
column of the End-of-Year Process page. To save time by not specifying a next school per student,
specify the default next school for all graduating students.
For example, if all middle school students graduate to the same high school, set that school as the
middle school's default next school. Then, the system moves all students graduating from the
middle school to the high school.
District System Administrator User Guide
System Administrator
© 2004 Apple Computer, Inc. All rights reserved.
148
If a student's Next School Indicator is not set and the Default Next School is 999999, that student
simply graduates and is not sent to another school. Typically, a high school sets its graduate grade
level as 12 and its Default Next School as 999999.
If any of the graduate grade levels or default next school settings are not correct, see the section
"
Next School
."
1. Log on at the district level.
Note: To use the end-of-year process, you must log on at the district level. If accessing the
End-of-Year Process page at the school level, the message “This function can only be
performed from District mode.” appears.
2. On the start page, choose System from the main menu.
3. Click "End-of-year process." The End-of-Year Process page appears.
4. Use the following table to enter information in the fields:
Note: Values must be entered for all fields to insure that students receive the appropriate
codes/comments in their enrollment records.
Field
Description
School
Displays the full name of each school on the PowerSchool
server.
School Number
Displays the identification number for each school on the
PowerSchool server.
(1) High Grade for each
School
Displays the highest-grade level specified by each school.
Students at each school who are below this specified grade
level remain at their current school and have their grade level
increased by 1. Students at each school who are currently at
this grade level will be graduated to the next school.
Note: If any of the highest-grade levels are not correct, you may
District System Administrator User Guide
System Administrator
© 2004 Apple Computer, Inc. All rights reserved.
149
Field
Description
modify them using the School Setup pages.
(2) Default Next School
for Students in High
Grade
Displays the default next school for students who are in the
highest-grade level. Students at each school who are currently
at this grade level will be graduated to the default next school.
Note: If any of the default next school settings are not correct,
you may modify them using the School Setup pages.
Type of Student
Displays the categories by which you can process students:
•
Graduating: Student is graduating from the highest
grade level on the server. These students need to have
their Next Grade Level set to 99 and their Next School
to 999999 (Graduating Students School). Option to
record Exit Code (current enrollment record) and Exit
Comment (re-enrollment record).
•
Promoted to next school: Student is being promoted
(Next Grade Level is greater than Current Grade Level)
and is transferring to another school (Next School
Indicator). Option to record Exit Code (current
enrollment record), Entry Code (re-enrollment record),
and Exit Comment.
•
Promoted within same school: Student is being
promoted (Next Grade Level is greater than Current
Grade Level) but is staying in the current school. Option
to record Exit Code (current enrollment record), Entry
Code (re-enrollment record), and Exit Comment.
•
Retained: Student is being retained (Next Grade Level is
equal to Current Grade Level) and (Next School
Indicator is equal to Current School). Option to record
Exit Code (current enrollment record), Entry Code (re-
enrollment record), and Exit Comment.
•
Demoted: Student is being demoted (Next Grade Level
is less than Current Grade Level). Option to record Exit
Code (current enrollment record), Entry Code (re-
enrollment record), and Exit Comment.
Note: If any of the graduate grade levels or default next school
settings are not correct, you may modify them using the School
Setup pages.
Exit Code for Current
Enrollment
Choose the appropriate exit code from the pop-up menu, such
as:
District System Administrator User Guide
System Administrator
© 2004 Apple Computer, Inc. All rights reserved.
150
Field
Description
•
AP (Alternative Placement)
•
DE (Death)
•
DO (Dropout)
•
EX (Expulsion)
•
GR (Graduated from HS)
•
PR (Promoted to next year)
•
TO (Transfer Out of State)
•
TS (Transfer within State)
•
P (Promoted)
•
R (Retained)
•
G (Graduated at year end)
•
C (Completed course of study at year end)
•
A (Attended, not expecting reenrollment)
•
SA (Still Enrolled - AIMS)
•
SC (Still Enrolled - Course Study)
•
SE (Still Enrolled - Met No Requirements)
•
PS (PowerSchool enrollment status change)
•
SS (Summer School)
•
NS (No show)
For more information, see the section "
Exit Codes
."
Entry Code for New
Enrollment
Choose the appropriate entry code from the pop-up menu,
such as:
•
AP (Alternative Placement)
•
DO (Previous Drop Out)
•
HS (Home School)
•
PR (Promoted from previous year)
•
TO (Transfer from out of State)
•
TS (Transfer from within State)
•
PS (PowerSchool enrollment status change)
•
SS (Summer School)
District System Administrator User Guide
System Administrator
© 2004 Apple Computer, Inc. All rights reserved.
151
Field
Description
For more information, see the section "
Entry Codes
."
Exit Comment
Enter a note for the student record affected by the end-of-year
process.
Replace Existing Values?
Because student records may already contain an existing Exit
Code in the current enrollment, you may or may not want to
overwrite the value(s). Do one of the following:
•
Select this checkbox to replace any existing exit codes.
•
Leave the checkbox blank to as to not overwrite any
existing exit codes.
Note: Regardless of the checkbox selected, if any exit code
fields are blank, the end-of-year function populates those fields
with the information entered on this page.
Fees Transfer Method
At the end of the year, students may have fee balances
remaining. Use this option to indicate to the system how you
want balances handled at the end of the year.
•
Select the "Roll over the current balance" to roll over the
balance as the new balance for the following year.
When rolling over current balances, students with a balance of
zero are not affected. Students with a balance greater than zero
(student owes money) or less than zero (school owes money),
receive a SOY Balance. This information appears on the student
Fee Transactions page.
•
Select "Zero the current balance" to not roll over any
remaining fee balances and start with a balance of zero
for the next school year.
Remaining balances for the ending school year are kept
unmodified so that administrators can collect/distribute money
owed in order to reach a zero balance.
Note: Fees and balances remain in the system as historic
records and are available to view based on term selection (at
the top of the page).
For more information, see the section "
Transfer Fees
."
Check here to confirm
that you really want to
do this.
Use this checkbox to confirm whether or not you want the end-
of-year process to do one of the following:
•
Select this checkbox to validate your data and perform
the end-of-year process.
District System Administrator User Guide
System Administrator
© 2004 Apple Computer, Inc. All rights reserved.
152
Field
Description
•
Leave the checkbox blank to validate your data and
make any corrections before actually performing the
end-of-year process.
5. Click Perform End-of-Year Processing. The end-of-year process begins.
If any of the prerequisites have not been met, an alert displays summarizing the error(s). If
all of the prerequisites have been met, the end-of-year process proceeds. A message
displays indicating that the end-of-year process is being performed.
After the process completes, verify that the information in the data file is correct. For
example, be sure the current eleventh graders were promoted to the twelfth grade level.
Make a backup of the data file.
Note: At this point, you have made backup files of all PowerSchool data. Therefore, this is an
ideal time to perform server tasks such as installing additional memory or changing
operating systems.
Prepare for the Upcoming School Year
The following is a list of tasks that you may want to perform in preparation for the upcoming school
year. If you need to make any system-wide changes, such as modifying course numbers, this is a
good time to perform those tasks.
•
Perform PowerGrade final grade setups at all schools on the server.
•
Verify or create the calendar at all schools and adjust any attendance issues.
•
Prepare for state reporting by entering any required information.
•
Create custom pages or reports as needed.
•
Evaluate what you can improve for next year and make a plan for implementing those
improvements.
•
Begin implementing a process for all teachers to create a new PowerGrade data file for the
upcoming year, including the use of the PowerSchool/PowerGrade connectivity key.
•
Make a final backup of the PowerSchool folder after completing all steps. Remove the
backup from the server and store in a secure location.
Transfer Fees
During the end-of-year process, school enrollment fees are not assessed even if students are re-
enrolled or transferred to a school. This is done so that the school enrollment fees, course
enrollment fees, and calendar can be set correctly for the new year. Once the end-of-year process is
done, you can assess fees using this procedure.
District System Administrator User Guide
System Administrator
© 2004 Apple Computer, Inc. All rights reserved.
153
How to Assess Fees After End-of-Year Process
1. Set up the calendar.
2. Set up school enrollment fees for each school.
3. Set up course enrollment fees for each course.
4. Assess school enrollment fees manually for all students (or some of them at a time).
5. When adding new students, school enrollment fees will be assessed automatically.
Note: If you assess school enrollment fees for students more than once, the students will
have multiple copies of the fees.
Export Historical Grades
Create an export file that contains the historical grades for a specific term. Use this procedure to
save a backup file of each term's historical grades or to maintain a record of historical grades
outside of PowerSchool, such as in a spreadsheet program.
How to Export Historical Grades
1. On the start page, choose System from the main menu.
2. Click Export Historical Grades. The Export Historical Grades page appears.
3. Use the following table to enter information in the fields:
District System Administrator User Guide
System Administrator
© 2004 Apple Computer, Inc. All rights reserved.
154
Field
Description
School
The page displays the school in which you are currently
working. To change the school, click School in the navigation
bar.
School Year
The current school year appears.
Store Code
Enter the store code of the term for which you want to export
historical grades.
Field Delimiter
Use the pop-up menu to indicate how you want the system to
separate fields in the export file:
•
Tab
•
Comma
Record Delimiter
Use the pop-up menu to indicate how you want the system to
separate records in the export file:
•
CRLF: carriage return and line feed
•
CR: carriage return
•
LF: line feed
Fields to Export
Enter the internal PowerSchool field names of the fields you
want to export.
Note: If you include a field from another table, enter the table
name in brackets first, such as [students]student_number. Press
Return (Mac) or Enter (Windows) after each field name.
4. Click Submit. The exported historical grades appear.
District System Administrator User Guide
System Administrator
© 2004 Apple Computer, Inc. All rights reserved.
155
Note: To save the file, choose File > Save As from your web browser. Select a file location
and type, such as a text file. Click Save.
Report Templates
Import report templates from another school that uses PowerSchool. For example, if a PowerSchool
administrator from another school already created a report you need, that administrator can attach
and send the report template file to you in an email message. When you receive the file, import the
template into your PowerSchool system.
Export report templates to share with other PowerSchool administrators or to save as a backup for
the template. In addition, by exporting a template and then deleting it, you can remove a template
from the system without losing it permanently.
How to Import a Report Template
1. On the start page, choose System from the main menu.
2. Click Import Report Template. The Import Report Template page appears.
3. Enter the file path and name of the template in the "File to Import" field or click Browse... to
select the template file.
District System Administrator User Guide
System Administrator
© 2004 Apple Computer, Inc. All rights reserved.
156
4. Click Import. The Alert: Template Successfully Imported page appears.
How to Export a Report Template
Export a report template to import into another PowerSchool system or to save as a backup. Report
templates can be exported for custom reports only: form letters, mailing labels, object reports, or
report cards.
1. On the start page, choose Reports from the main menu.
2. On the Reports page, click Report Setup.
3. On the Report Setup page, click Form Letters, Mailing Labels, Object Reports, or Report
Cards.
4. Select the report to be exported as a template. The Edit Form Letter, Edit Mailing Label
Layout, Object Report: [report name], or Report Card page appears.
District System Administrator User Guide
System Administrator
© 2004 Apple Computer, Inc. All rights reserved.
157
5. Click "Export Report as Template." The File Download dialog appears.
Note: Depending on the type of report template, the link can be "Export this report as a
template" or "Export as a Template."
6. Select "Save this file to disk."
7. Click OK. The Save As dialog appears.
8. Select a file location.
9. Click Save. The system exports the report template.
District System Administrator User Guide
System Administrator
© 2004 Apple Computer, Inc. All rights reserved.
158
Permanently Store Grades
At the end of each grading term, use the Permanently Store Grades function to copy and store the
students’ current grades in PowerGrade as historical grades.
Before permanently storing grades, be sure that you set up grade scales, final grades, and the
current grade display. For more information, see the sections "
Grade Scales
," "
Final Grades
Setup
," and "
Current Grade Display
."
How to Permanently Store Grades
It is recommended that you run several reports before permanently storing grades. The Student
Schedule Listing report lists the current grades and any missing grades for selected students. Print
the Class Rosters report for teachers to verify that all the grades are correct.
1. On the start page, choose System from the main menu.
2. Click Permanently Store Grades. The Permanently Store Grades page appears.
3. Use the following table to enter information in the fields:
District System Administrator User Guide
System Administrator
© 2004 Apple Computer, Inc. All rights reserved.
159
Field
Description
Store Code
Use a two-digit code to indicate the term in which the students
earned the grades, such as Q1 or S1. The first character must be
a letter, and the second character must be a number.
Note: Do not use the same store code twice in one year. The
system will overwrite the grades you stored under the store
code the first time with the grades you store the second time.
Use this final grade
Enter the term code from which you want to save the grades.
The term code is usually the same as the store code, such as Q1
or S1. For more information on defining term codes, see the
section "
Final Grades Setup
."
Exclude and Include
Enrollment Records
You do not have to store current grades for all students. If you
want to store current grades based on students' enrollment or
dropped class dates, select any combination of the following
checkboxes to filter the selected students:
•
Exclude enrollment records where the student enrolled
in the class after this date: Enter the date using the
format mm/dd/yyyy or mm-dd-yyyy. If you do not use
this format, an alert appears. If you submit the date with
an incorrect format, the date field will be submitted as a
blank entry.
•
Exclude enrollment records where the student dropped
the class before this date: Enter the date using the
format mm/dd/yyyy or mm-dd-yyyy. If you do not use
this format, an alert appears. If you submit the date with
an incorrect format, the date field will be submitted as a
blank entry.
•
Include only enrollment records that are currently active
and that were active on this date: Enter the date using
the format mm/dd/yyyy or mm-dd-yyyy. If you do not
use this format, an alert appears. If you submit the date
with an incorrect format, the date field will be
submitted as a blank entry. To be included in the grade
storing process for a class, a student must have enrolled
in a class on or before the date you enter and cannot
have dropped the course until or after the date.
Note: If you leave the date-related fields blank, PowerSchool
stores a grade for every enrollment record, including classes
that students dropped during the term. Most schools enter a
two-week grace period at both the beginning and end of the
term. This allows for all of the add/drop procedures at the
District System Administrator User Guide
System Administrator
© 2004 Apple Computer, Inc. All rights reserved.
160
Field
Description
beginning of the term to be ignored in the store grades
process. Also, PowerSchool does not store grades for students
who enroll in your school during the last two weeks of the
term.
Request that grades be
stored only for a specific
section
If you want to store grades for students in a specific course
section only, enter the course and section numbers, separated
by a period. For example, enter 113.04 for Course 113, Section
04. You can do this when teachers are late in entering their final
grades or when testing the process of storing grades. Store
grades for one course section before you store grades for all
course sections. Leave this field blank to store grades for all
course sections.
Percent of Credits to be
awarded each term
For each term, specify the percent of possible credits each
student can earn. For example, if you store grades for Q1 in a
school year with four quarters, students earn 25% of the
possible credits they can earn in a yearlong course. The terms
listed refer to the courses, such as courses that are one year
long, or courses that are one semester long. If you want to store
grades and you do not want to award credit, enter 0 in these
fields.
Note: Be sure you define the proper amount of credits for all
courses. Also, define that the appropriate grades earn
graduation credit on the Gradescale page.
Options for classes
enrolled at other schools
Use the pop-up menus to indicate the options you want to
apply for storing grades for classes that students take at other
schools:
•
Store grades for classes enrolled at: Select whether you
want to store grades for all schools or for the selected
school only. If storing for the selected school only,
PowerSchool will not store grades for the other schools
at which students may take classes.
•
Record the school name of: Select which school name
to use when storing grades. Select either the other
school or the current school.
Options for Withholding
Credit
You can determine that all students who receive a specific
number of attendance points during the date range you enter
do not receive credit for the course and earn an entirely
different grade. For example, the student originally receives a C;
however, due to excessive absences, the student receives a WC
and no credit for this course.
District System Administrator User Guide
System Administrator
© 2004 Apple Computer, Inc. All rights reserved.
161
Field
Description
Complete the following steps:
a. Select the checkbox.
b. Enter the number of attendance points the student
must have received and the date range during which he
or she received them to earn the grade you enter.
c. Enter a comment in the teacher comment field if you
want the original grade the student earned before
counting the attendance points to appear with the
comment.
4. Click Store Current Grades. The "Alert: Storing Grades" page displays the status of the
storing grades process.
Note: If you notice that you entered incorrect data after storing grades, repeat this
procedure for the same store code. PowerSchool overwrites the existing grades with the
new ones.
PowerGrade Settings
Use this page to edit PowerGrade settings. PowerSchool and the PowerGrade application on each
teacher's computer constantly send data back and forth to keep data current.
For example, after enrolling a new student in a class using PowerSchool, PowerSchool sends the
new student schedule information to the appropriate teacher's PowerGrade application.
Alternatively, when a teacher enters a new assignment grade, PowerGrade sends the grade to
PowerSchool, where the student's current grade is adjusted.
How to View Current PowerGrade Backups
Display any current PowerGrade grade backups. Teachers use PowerGrade to make backup files of
students' grades.
1. On the start page, choose System from the main menu.
2. Click PowerGrade Settings. The PowerGrade Settings page appears.
District System Administrator User Guide
System Administrator
© 2004 Apple Computer, Inc. All rights reserved.
162
3. Click Current PowerGrade Backups. The Current PowerGrade Backups page appears.
How to Add Extra PowerGrade Download Fields
Teachers can use PowerSchool fields that you send to PowerGrade to view student information,
including guardian names, daytime phone numbers, and allergies. In PowerSchool, use the fields to
search for students or to include on custom reports.
Note: You can create up to ten extra PowerSchool fields to download.
The list of extra PowerGrade fields displays any fields previously created. These fields appear on the
Class Roster page in each teacher's PowerGrade application. You can create PowerGrade fields only
when logged in to a specific school.
District System Administrator User Guide
System Administrator
© 2004 Apple Computer, Inc. All rights reserved.
163
1. On the start page, choose System from the main menu.
2. Click PowerGrade Settings. The PowerGrade Settings page appears.
3. Click Extra PowerGrade Download Fields. The Extra PowerGrade Download Fields page
appears.
4. Click New. The Edit PowerGrade Field page appears.
District System Administrator User Guide
System Administrator
© 2004 Apple Computer, Inc. All rights reserved.
164
5. Use the following table to enter information in the fields:
Field
Description
Field Name (Fields)
Enter the internal PowerSchool field name, such as
student_nickname. Click Fields to view the PowerSchool field
list.
Field Name
Enter the field name that appears on the Class Roster page in
PowerGrade, such as Nickname.
Sort Order
Enter a number between 1 and 10 to indicate the order in
which you want this field to appear with the other extra
PowerGrade fields on the Class Roster page.
6. Click Submit. The Extra PowerGrade Download Fields page displays the new field.
District System Administrator User Guide
System Administrator
© 2004 Apple Computer, Inc. All rights reserved.
165
How to Edit Extra PowerGrade Download Fields
1. On the start page, choose System from the main menu.
2. Click PowerGrade Settings. The PowerGrade Settings page appears.
3. Click Extra PowerGrade Download Fields. The Extra PowerGrade Download Fields page
appears.
4. Click the field to edit in the Field Name That Teachers See column. The Edit PowerGrade
Field page appears.
District System Administrator User Guide
System Administrator
© 2004 Apple Computer, Inc. All rights reserved.
166
5. Use the following table to edit information in the fields:
Field
Description
Field Name(Fields)
Enter the internal PowerSchool field name, such as
student_nickname. Click Fields to view the PowerSchool field
list.
Field Name
Enter the field name that appears on the Class Roster page in
PowerGrade, such as Nickname.
Sort Order
Enter a number between 1 and 10 to indicate the order in
which you want this field to appear with the other extra
PowerGrade fields on the Class Roster page.
6. Click Submit. The Extra PowerGrade Download Fields page displays the edited fields.
District System Administrator User Guide
System Administrator
© 2004 Apple Computer, Inc. All rights reserved.
167
How to Delete Extra PowerGrade Download Fields
1. On the start page, choose System from the main menu.
2. Click PowerGrade Settings. The PowerGrade Settings page appears.
3. Click Extra PowerGrade Download Fields. The Extra PowerGrade Download Fields page
appears.
District System Administrator User Guide
System Administrator
© 2004 Apple Computer, Inc. All rights reserved.
168
4. Click the field to delete in the Field Name That Teachers See column. The Edit PowerGrade
Field page appears.
5. Click Delete. The Extra PowerGrade Download Fields page displays without the deleted
field.
District System Administrator User Guide
System Administrator
© 2004 Apple Computer, Inc. All rights reserved.
169
How to Force PowerGrade Roster Updates
Use this feature to force teachers to update their rosters the next time they open PowerGrade.
1. On the start page, choose System from the main menu.
2. Click PowerGrade Settings. The PowerGrade Settings page appears.
3. Click Force PowerGrade Roster Updates. When the setting takes effect, the Changes
Recorded page appears.
District System Administrator User Guide
System Administrator
© 2004 Apple Computer, Inc. All rights reserved.
170
How to Set PowerGrade Attendance Restrictions
Restrict PowerGrade users from modifying attendance outside of a specified range of days.
1. On the start page, choose System from the main menu.
2. Click PowerGrade Settings. The PowerGrade Settings page appears.
3. Click PowerGrade Attendance Settings. The PowerGrade Attendance Settings page appears.
4. Choose the number of school days teachers may alter attendance prior to the current date
and the number of school days teachers may alter attendance after the current date from
the pop-up menus.
5. Click Submit. The PowerGrade Settings page appears.
How to Edit PowerGrade Backup Settings
Teachers can back up their PowerGrade data files to the PowerSchool server in a folder named
PowerGrade Backups. Specify how many backup files to store on the server for each teacher. The
District System Administrator User Guide
System Administrator
© 2004 Apple Computer, Inc. All rights reserved.
171
most recent backup file replaces the oldest backup file in the folder. Consider any limited server
storage space when editing this setting.
1. On the start page, choose System from the main menu.
2. Click PowerGrade Settings. The PowerGrade Settings page appears.
3. Click PowerGrade Backup Settings. The PowerGrade Backup Settings page appears.
4. Enter the maximum number of PowerGrade backups to keep for each teacher.
5. Click Submit. The System Settings page appears.
How to Download and Install PowerGrade
Download the latest version of PowerGrade.
District System Administrator User Guide
System Administrator
© 2004 Apple Computer, Inc. All rights reserved.
172
Note: If you are using Windows 2000, log in to your local system as the administrator before
installation.
1. On the start page, choose System from the main menu.
2. Click PowerGrade Settings. The PowerGrade Settings page appears.
3. Click PowerGrade Download.
4. On the PowerGrade Download page, click the link to the most recent PowerGrade file for
your computer type. PowerGrade saves to a location on your computer.
Note: If downloading PowerGrade for Windows, verify that the file name extension ".exe"
appears in the File Download dialog. If it doesn't, enter .exe after the file name, such as
PG[4.0.1.07][1].exe. Click OK.
5. Double-click the installation icon from the location where the file downloaded. The
installation process starts.
How to Add PowerGrade Reports
Add a report to the list of reports in PowerGrade that all teachers can edit and print for their classes.
A list displays the reports already available to teachers in PowerGrade; teacher-created reports
appear at the top of the Edit Reports submenu in PowerGrade, and imported reports appear at the
bottom.
1. On the start page, choose System from the main menu.
2. Click PowerGrade Settings. The PowerGrade Settings page appears.
District System Administrator User Guide
System Administrator
© 2004 Apple Computer, Inc. All rights reserved.
173
3. Click PowerGrade Reports. The PowerGrade Reports page appears.
4. Enter the path and file name for the template to upload in the "Upload a new PowerGrade
report" field.
Note: Alternatively, click Browse..., navigate to the file, and click Open.
5. Click Submit. The PowerGrade Reports page displays the uploaded template.
District System Administrator User Guide
System Administrator
© 2004 Apple Computer, Inc. All rights reserved.
174
How to Delete PowerGrade Reports
Delete a report from the list of reports in PowerGrade that all teachers can print for their classes.
The PowerGrade Reports page displays the reports already available to teachers in PowerGrade.
1. On the start page, choose System from the main menu.
2. Click PowerGrade Settings. The PowerGrade Settings page appears.
3. Click PowerGrade Reports. The PowerGrade Reports page appears.
District System Administrator User Guide
System Administrator
© 2004 Apple Computer, Inc. All rights reserved.
175
4. Select the checkbox next to the report template to be deleted.
5. Click Submit. The PowerGrade Reports page displays without the deleted template.
How to Edit PowerGrade and PowerSchool Connectivity Settings
Determine if teachers must enter a security key the first time they start PowerGrade. Set the
PowerGrade security key for each teacher. The system uses this key to continue communication
between PowerGrade and the PowerSchool system. To stop this communication for any reason, the
PowerSchool administrator can change a teacher's connectivity key.
Because PowerGrade is often installed on classroom computers, the connectivity key is very
important to ensure that students or other school community members cannot access confidential
student information. For more information, see the section "
Staff Security Settings
."
If a teacher is locked out of PowerGrade, an administrator can refer to the Temporary PowerGrade
Locking Password on this page to reset the teacher's password.
District System Administrator User Guide
System Administrator
© 2004 Apple Computer, Inc. All rights reserved.
176
1. On the start page, choose System from the main menu.
2. Click PowerGrade Settings. The PowerGrade Settings page appears.
3. Click PowerGrade/PowerSchool Connectivity. The PowerGrade/PowerSchool Connectivity
page appears.
4. Use the following table to edit information in the fields:
Field
Description
Require PowerGrade
users to use a security
key for connecting to the
PowerSchool server
Select this checkbox if you want to require teachers to use a
security key when transferring information between
PowerGrade and PowerSchool. Otherwise, deselect this
checkbox.
Temporary PowerGrade
Locking Password
Use this temporary password to unlock PowerGrade when
teachers are locked out. After you log on to PowerGrade using
this password, the teacher can change his or her password. This
temporary password changes on a daily basis.
5. Click Submit. The Changes Recorded page appears.
District System Administrator User Guide
System Administrator
© 2004 Apple Computer, Inc. All rights reserved.
177
Report Queue
Use the report queue to view, cancel, and reexecute reports that all users submit to the queue.
When users submit report requests, the system captures those requests and transmits the jobs to
the report queue. The Report Queue page displays the status of the reports as they are processed
by the system. The report queue also includes debugging tools and logs to troubleshoot problems
with reports.
Users can view, cancel, and reexecute only their own jobs. Additionally, only users can delete jobs,
and they can delete only their own. For more information, see the procedure "
Report Status
."
How to View Report Queue Jobs
1. On the start page, choose System from the main menu.
2. On the System Administrator page, click Report Queue Settings. The Report Queue Settings
page appears.
3. Click Current Jobs. The Report Queue - Current Jobs page displays the reports.
4. Do one of the following:
•
Click Refresh to update the page.
District System Administrator User Guide
System Administrator
© 2004 Apple Computer, Inc. All rights reserved.
178
•
Click the job name of the report. The Report Queue Job Detail page displays details
of the report job, and you can select the Cancel Job checkbox.
•
Select the Cancel checkbox(es) for the report(s) you want to cancel. Click Cancel
Selected Jobs.
How to View Completed Report Queue Jobs
1. On the start page, choose System from the main menu.
2. On the System Administrator page, click Report Queue Settings. The Report Queue Settings
page appears.
3. Click Completed Jobs. The Report Queue - Completed Jobs page displays the reports.
District System Administrator User Guide
System Administrator
© 2004 Apple Computer, Inc. All rights reserved.
179
4. Do one of the following:
•
Click Refresh to update the page.
•
Click the job name of the report. The Report Queue Job Detail page displays details
of the report job. See the section "
How to Understand Report Queue Job
Details
."
•
Select the Result File to display the report.
How to Understand Report Queue Job Details
View the job details for any report with any status.
1. On the start page, choose System from the main menu.
2. On the System Administrator page, click Report Queue Settings. The Report Queue Settings
page appears.
District System Administrator User Guide
System Administrator
© 2004 Apple Computer, Inc. All rights reserved.
180
3. Click Completed Jobs. The Report Queue - Completed Jobs page displays the reports.
4. Click the job name of the report. The Report Queue Job Detail page appears.
5. Use the following table to enter information in the fields:
Field
Description
User
The username of the person who ran the report appears.
District System Administrator User Guide
System Administrator
© 2004 Apple Computer, Inc. All rights reserved.
181
Field
Description
School
The school name and number for the report appear.
Created
The date and time the report job started appear.
Job Name
The name of the report appears.
Type
The output format of the report appears.
Reports
The name of the table that includes the data used for the report
appears.
Status
The status of the report job displays:
•
Completed: Job is finished.
•
Running: Job is processing.
•
Pending: Job has not started.
•
Canceled: Job has been canceled.
Started
The date and time the report started running appear.
Ended
The date and time the report finished running appear.
When to Execute
Select a time to start running this report:
•
ASAP: Execute immediately.
•
At Night: Execute during the next evening.
•
On Weekend: Execute during the next weekend.
•
On Specific Date/Time: Execute on the date and time
specified in the following fields.
Run Job Again?
Select this checkbox to execute the report again.
Result File
Select the Result File to display the report.
File Size
The size of the file appears.
Location on Server
The file location on the PowerSchool server appears. This
information is available for completed jobs only.
Priority
Enter a priority for the report. Lower numbers give the report
higher priority. This information is available for pending jobs
only. You can further modify priorities on the user group
security pages. For more information, see the section "
How to
Edit Security Groups
."
District System Administrator User Guide
System Administrator
© 2004 Apple Computer, Inc. All rights reserved.
182
6. Click Submit to save your changes.
How to View the Report Queue Status
The Report Queue Status page varies depending on the status of the report jobs. For example, you
can cancel any jobs with the status Pending or Running, whereas Canceled or Completed jobs
cannot be modified.
1. On the start page, choose System from the main menu.
2. On the System Administrator page, click Status. The Report Queue Status page appears.
3. Use the following table to understand the fields in the Report Queue section:
Field
Description
Current status
The status of the entire report queue appears. The report queue
can be running or not running. Other error or status messages
pertaining to the entire report queue may appear.
Last restarted
The date and time of the last time the job was restarted
appears.
Number of report
processes
The number of report processes currently running in
PowerSchool appears.
District System Administrator User Guide
System Administrator
© 2004 Apple Computer, Inc. All rights reserved.
183
Field
Description
Automatically delete
completed jobs after
The number of days that a job remains in the report queue
appears. To modify this number, see the section "
How to Set
Report Queue Preferences
."
Maximum pending jobs
per user
The maximum number of jobs any one user can have pending
in the report queue appears. To modify this number, see the
section "
How to Set Report Queue Preferences
."
Result file location
The file location on the PowerSchool server appears.
4. Use the following table to understand the fields in the Job Statistics section:
Field
Description
Currently running jobs
The number of jobs currently with the running status appears.
Last job run
The date and time of the last job to run appear.
Jobs run today
The number of jobs run so far today appears.
Total jobs ever run
The number of jobs ever run in PowerSchool appears.
Pending jobs on server
The number of jobs currently with the Pending status appears.
Click the number to display the jobs.
Completed jobs on
server
The number of jobs currently with the Completed status
appears. Click the number to display the jobs.
Canceled jobs on server
The number of jobs currently with the Canceled status appears.
Total jobs on server
The total number of jobs currently on the server with any status
appears.
5. Use the following table to enter information in the Report Processes section:
Field
Description
Process Name
The name(s) of the currently running report process(es) appear.
Jobs Run
The number of jobs run for each process appears.
Total Time
The total time each process took appears.
Status
The status of each process appears. If the job is running, the
name of the report appears. Click the report name to display
the job details. When a job completes, the report name no
longer appears.
District System Administrator User Guide
System Administrator
© 2004 Apple Computer, Inc. All rights reserved.
184
Field
Description
Cancel Checkbox
Select the checkbox(es) next to the job(s) you want to cancel.
Then, click Cancel Selected Jobs.
6. Click Refresh to update the page (optional).
How to Set Report Queue Preferences
1. On the start page, choose System from the main menu.
2. On the System Administrator page, click Report Queue Settings. The Report Queue Settings
page appears.
3. Click Preferences. The Report Queue Preferences page appears.
4. Use the following table to enter information in the fields:
Field
Description
Automatically delete
completed jobs after
Enter the number of days each job remains in the report queue.
After the specified number of days, PowerSchool automatically
deletes the affected job.
District System Administrator User Guide
System Administrator
© 2004 Apple Computer, Inc. All rights reserved.
185
Field
Description
Maximum pending jobs
per user
Enter the maximum number of jobs each user can have in the
report queue at one time. To indicate no limit, enter 0.
Number of report
processes
Enter the maximum number of report processes, or number of
reports running at the same time. This setting does not take
effect until the next time the PowerSchool server is restarted.
Automatically start
Report Queue on system
startup
Select either Startup or Don't Startup to indicate what you want
the report queue to do when the PowerSchool server restarts.
Warning: Modifying this setting affects restarts, so use extreme
caution when selecting this option.
If you indicate Don't Startup and want to manually start the
report queue, enter Repo_Batch_Startup in the PowerSchool
Server's Execute window.
To disable the report queue for a single restart instead of
modifying this setting, press Command-Option (Mac) or
Control-Alt (Windows) when starting the PowerSchool Server.
The report queue will not start up for this session but will do so
when the server restarts.
5. Click Submit to save your changes.
Scan Pages
PowerSchool can scan for customized pages that include a no update tag (). PowerSchool scans all
pages in the system and returns a report of what pages include the no update tag in the source.
How to Scan for Customized Pages
1. On the start page, choose System from the main menu.
2. Click Scan Pages. After the system scans for customized pages, the Search Page Contents
Results page appears.
3. Click the file path to view the page.
District System Administrator User Guide
System Administrator
© 2004 Apple Computer, Inc. All rights reserved.
186
How to View Customized HTML Pages
1. On the start page, choose System from the main menu.
2. Click Scan Pages. After the system scans for customized pages, the Search Page Contents
Results page appears.
3. Click View next to the page name in the File Path column. The page appears.
How to Edit Customized HTML Pages
1. On the start page, choose System from the main menu.
2. Click Scan Pages. After the system scans for customized pages, the Search Page Contents
Results page appears.
3. Click Edit next to the page in the File Path column. The File Download dialog appears.
4. Select "Save this file to disk."
5. Click OK. The Save As dialog appears.
District System Administrator User Guide
System Administrator
© 2004 Apple Computer, Inc. All rights reserved.
187
6. Select a file location.
7. Click Save. The Search Page Contents page appears. Edit the file using the appropriate
application.
Special Operations
Use this page to perform special operations for your school's PowerSchool data as directed by
PowerSchool Technical Support. For example, run the special operation "Clear student photos" to
remove all student photos from the selected school.
To recalculate lunch balances for all students, select the "Recalculate lunch balances" operation. To
recalculate lunch balances for a single student, see the section "
How to Recalculate a
Student's Lunch Balance
."
How to Run a Special Operation
1. On the start page, choose System from the main menu.
2. Click Special Operations. The Special Operations page appears.
3. Use the following table to enter information in the fields:
District System Administrator User Guide
System Administrator
© 2004 Apple Computer, Inc. All rights reserved.
188
Field
Description
Operation
Choose the operation, as directed by PowerSchool Technical
Support, from the pop-up menu.
Param 1
Enter the information provided by PowerSchool Technical
Support.
Param 2
Enter the information provided by PowerSchool Technical
Support.
Code
Enter the information provided by PowerSchool Technical
Support.
4. Click Submit. The system completes the special operation.
Store Standards Grades
Periodically, you might want to capture standards grades for reporting purposes. You can store
standards grades at any time using any store code. Stored standards grades can be used on pages,
in reports, or in exports. Elementary reports cards are good examples of using stored standards
grades.
How to Store Standards Grades
1. On the start page, choose System from the main menu.
2. On the System Administrator page, click Store Standards Grades. The Store Standards
Grades page appears.
District System Administrator User Guide
System Administrator
© 2004 Apple Computer, Inc. All rights reserved.
189
3. Use the following table to enter information in the fields:
Field
Description
Which Students
Select one of the following options to determine for which
students you want to store standards grades:
•
All students on the system
•
All students at the current school
•
The selected group of students
Store Code
Enter the store code of the grading term for which you want to
store standards grades, such as Q1 or S2.
Storage Method
Select one of the options to indicate whether you want to
retrieve current grades or grades for a particular date range. If
restricting to a date range, enter that range in the fields using
the format mm/dd/yyyy or mm-dd-yyyy. If you do not use this
format, an alert appears. If you submit the date with an
incorrect format, the date field will be submitted as a blank
entry.
Existing Scores
Select one of the options to indicate whether you want to
overwrite previously stored grades for this grading term.
Store these types
Select any combination of the checkboxes to indicate which
types of standards you want to store: National State District or
District System Administrator User Guide
System Administrator
© 2004 Apple Computer, Inc. All rights reserved.
190
Field
Description
types of standards you want to store: National, State, District, or
School.
Only store these
identifiers
Either enter single identifiers to store or leave blank for all.
Identifiers entered here override the type(s) selected for "Store
these types."
4. Click Submit. PowerSchool begins storing grades.
District System Administrator User Guide
System Settings
© 2004 Apple Computer, Inc. All rights reserved.
191
System Settings
Use the System Settings page to access general setting definition functions for your PowerSchool
system. Click the links to modify settings for each feature.
Backups
Specify if you want your PowerSchool server to automatically create daily backups. Alternatively,
manually create a backup instead of using the automatic backup function or prior to performing
certain procedures, such as the end-of-year process.
District System Administrator User Guide
System Settings
© 2004 Apple Computer, Inc. All rights reserved.
192
A backup is a file that contains a copy of all the data on your PowerSchool server at the specified
moment in time. If something or someone corrupts a large amount of data, use the backup to
restore a recent, correct copy of all the data.
How to Automatically Back Up PowerSchool
1. On the start page, choose System from the main menu.
2. Click System Settings. The System Settings page appears.
3. Click Auto Backup. The Automatic Database Backups page appears.
4. Use the following table to enter information in the fields:
Field
Description
Last Successful Backup
The exact date and time of the last backup appears.
Perform Backups Daily At Choose the hour at which you want the system to
automatically back up your data from the pop-up menu.
Because backups usually take up to ten minutes and users
cannot access the server during a backup, it is recommended
that you select a time during the night hours when few people,
if any, are using the system, such as 2 a.m. or 3 a.m.
Number of Backup Sets
To Keep in Each Backup
Folder
Define the number of backup files or days' worth of backups
you want to store in each backup folder. After the system saves
this number of backup files in a folder, the next backup
District System Administrator User Guide
System Settings
© 2004 Apple Computer, Inc. All rights reserved.
193
Field
Description
Folder
automatically overwrites the oldest backup in the folder.
Backup 1, 2, and 3 Paths
Specify the complete file paths where you want the system to
save the backup files. The system usually automatically creates
the Backup 1 path as a location on the primary hard drive of the
system on which PowerSchool runs. You can change this
location or put other locations in the other paths. The system
alternates backup paths on a daily basis. For example, Monday's
backup will go to Backup 1 path, Tuesdays backup will go to
Backup 2 path, and so on.
If you only enter one backup path, PowerSchool backs up to
that location every night. These locations can be other local
storage devices like hard disks or Jaz drives, or they can be
remote file servers.
Email Backup Reports To
Enter the email addresses of the individuals to whom you want
the system to automatically send an email message after it
completes a backup. Usually, you enter the PowerSchool
administrator's address. If you enter more than one address,
separate them with commas.
Restart Server After
Backup
Select either Yes or No to indicate if you want the server to
automatically restart after each backup. Unless PowerSchool
suggests otherwise for your school, select Yes.
5. Click Submit. The System Settings page appears.
How to Manually Backup PowerSchool
Before manually backing up PowerSchool, you must define a backup path on the Automatic
Database Backups page. Otherwise, PowerSchool will not know where to save the backup file. For
more information, see the section "
How to Automatically Backup PowerSchool
."
1. On the start page, choose System from the main menu.
2. Click System Settings. The System Settings page appears.
3. Click Backup PowerSchool. The Confirm Backup page appears.
District System Administrator User Guide
System Settings
© 2004 Apple Computer, Inc. All rights reserved.
194
4. Click Submit. The Alert page appears.
PowerSchool Updates
PowerSchool can automatically update your PowerSchool system with the latest system update.
You do not need to manually maintain the latest version of the system. However, you can manually
force PowerSchool to retrieve the latest update.
Note: When updating PowerSchool, visit the Release Notes on the PowerSchool Customer Support
web site (
https://www.powerschool.com/support/documentation/releasenotes/
) so that
you know how each update changes your system.
How to Set Auto Update Settings
Set up the Auto Update feature to avoid manual updates. If PowerSchool releases an update, your
system automatically updates sometime between 10 p.m. and 6 a.m.
1. On the start page, choose System from the main menu.
2. Click System Settings. The System Settings page appears.
3. Click Auto Update. The Automatic Updating page appears.
District System Administrator User Guide
System Settings
© 2004 Apple Computer, Inc. All rights reserved.
195
4. Use the following table to enter information in the fields:
Field
Description
Automatic Update
Enabled
Select this checkbox to enable automatic updates to your
PowerSchool server.
Update Server Address
Enter the URL of the PowerSchool update server. Contact
PowerSchool for this address.
Port to use for Update
Request
When you implement PowerSchool at your school,
PowerSchool will instruct you to enter a port here, if you need
to use a port other than the default. If you are updating from an
internal server, this port must match the update port defined
on that server's Server Settings page.
To use the default port, leave this field blank.
Maintain Application
Memory Setting
If you are running PowerSchool on an Apple computer and you
customized the PowerSchool application memory setting,
select this checkbox to maintain that memory setting after an
update.
5. Click Submit. The System Settings page appears.
How to Update PowerSchool
The PowerSchool Automatic Updater compares your PowerSchool system's version to the current
release of PowerSchool.
1. On the start page, choose System from the main menu.
District System Administrator User Guide
System Settings
© 2004 Apple Computer, Inc. All rights reserved.
196
2. Click System Settings. The System Settings page appears.
3. Click Update PowerSchool. The PowerSchool Automatic Updater page appears.
If you need to update PowerSchool, see the section "
How to Update Pages
."
How to Update Pages
The Update Pages function forces the system to automatically check the PowerSchool update
server for any updates to pages that your system does not yet include.
1. On the start page, choose System from the main menu.
2. Click System Settings. The System Settings page appears.
3. Click Update Pages. The Confirm Update Pages page appears.
4. Click Submit. The Updating Pages message appears.
Browser Timeout
When connecting to your PowerSchool server via your selected browser, specifically Safari, you
could potentially experience a time-out error. A time-out error occurs when the browser has waited
a certain length of time for some input but has not received it. In order to avoid this interruption,
District System Administrator User Guide
System Settings
© 2004 Apple Computer, Inc. All rights reserved.
197
you can set the Browser Timeout settings to have the PowerSchool server send a "ping" to the
browser so that the time-out error does not occur.
Enable Browser Timeout
To enable this functionality, select the "Connection Monitor Enabled at Startup" checkbox and click
Submit. You must restart your PowerSchool server for the change to take effect.
You can change the values for the other three settings: Connection Monitor applies only to Safari,
Timeout monitor checking interval (seconds), and Timeout threshold (seconds) at any time and click
Submit. Once you click Submit, the changes immediately take effect.
Disable Browser Timeout
To disable this functionality, deselect the "Connection Monitor Enabled at Startup" checkbox and
click Submit. Once you click Submit, restart your PowerSchool server for the change to take effect.
How to Set Browser Timeout
1. On the start page, choose System from the main menu.
2. Click System Settings. The System Settings page appears.
3. Click Browser Timeout. The Browser Timeout page appears.
4. Use the following table to enter information in the fields.
District System Administrator User Guide
System Settings
© 2004 Apple Computer, Inc. All rights reserved.
198
Field
Description
Connection Monitor
Enabled at Startup
In order to avoid possible time-out errors, this checkbox needs
to be selected. To turn off this feature, deselect this checkbox
and restart the PowerSchool Web Server. By default this
checkbox is selected.
Connection Monitor
applies only to Safari
Select this checkbox to apply this feature to Safari only.
Deselect this checkbox to apply this feature to Safari, Netscape,
and Internet Explorer browsers. By default this checkbox is
selected.
Timeout monitor
checking interval
(seconds)
Enter the number of seconds you want the server to check for
open browser connections that are not receiving data from the
server. The default is set to 3 seconds.
Timeout threshold
(seconds)
Enter the number of seconds you want the server to send
communication to the browser in order to keep the connection
to the PowerSchool server open. The default is set to 15
seconds.
5. Click Submit. The Changes Recorded page appears.
CPU Usage
Set CPU settings to adjust the time the system spends on certain operations.
Note: If you are going to use settings other than the default settings, contact PowerSchool
Technical Support to discuss your particular server setup.
How to Set CPU Usage
1. On the start page, choose System from the main menu.
2. Click System Settings. The System Settings page appears.
3. Click CPU Usage. The Server CPU Usage page appears.
District System Administrator User Guide
System Settings
© 2004 Apple Computer, Inc. All rights reserved.
199
4. Use the following table to enter information in the fields.
Note: A tick is equal to 1/60th of a second.
Field
Description
Minimum no. of ticks per
call to the system
Enter the least amount of time (in ticks) that is given to the
system and other applications by the PowerSchool server.
Maximum no. of ticks per
call to the system
Enter the maximum uninterrupted time (in ticks) that is given
to the system and other applications by the PowerSchool
server.
No. of ticks between calls
to the system
Enter the minimum amount of time (in ticks) between
interruptions to the PowerSchool server. The actual amount of
time taken by the system and other applications is determined
by the parameters in the preceding fields.
5. Click Submit. The Changes Recorded page appears.
Email Setup
Use this page to set up email for various PowerSchool functions. The system sends email messages
to PowerSchool users at your school, including teachers and administrators, as well as sends replies
from parents and guardians.
Note: You cannot use PowerSchool to send email messages to other users, parents, or students. The
following procedures refer to system-generated email messages only. Use an external email system
if you want to provide email services for staff, students, and administrators.
How to Set Up Email Addresses
1. On the start page, choose System from the main menu.
2. Click System Settings. The System Settings page appears.
3. Click E-mail Setup. The Email Setup page appears.
District System Administrator User Guide
System Settings
© 2004 Apple Computer, Inc. All rights reserved.
200
4. Use the following table to enter information in the fields:
Field
Description
POP/SMTP Server
Enter your PowerSchool mail server address. Although you can
enter a URL, an IP address is preferred.
Email Address of
PowerSchool Technical
Administrator
Enter your system administrator’s email address.
E-mail From Host For
Mail Generated By
PowerSchool
Enter the domain name that appears after all email addresses at
your school. For example, if your email address is
user@auhsd.ca.us, enter auhsd.ca.us.
Do not enter an IP address.
Reply-To E-mail For
Electronic Progress
Reports Sent To Parents
Enter the email address to which parents can automatically
reply when they receive a progress report via email. You must
set up an account on your mail server that matches this
address.
Additionally, the following account must be set up on your mail
server: powerschool@<yourmailserver>. For example, if your
email address is user@fhs.fuhsd.ca.us, then the account must be
set up as powerschool@fhs.fuhsd.ca.us.
Complete E-mail Address
To Use As The From
Address When Sending
System-Generated E-mail
To Administrators And
Teachers
Enter the email address you want administrators and teachers
to reply to when they receive system-generated email
messages. The system also displays this address as the From
address in an email message. For example, if a student changes
classes in the middle of a semester, the system sends an email
message to the teacher of the class in which the student is
enrolling.
5. Click Submit. The System Settings page appears.
How to Test Email
Use this page to send test email messages in PowerSchool.
1. On the start page, choose System from the main menu.
2. Click System Settings. The System Settings page appears.
3. Click Test E-mail server. The Test Email page appears.
District System Administrator User Guide
System Settings
© 2004 Apple Computer, Inc. All rights reserved.
201
4. Use the following table to enter information in the fields:
Field
Description
From
Enter the email address of the sender of the test email message.
To
Enter the email address of the receiver of the test email
message.
Subject
Enter a description of the test email message.
Message
Enter the text of the test email message.
5. Click Submit. The system sends an email message to the recipient's address and displays an
alert.
How to View the Outgoing Mail Queue
Use this page to view any email messages created by users on your PowerSchool server that are
waiting to be sent. Normally, PowerSchool immediately sends email messages. However,
communication failures cause messages to temporarily reside in the outgoing mail queue.
For each email message, the page displays the recipient's address and the subject. You can only
view this information.
1. On the start page, choose System from the main menu.
2. Click System Settings. The System Settings page appears.
3. Click Outgoing Mail Queue. The Outgoing Mail Queue page displays any unsent email
items.
District System Administrator User Guide
System Settings
© 2004 Apple Computer, Inc. All rights reserved.
202
4. Click the name of a message to view.
MIME Types
PowerSchool uses Multipurpose Internet Mail Extension (MIME) types to enable a user's browser to
display image and text files that are not in HTML format. The MIME type has a type and subtype
separated by a slash, such as image/gif and text/plain. Your PowerSchool server sends the MIME
type to the user's browser so that it can start the appropriate helper application or plug-in.
Important: Do not perform any procedures related to MIME types without the guidance of
PowerSchool Technical Support.
PowerSchool is preconfigured with a number of MIME types. Use this page to add, edit, and delete
MIME types in PowerSchool.
How to Add MIME Types
1. On the start page, choose System from the main menu.
2. Click System Settings. The System Settings page appears.
3. Click Mime Types. The Mime Types page appears.
District System Administrator User Guide
System Settings
© 2004 Apple Computer, Inc. All rights reserved.
203
4. Click New. The Edit Mime Type page appears.
District System Administrator User Guide
System Settings
© 2004 Apple Computer, Inc. All rights reserved.
204
5. Use the following table to enter information in the fields:
Field
Description
Suffix
Enter the file type (extension).
MIME
Enter the MIME type and subtype, separated with a slash (/).
6. Click Submit. The Mime Types page displays the new MIME type.
How to Edit MIME Types
1. On the start page, choose System from the main menu.
2. Click System Settings. The System Settings page appears.
3. Click Mime Types. The Mime Types page appears.
District System Administrator User Guide
System Settings
© 2004 Apple Computer, Inc. All rights reserved.
205
4. Click the MIME type to be edited in the Mime column. The Edit Mime Type page appears.
District System Administrator User Guide
System Settings
© 2004 Apple Computer, Inc. All rights reserved.
206
5. Use the following table to edit information in the fields:
Field
Description
Suffix
Edit the file type (extension).
MIME
Edit the MIME type and subtype, separated with a slash (/).
6. Click Submit. The Mime Types page displays the edited MIME Type.
How to Delete MIME Types
1. On the start page, choose System from the main menu.
2. Click System Settings. The System Settings page appears.
3. Click Mime Types. The Mime Types page appears.
District System Administrator User Guide
System Settings
© 2004 Apple Computer, Inc. All rights reserved.
207
4. Click the MIME type to be deleted in the Mime column. The Edit Mime Type page appears.
District System Administrator User Guide
System Settings
© 2004 Apple Computer, Inc. All rights reserved.
208
5. Click Delete. The Mime Types page displays without the deleted MIME type.
Reporting Engine Settings
Use this page to automatically update your PowerSchool server with the latest state reports.
How to Modify Reporting Engine Settings
1. On the start page, choose System from the main menu.
2. Click System Settings. The System Settings page appears.
3. Click Reporting Engine. The Reporting Engine page appears.
4. Select the Enabled checkbox if you want PowerSchool to automatically update with any
changes to state reports. Otherwise, deselect this checkbox.
5. Click Submit. The Changes Recorded page appears.
System Security
Use this page to modify system-level security settings. The settings relate to the amount of time
that can pass before a PowerSchool or Parent Access user is automatically logged out of the system
due to inactivity. In addition, specify the default security level for a page when no page-specific
security is set. For more information, see the section "
Security
."
How to Set System Security
1. On the start page, choose System from the main menu.
2. Click System Settings. The System Settings page appears.
3. Click Security. The Security Settings page appears.
District System Administrator User Guide
System Settings
© 2004 Apple Computer, Inc. All rights reserved.
209
4. Use the following table to enter information in the fields:
Field
Description
Log out Administrative
Users After This Many
Minutes Of Inactivity
Enter the number of minutes after users have not used the
PowerSchool system that the system automatically logs them
out.
Log out Guardian Users
Off After This Many
Minutes Of Inactivity
Enter the number of minutes after parent or guardian users
have not actively used the Parent Access pages that the system
automatically logs them out.
Unless Specified
Otherwise for an
Individual Screen,
Groups Have This Level
Of Access
Enter a default level of access for all users for individual pages.
For each user group, you can define their level of access on
every PowerSchool page.
5. Click Submit. The System Settings page appears.
Select Student Options
Select up to two fields of information you want to appear next to each student’s name on the
Student Selection page.
District System Administrator User Guide
System Settings
© 2004 Apple Computer, Inc. All rights reserved.
210
For more information, see the section "
Search and Select
."
Note: You can opt to select either one field or no fields to appear next to students' names. To do
this, choose the [blank] option from the pop-up menu.
How to Modify Select Student Options
1. On the start page, choose System from the main menu.
2. Click System Settings. The System Settings page appears.
3. Click Select Student Options. The Select Student Options page appears.
District System Administrator User Guide
System Settings
© 2004 Apple Computer, Inc. All rights reserved.
211
4. Use the following table to enter information in the fields:
Field
Description
Include Option 1
Choose an option from the pop-up menu:
•
[Blank]
•
Student Number
•
Social Security Number (SSN)
•
Date of Birth
•
Grade Level
Include Option 2
Choose an option from the pop-up menu:
•
[Blank]
•
Student Number
•
Social Security Number (SSN)
•
Date of Birth
•
Grade Level
5. Click Submit. The Select Student Options page displays the modifications.
Server Licensing
The PowerSchool server includes software licensing in the form of a server licensing key. During
deployment, PowerSchool provides each customer with a server licensing key tied to the server's
district customer number. The licensing key enforces a number of items, including the platform,
maximum number of schools and students, and expiration dates.
District System Administrator User Guide
System Settings
© 2004 Apple Computer, Inc. All rights reserved.
212
How to Enter the Server License Key
There are two ways to enter a server licensing key: from the server and from the Server Licensing
page in PowerSchool. Enter the licensing key from the server during your initial implementation or
when a licensing key becomes invalid. Use the Server Licensing page in PowerSchool to enter the
initial licensing key for upgrading customers or whenever a new licensing key is required.
1. On the start page, choose System from the main menu.
2. Click System Settings. The System Settings page appears.
3. Click Server Licensing. The Server Licensing page appears.
4. Enter the license key provided by PowerSchool in the License Key field.
5. Click Submit. The server license key is saved.
If the licensing key is valid, the Licensing Settings section displays the licensing information.
If the licensing key is for a beta version, expires, or is tied to a specific version of
PowerSchool Server, that information appears at the bottom in red.
If the licensing key is invalid, does not match, or exceeds the licensing settings, that
information also appears in red.
The next time PowerSchool Server is started, a dialog appears on the server computer and
requests a valid licensing number. PowerSchool Server will not function without a valid
licensing key.
Server Settings
Server settings relate specifically to the computer that runs the PowerSchool application. Use this
page to set the Internet Protocol (IP) address for the PowerSchool server and the ports used for
communication. The fields that appear on the Server Settings page will vary if your server runs on
Mac OS X or is configured as an update server.
For more information on server settings, see the section "
Server Settings Information
."
District System Administrator User Guide
System Settings
© 2004 Apple Computer, Inc. All rights reserved.
213
How to Modify Server Settings
1. On the start page, choose System from the main menu. The System Administrator page
appears.
2. Click System Settings. The System Settings page appears.
3. Click Server Settings. The Server Settings page appears.
Note: The Update Server Settings section appears only if the server has been configured as
a master update server.
4. Note the Internet Settings section.
5. Use the following table to enter information in the fields in the Internet Settings section:
Field
Description
Domain Name (DNS) or
IP Address
The DNS or IP address of your dedicated PowerSchool server.
Note: Do not modify this information.
Bypass DNS validation of
IP Address
Indicates whether or not to skip the process of validating the
DNS entry. The default is disabled.
Note: Do not modify this information.
6. Note the Web Server Settings section.
7. Use the following table to enter information in the fields in the Web Server Settings section:
Note: The "Redirect using OS" checkbox appears only if your PowerSchool server runs on
Mac OS X.
Field
Description
Web Port
The port on the server used for the web server. The default is
80 which is used for HTTP traffic
District System Administrator User Guide
System Settings
© 2004 Apple Computer, Inc. All rights reserved.
214
Field
Description
80, which is used for HTTP traffic.
Note: Do not modify this information.
If you are running your PowerSchool server on Mac OS X, the
"Redirect using OS" checkbox appears. Select this checkbox to
redirect communication to the port number specified. It is likely
that you log in to the PowerSchool server using an
administrator account, which means that you cannot access
ports with a number less than 1024. Therefore, you can redirect
ports such as port 80 to port 8080. Selecting this checkbox sets
IP forwarding rules for this redirection using the password set in
the Mac OS X administrator field.
SSL
Select this checkbox if you want to enable the SSL connection,
which is strong encryption of information sent to and from the
server. Otherwise, deselect this checkbox to disable the SSL
connection. The default is disabled.
SSL Web Port
If SSL is enabled, enter the port on the web server used for the
SSL connection. The default is 443.
If you are running your PowerSchool server on Mac OS X, the
"Redirect using OS" checkbox appears. Select this checkbox to
redirect communication to the port number specified. It is likely
that you log in to the PowerSchool server using an
administrator account, which means that you cannot access
ports with a number less than 1024. Therefore, you can redirect
ports such as port 443 to port 8443. Selecting this checkbox
sets IP forwarding rules for this redirection using the password
set in the Mac OS X administrator field.
Number of Listens
The maximum number of listens for requests from the web
server. Listening refers to the server receiving page requests
from clients and then replying with the contents of the
requested page. The default is 30.
Note: It's OK to modify this information.
8. Note the PowerGrade Settings section.
District System Administrator User Guide
System Settings
© 2004 Apple Computer, Inc. All rights reserved.
215
9. Use the following table to enter information in the fields in the PowerGrade Settings
section:
Field
Description
Port
The port on the server used for the PowerGrade. The default is
80, though many others use 5071.
SSL
Select this checkbox if you want to enable the SSL connection,
which is strong encryption of information sent to and from the
server. Otherwise, deselect this checkbox to disable the SSL
connection. The default is disabled.
Number of Listens
The maximum number of listens for requests from PowerGrade.
Listening refers to the server receiving page requests from
clients and then replying with the contents of the requested
page. The default is 30.
Note: It's OK to modify this information.
10. Note the SSL Settings and Advanced SSL Web Settings sections.
11. Use the following table to enter information in the fields in the SSL Settings and Advanced
SSL Web Settings sections:
Field
Description
Private Key Password
The password used by the server when transmitting secure SSL
communication. The password must be at least 4 characters.
Number of Redirect
Listens
The number of listens for redirecting unsecured hits to an SSL
connection. The default is 10.
Note: It's OK to modify this information.
District System Administrator User Guide
System Settings
© 2004 Apple Computer, Inc. All rights reserved.
216
Field
Description
Use mixed content with
SSL
Indicates whether or not to optimize performance by
minimizing the data that requires SSL encryption. By using the
advanced settings when SSL for web is enabled, all images from
PowerSchool Server will be sent on port 80, an unsecured
connection. Images include JPG, GIF, and ICO files. All other
data is handled on the SSL connection. Older web browsers,
such as Netscape 4.7, do not support mixed content
connections.
Note: It's OK to modify this information.
Number of SSL Listens
If mixed content is enabled, the number of listens for each port
can be set independently. The number of listens on port 443.
The default is 30.
Note: It's OK to modify this information.
Number of Non-SSL
Listens
If mixed content is enabled, the number of listens for each port
can be set independently. The number of listens on port 80.
The default is 10.
Note: It's OK to modify this information.
12. Note the Update Server Settings section.
13. Use the following table to enter information in the fields in the Update Server Settings
section:
Note: This section appears only if the server has been configured as a master update server.
Field
Description
SSL
SSL is disabled for updating.
Port
The port on the server used for the server update. The default is
port 80. The server updates.powerschool.com uses port 80 only.
Note: Only enter a value if this server is acting as an internal
update server. If so, you must also specify this same port on the
servers being updated from their Auto Update page.
District System Administrator User Guide
System Settings
© 2004 Apple Computer, Inc. All rights reserved.
217
Field
Description
Number of Listens
The maximum number of listens to dedicate to requests for
server updates. The default is 10.
Note: It's OK to modify this information.
14. Note the Performance Settings and Advanced Settings sections.
15. Use the following table to enter information in the fields in the Performance Settings and
Advanced Settings sections:
Note: The Mac OS X Administrator Password field appears only if your PowerSchool server
runs on Mac OS X.
Field
Description
Number of Handlers
The number of handlers. When user-caused events occur,
handlers carry out the requested task. The default is 30.
Note: It's OK to modify this information.
Mac OS X Administrator
Password
If your PowerSchool server runs on Mac OS X, enter the
password for the Mac OS X Administrator account. This
password is used by PowerSchool to set IP forwarding rules (see
"
Web Server Settings
") and ensure you are able to read,
write, and execute all files in the main PowerSchool directory.
For more information, see the section "
How to Set File
Permissions
."
16. Click Submit. The server resets.
How to Set File Permissions
The following information applies only if your PowerSchool server runs on Mac OS X.
Only by providing to your PowerSchool server a Mac OS X administrator password can you ensure
the ability to set permissions for all files in the main PowerSchool directory and set IP forwarding
rules.
District System Administrator User Guide
System Settings
© 2004 Apple Computer, Inc. All rights reserved.
218
Setting file permissions does not necessarily require a Mac OS X administrator password. However,
if a file's permissions cannot be set by the account under which PowerSchool is running and this
account does not have the proper permissions to the file, PowerSchool will not be able to use the
file. For example, this can happen when the extension of a remote access application (such as
Timbuktu) is running as root and is used to copy a file to the PowerSchool directory. Also, you must
enter your Mac OS X administrator password if you use IP forwarding. For more information on IP
forwarding, see the section “
Web Server Settings
.”
Note: The Mac OS X Administrator Password field on the File Permission Settings page has the
same purpose as the field of the same name on the Server Settings page. If you set the password
on one of the two pages, the password is set on the other.
1. On the start page, choose System from the main menu. The System Administrator page
appears.
2. Click System Settings. The System Settings page appears.
Note: The Mac OS X File Permission Settings link appears only if your PowerSchool server
runs on Mac OS X.
3. Click Mac OS X File Permission Settings. The File Permission Settings page appears.
4. Use the following table to enter information in the fields:
Field
Description
Execute as root
Select this checkbox to ensure that the PowerSchool server
application has the highest level of permission on your server
by operating under the root user in Mac OS X. It is
recommended that you select this checkbox.
If you deselect this checkbox, the Mac OS X Administrator
Password field entry is ignored and you cannot use IP
forwarding. It is then your responsibility to ensure that the
account under which PowerSchool is running can properly set
file permissions.
District System Administrator User Guide
System Settings
© 2004 Apple Computer, Inc. All rights reserved.
219
Field
Description
Mac OS X Administrator
Password
If your PowerSchool server runs on Mac OS X, enter the
password for the Mac OS X Administrator account. This
password is used by PowerSchool to set IP forwarding rules (see
"
Web Server Settings
") and ensure you are able to read,
write, and execute all files in the main PowerSchool directory.
5. Click Submit. The Changes Recorded page appears.
Server Settings Information
PowerSchool manages handlers and listens based on specifications made on the Server Settings
page. In addition to details related to handlers and listens, the following section discusses the
internal minimums, maximums, and defaults for PowerSchool server settings.
Handlers are the processes responsible for handling hits, which are requests for page items. A hit
can come from a web browser, PowerGrade, or another PowerSchool server.
Listens receive hits. Once a hit is received, the listen status changes from idle to active. A single
main process loops through each listen and checks its status. Once a listen's status is active, the
main process wakes up an available handler and assigns it the active listen. The handler then
processes the hit. When the hit is complete, the listen is stopped, or killed, the handler goes idle
until needed again, and a new listen is created to replace the one killed.
On the Server Settings page, there are three types of listens: web, PowerGrade, and update server.
There is also a field for setting the number of handlers. The default numbers for each are specified
on the page. However, the relationship of handlers to listens and the minimum and maximum
number that PowerSchool uses for each listen are not specified.
Listen
Min
Max
Default
Web
30
500
30
PowerGrade
0
450
10
Update
0
500
10 if an update
server; otherwise, 0
The maximum total listens—all the listens combined—is 500. The maximum number of handlers is
200. The number of handlers the system will use is no more than the total number of listens, since it
is not necessary to have more handlers than things to handle. However, the number of listens can
be greater than the number of handlers. If there are no handlers available to handle an active listen,
the listen will go into a queue and wait for a handler to become available.
If SSL is configured (meaning that it may or may not be enabled, but it can open secured listens
because the security certificate, private key, and optional password are valid), web redirect listens
are created. If SSL is enabled, the web redirect uses port 80. If SSL is disabled, the web redirect uses
port 443. The following table identifies the web redirect numbers:
District System Administrator User Guide
System Settings
© 2004 Apple Computer, Inc. All rights reserved.
220
Listen
Min
Max
Default
Web Redirect
0
20
10
If SSL is not configured (meaning that the SSL setup is not valid), no web redirect listens are
created. If SSL Mixed Content is enabled, the main web listens are ignored and the numbers are as
follows:
Listen
Min
Max
Default
Mixed SSL
30
470
30
Mixed Unsecured
10
470
10
The following table identifies the servers and their ports:
Server
Default
Web
80
Web SSL
443
Web Redirect (SSL enabled)
80
Web Redirect (SSL configured but not enabled)
443
PowerGrade
80
PowerGrade SSL (future functionality)
5072
Update
80
Mixed SSL
443
Mixed Unsecured
80
With SSL disabled, you can actually use both the web and PowerGrade ports to respond to all hits.
However, with SSL enabled, a web hit will only respond on port 443; if it is a redirect or has mixed
content, the web hit also uses port 80. If SSL is enabled, PowerGrade hits will only respond on the
port specified, but not on port 443. PowerGrade SSL is a future functionality.
Server Statistics
Use this page to view information related to your PowerSchool server. The page is divided into the
following sections:
•
Server Info: Displays your server’s basic information
•
Schools: Displays information about each school on this server
District System Administrator User Guide
System Settings
© 2004 Apple Computer, Inc. All rights reserved.
221
•
Memory: Displays the amount of memory on your server by memory type
•
PowerSchool Volume: Displays the size and location of the PowerSchool system on your
server
•
Users: Displays the number of users currently logged in to the system and any disabled user
IP addresses
•
Listens: Displays the information related to receiving hits
•
Handlers: Displays handler information
•
Streams: Displays the status of the communication between PowerSchool and PowerGrade
•
Hits: Displays the number of page item requests by user type, including web pages and
images
•
Processes: Displays the status of all the services on the server
•
Data: Displays the number of active schools, students, staff members, and courses
•
Tables: Displays each PowerSchool table name and the number of records in each
For more information on handlers, listens, hits, and ports, see the section "
Server Settings
Information
."
How to View Server Statistics
1. On the start page, choose System from the main menu.
2. Click System Settings. The System Settings page appears.
3. Click Server Statistics. The Server Statistics page appears.
4. Use the following table to understand the information in the Server Info section:
District System Administrator User Guide
System Settings
© 2004 Apple Computer, Inc. All rights reserved.
222
Field
Description
District Name
Name of the district used in your system.
Customer Support
Number
Number used to identify your PowerSchool system to
PowerSchool Technical Support.
PowerSchool Version
Current version and build number of the PowerSchool system.
Date and Time
Current system date and time.
Updating From This
Server
Indicates if updating PowerSchool is possible from this server.
Machine Name
Network name of server.
Platform
Hardware system used to run PowerSchool.
Operating System
Name of the operating system used on the server. An operating
system is a program that controls the hardware and application
programs on a computer.
Server Location
Internet or network location of the server, expressed as either
an IP address or URL.
Primary IP Address
IP address of your PowerSchool system on the server.
Machine Uptime
Amount of time the server has run since the last time it was
restarted.
PowerSchool Uptime
Amount of time the PowerSchool system has run since the last
time it was restarted.
5. Note the Schools section.
6. Use the following table to understand the information in the Schools section:
Field
Description
School Name
Name of the schools on the system.
District System Administrator User Guide
System Settings
© 2004 Apple Computer, Inc. All rights reserved.
223
Field
Description
School Number
School number assigned to each school.
Note: For more information, see the section "
School
Numbers
."
Grade Range
Range of grade levels for each school.
Number of Active
Students
Current number of enrolled students at each school.
7. Note the Memory section.
8. Use the following table to understand the information in the Memory section:
Field
Description
Installed RAM
Number of bytes of random access memory (RAM) installed on
the server.
Virtual Memory
Number of bytes of hard drive space used to supplement the
server's memory capacity.
PowerSchool Free
Memory
Number of bytes of memory that are available to run
PowerSchool.
9. Note the PowerSchool Volume section.
10. Use the following table to understand the information in the PowerSchool Volume section:
Field
Description
Installed Path
Path of the PowerSchool root directory.
District System Administrator User Guide
System Settings
© 2004 Apple Computer, Inc. All rights reserved.
224
Field
Description
Volume Size
Number of bytes of storage on the server.
Used Space
Current number of used bytes of storage on the server.
Free Space
Current number of available bytes of storage on the server.
Data File Path
Name and path of file used to store PowerSchool data.
Data File Size
Current size of the PowerSchool data file.
Buffers Last Flushed
Last date and time the buffers were purged. A buffer is a
holding area (usually in RAM) used by the central processing
unit (CPU) to process data before transferring it to a storage
device.
11. Note the Users section.
12. Use the following table to understand the information in the Users section:
Field
Description
Currently Connected
Users
Number of users currently logged on to PowerSchool. Click the
number to view the users' usernames and IP addresses.
Highest Number of Users
Today
Highest number of users logged in to PowerSchool at any time
today.
Disabled IP Addresses
Number of IP addresses disabled due to multiple failed login
attempts. For more information, see the section "
Login
Attempts Restrictions
."
13. Note the Listens section.
District System Administrator User Guide
System Settings
© 2004 Apple Computer, Inc. All rights reserved.
225
14. Use the following table to understand the information in the Listens section:
Field
Description
Busy Listens
Current number of listens that respond as busy.
Highest Number of Busy
Listens
The busiest listens at any time today.
Maximum Listens
Setting for the maximum number of listens. For more
information, see the section "
Server Settings
."
Web Port Number/SSL
Status
Setting for the number of listens dedicated to the web port.
Web Redirect Port
Number
Setting for the number of listens dedicated to redirecting web
hits between SSL and Non-SSL ports.
Web Mixed Content SSL
Port 443
Setting for the number of listens dedicated to web SSL hits
when Mixed Content is enabled.
Web Mixed Content Non
SSL Port 80
Setting for the number of listens dedicated to web Non-SSL hits
when Mixed Content is enabled.
PowerGrade Port
Number
Setting for the number of listens dedicated to the PowerGrade
port.
Update Server Port
Number
Setting for the number of listens dedicated to the Update
Server port. This port is only applicable when the server has
been set up as a master update server.
15. Note the Handlers section.
District System Administrator User Guide
System Settings
© 2004 Apple Computer, Inc. All rights reserved.
226
16. Use the following table to understand the information in the Handlers section:
Field
Description
Busy Handlers
Current number of handlers that respond as busy. Click the
number to view the handlers and their statuses, which user
accounts are using the handlers, and for how long the handler
has been busy processing a hit. The Check Handlers page
appears.
Highest Number of Busy
Handlers
The most busy handlers at any time today.
Maximum Handlers
Setting for the maximum number of handlers. For more
information, see the section "
Server Settings
."
17. Note the Streams section.
18. Use the following table to understand the information in the Streams section:
Field
Description
Current Stream
Click Stream Status to view the status of the data stream
between PowerSchool and a client. The Check Streams page
District System Administrator User Guide
System Settings
© 2004 Apple Computer, Inc. All rights reserved.
227
Field
Description
appears.
Current PowerGrade
Connections
Current number of users sending or receiving information
between PowerGrade and PowerSchool.
Bytes Sent Since Last
Restart
Number of bytes sent since the last time the server was
restarted.
Bytes Received Since Last
Restart
Number of bytes received since the last time the server was
restarted.
19. Note the Hits section.
20. Use the following table to understand the information in the Hits section:
Field
Description
Total Hits
Number of hits or file requests made to PowerSchool since
installed.
Hits today
Number of hits made to PowerSchool so far today.
Admin Hits Today
Number of hits made to the PowerSchool Administration pages
so far today.
Teacher/Sub Hits Today
Number of hits made to the PowerSchool Teacher or the
Substitute Teacher pages so far today.
District System Administrator User Guide
System Settings
© 2004 Apple Computer, Inc. All rights reserved.
228
Field
Description
Guardian Hits Today
Number of hits made to the PowerSchool Parent Access pages
under a parent or guardian username so far today.
Student Hits Today
Number of hits made to the PowerSchool Parent Access pages
under a student username so far today.
Portal Hits Today
Number of hits made to the PowerSchool Parent Access pages
so far today.
Current Queued Hits
Number of current hits that are waiting for a response from
PowerSchool.
Highest Queued Hits
Today
The most queued hits at any time today.
21. Note the Processes section.
22. Use the following table to understand the information in the Processes section:
Field
Description
Task Server
Indicates if the Task Server is running or not.
Web Server
Indicates if the Web Server is running or not.
Communication Server
Indicates if the Communication Server is running or not.
PowerLink
Indicates if PowerLink is running or not.
Log Process
Indicates if the Log Process is running or not.
23. Note the Data section.
District System Administrator User Guide
System Settings
© 2004 Apple Computer, Inc. All rights reserved.
229
24. Use the following table to understand the information in the Data section:
Field
Description
Schools on Server
Number of schools on the server.
Active Students on
Server
Number of students enrolled at all schools on the server.
Active Staff on Server
Number of current staff members at all schools on the server.
Courses on Server
Number of courses at all schools on the server.
25. Note the Tables section.
26. Use the following table to understand the information in the Tables section:
Field
Description
Table Name (number)
Name of the table.
Records
Number of records in the table. Click the number next to the
table to run the Direct Database Export for that table. The
Direct Database Export (DDE) page appears.
District System Administrator User Guide
System Settings
© 2004 Apple Computer, Inc. All rights reserved.
230
Field
Description
For more information, see the section "
Direct Database
Export
."
Server Tools
Server tools include the ability to automatically ping the server to confirm the server's availability.
How to Use Server Tools
1. On the start page, choose System from the main menu.
2. Click System Settings. The System Settings page appears.
3. Click Server Tools. The Server Tools page appears.
4. Use the following table to enter information in the field:
Field
Description
Auto Ping Every 5 Mins.
Select this checkbox to try reaching your server every five
minutes. This checkbox is typically selected when you want to
make sure your server is running and available and when
troubleshooting.
5. Click Submit. The server tools are either active or inactive, depending on your selection.
District System Administrator User Guide
System Settings
© 2004 Apple Computer, Inc. All rights reserved.
231
System Styles
System styles are used when creating custom reports. They include font, font size, and alignment.
Use this page to add styles, edit styles, and set style defaults.
Fonts are an important part of how your custom reports look. Perhaps you like report titles to be in
large, bold, capital letters. Or perhaps you prefer that footer text be small and italicized.
PowerSchool provides several styles you can use so that you don't have to set these preferences
each time. Or create new styles according to your own preferences and needs. If you do not want
to create styles at this point, you can still create reports. For more information, see the section
"
Report Cards
."
How to Add Styles
1. On the start page, choose System from the main menu.
2. Click System Settings. The System Settings page appears.
3. Click Styles. The Styles page appears.
4. Click New. The "Edit a Style Definition" page appears.
District System Administrator User Guide
System Settings
© 2004 Apple Computer, Inc. All rights reserved.
232
5. Use the following table to enter information in the fields:
Field
Description
Style Name
Enter the name of the style.
Font
Choose a font from the pop-up menu.
Font Style
Select any combination of the three style checkboxes:
•
Bold
•
Italic
•
Underline
Font Size
Enter the font size in points.
Note: One point is 1/72 of an inch.
Line Height
Enter the height of each line in a paragraph in points.
Note: One point is 1/72 of an inch.
Alignment
Choose the paragraph alignment from the pop-up menu:
•
Default
•
Left
•
Center
•
Right
District System Administrator User Guide
System Settings
© 2004 Apple Computer, Inc. All rights reserved.
233
Field
Description
Use This As The Default
System Style
Use the pop-up menu to choose Yes if you want the system to
apply this font to all reports, unless you specify a different font
when you create a report. Otherwise, choose No.
6. Click Submit. The Styles page displays the new style.
How to Edit Styles
1. On the start page, choose System from the main menu.
2. Click System Settings. The System Settings page appears.
3. Click Styles. The Styles page appears.
District System Administrator User Guide
System Settings
© 2004 Apple Computer, Inc. All rights reserved.
234
4. Click the style to be edited. The "Edit a Style Definition" page appears.
5. Use the following table to enter information in the fields:
Field
Description
Style Name
Edit the name of the style.
Font
Choose a font from the pop-up menu.
Font Style
Select any combination of the three style checkboxes:
District System Administrator User Guide
System Settings
© 2004 Apple Computer, Inc. All rights reserved.
235
Field
Description
•
Bold
•
Italic
•
Underline
Font Size
Edit the font size in points.
Note: One point is 1/72 of an inch.
Line Height
Edit the height of each line in a paragraph in points.
Note: One point is 1/72 of an inch.
Alignment
Choose the paragraph alignment from the pop-up menu:
•
Default
•
Left
•
Center
•
Right
Use This As The Default
System Style
Use the pop-up menu to choose Yes if you want the system to
apply this font to all reports, unless you specify a different font
when you create a report. Otherwise, choose No.
6. Click Submit. The Styles page displays the edited style.
District System Administrator User Guide
District Setup
© 2004 Apple Computer, Inc. All rights reserved.
236
District Setup
General
Calendar Membership Types
Define calendar membership types before setting up the school calendar. Assign them to days on
your school calendar. For example, create a Holiday calendar membership type to assign to
holidays. Calendar membership types are for informational use only and do not affect attendance
calculations.
To perform any of the following procedures, you must first switch schools to the district office. See
the section "
How to Change Schools
."
How to Add a Calendar Membership Type
1. On the start page, choose District from the main menu.
2. Click Calendar Membership Types. The Calendar Membership Types page appears.
3. Click New. The Edit Calendar Membership Type page appears.
District System Administrator User Guide
District Setup
© 2004 Apple Computer, Inc. All rights reserved.
237
4. Use the following table to enter information in the fields:
Field
Description
Code
Enter a code for the membership type.
Meaning
Enter a description of the code.
5. Click Submit. The Calendar Membership Types page displays the new membership type.
How to Edit a Calendar Membership Type
1. On the start page, choose District from the main menu.
2. Click Calendar Membership Types. The Calendar Membership Types page appears.
District System Administrator User Guide
District Setup
© 2004 Apple Computer, Inc. All rights reserved.
238
3. Click the link in either the code or meaning column for the membership type to be edited.
The Edit Calendar Membership Type page appears.
4. Use the following table to edit information in the fields:
Field
Description
Code
Edit the code for the membership type.
Meaning
Edit the description of the code.
5. Click Submit. The Calendar Membership Types page displays the edited membership type.
District System Administrator User Guide
District Setup
© 2004 Apple Computer, Inc. All rights reserved.
239
How to Delete a Calendar Membership Type
1. On the start page, choose District from the main menu.
2. Click Calendar Membership Types. The Calendar Membership Types page appears.
3. Click the link in either the code or meaning column for the membership type to be deleted.
The Edit Calendar Membership Type page appears.
District System Administrator User Guide
District Setup
© 2004 Apple Computer, Inc. All rights reserved.
240
4. Click Delete. The Calendar Membership Types page displays without the deleted
membership type.
Citizenship Codes
Use this page to create, view, edit, or delete citizenship codes used when grading students.
How to Add a Citizenship Code
You must log in to the district office before performing this procedure.
1. On the start page, choose District from the main menu.
2. Click Citizenship Codes. The Citizenship Codes page appears.
District System Administrator User Guide
District Setup
© 2004 Apple Computer, Inc. All rights reserved.
241
3. Click New. The Edit Citizenship Code page appears.
4. Use the following table to enter information in the fields:
Field
Description
Code
Enter the citizenship code.
Description
Enter a description for the citizenship code.
Sort order for display
Use the pop-up menu to choose the sort order to appear on
the Citizenship Codes page.
5. Click Submit. The Citizenship Codes page displays the new citizenship code.
District System Administrator User Guide
District Setup
© 2004 Apple Computer, Inc. All rights reserved.
242
How to Edit a Citizenship Code
You must log in to the district office before performing this procedure.
1. On the start page, choose District from the main menu.
2. Click Citizenship Codes. The Citizenship Codes page appears.
3. Click either the code or the description of the citizenship code to be edited. The Edit
Citizenship Code page appears.
District System Administrator User Guide
District Setup
© 2004 Apple Computer, Inc. All rights reserved.
243
4. Use the following table to edit information in the fields:
Field
Description
Code
Edit the citizenship code.
Description
Edit a description for the citizenship code.
Sort order for display
Use the pop-up menu to choose the sort order to appear on
the Citizenship Codes page.
5. Click Submit. The Citizenship Codes page displays the edited citizenship code.
District System Administrator User Guide
District Setup
© 2004 Apple Computer, Inc. All rights reserved.
244
How to Delete a Citizenship Code
You must log in to the district office before performing this procedure.
1. On the start page, choose District from the main menu.
2. Click Citizenship Codes. The Citizenship Codes page appears.
3. Click either the code or the description of the citizenship code to be deleted. The Edit
Citizenship Code page appears.
4. Click Delete. The Selection Deleted page appears.
District System Administrator User Guide
District Setup
© 2004 Apple Computer, Inc. All rights reserved.
245
Master Course List
The master course list displays all the active courses for your school. To view sections of courses, see
the section "
Sections
."
How to View the Master Course List
The master course list displays all courses for the selected school(s). Asterisks (*) next to course
names indicate associated course fees.
1. On the start page, choose District from the main menu. The District Setup page appears.
2. Click Courses. The Courses page appears.
3. Click View Master Course List from the courses menu. The Master Course List page appears.
4. Use this page to do any of the following:
•
Click Course Number to sort the list of courses by number.
District System Administrator User Guide
District Setup
© 2004 Apple Computer, Inc. All rights reserved.
246
•
Click Course Name to sort the list of courses by name.
•
Click Active Status on the Master Course List page to sort the list of courses by either
active or inactive status.
•
Click the name of a course in the courses menu to view course details and edit
course information.
How to Add a Course to the Master Course List
Courses are created at the district level and then associated with individual schools. To associate a
course with a school, see the section "
How to Edit Course Status
." You must first log in to the
district office before performing this procedure.
1. On the start page, choose District from the main menu. The District Setup page appears.
2. Click Courses. The Courses page appears.
3. Click View Master Course List from the courses menu. The Master Course List page appears.
District System Administrator User Guide
District Setup
© 2004 Apple Computer, Inc. All rights reserved.
247
4. Click New. The New Course page appears.
5. Use the following table to enter information in the fields:
Field
Description
Course Name
The name of the course appears.
Course Number
The number used to identify the course appears.
Alternate Course
Number
An additional number used to identify the course appears.
Credit Hours
The number of credits a student receives for taking the course
appears.
CIP Code
In some states, schools use CIP codes to identify courses as part
of a state-managed vocational program.
Vocational Class
Select this checkbox if the course is a vocational class.
District System Administrator User Guide
District Setup
© 2004 Apple Computer, Inc. All rights reserved.
248
Field
Description
Credit Type
Enter the type of credit a student receives for passing this
course, such as standard, advanced, or remedial. You can then
apply this credit to a graduation type.
Default Maximum
Enrollment
The maximum number of students who can be enrolled in this
course appears.
Prerequisite Courses
The course number(s) that students must complete with a
passing grade before they can take this course appear. Separate
multiple courses with commas.
Note: When you enroll a student in a course, the system does
not automatically check if the student completed the
prerequisite courses you enter here. The user enrolling the
student must manually reference and research the information.
PowerLink (English)
PowerLink reads course-related text entered here when parents
and guardians access student information and select the
English option.
PowerLink (Español)
PowerLink reads course-related text entered here when parents
and guardians access student information and select the
Spanish option.
Gradescale
Choose the grade scale from the Gradescale pop-up menu. For
more information, see the section "
How to Assign Grade
Scales to Courses
."
GPA Added Value Points
Enter any added value for the grade points, such as 1 for one
additional grade point. You can also use fractions of a point.
Most schools do not enter added values.
Exclude from GPA?
Select the option to either include or exclude the grade from
the GPA calculation.
Exclude from Class Rank? Select the option to either include or exclude the grade from
the class rank calculation.
Exclude from Honor Roll? Select the option to either include or exclude the grade from
the honor roll calculation.
Use the Course for Lunch Select this checkbox to use all sections of this course for lunch.
Otherwise, leave blank.
Exclude on Report
Cards/Transcripts
Select this checkbox to exclude all sections of this course from
appearing on Report Cards/Transcripts. Otherwise, leave blank.
District System Administrator User Guide
District Setup
© 2004 Apple Computer, Inc. All rights reserved.
249
6. Click Submit. The new course appears on the master course list.
How to Edit Course Information
You can edit course information at the school or district level. To edit a course at the district level,
log in to the district office and click District. Continue with Step 2 below.
1. On the start page, choose School from the main menu. The School Setup page appears.
2. Click Courses. The Courses page appears.
3. Choose the name of the course from the courses menu. The Edit Course page appears. Note
that the page is divided into four functional areas: District, Fees, Scheduling, and
Relationships. By default, the District tab is selected.
District System Administrator User Guide
District Setup
© 2004 Apple Computer, Inc. All rights reserved.
250
4. Use the following table to enter information in the fields:
Field
Description
Course Name
The name of the course appears.
Course Number
The number used to identify the course appears.
Course Name
Edit the name of the course.
District System Administrator User Guide
District Setup
© 2004 Apple Computer, Inc. All rights reserved.
251
Field
Description
Alternate Course
Number
An additional number used to identify the course appears.
Credit Hours
The number of credits a student receives for taking the course
appears.
CIP Code
In some states, schools use CIP codes to identify courses as part
of a state-managed vocational program.
Vocational Class
Select this checkbox if the course is a vocational class.
Credit Type
Edit the type of credit a student receives for passing this course,
such as standard, advanced, or remedial. You can then apply
this credit to a graduation type.
Default Maximum
Enrollment
Edit the maximum number of students who can be enrolled in
this course.
Department
Click Associate to select the department for this course.
Note: Click Department to create or edit departments at your
school.
Subject Area
Edit the subject area for the course.
Prerequisite Courses
The course number(s) that students must complete with a
passing grade before they can take this course appear. Separate
multiple courses with commas.
Note: When you enroll a student in a course, the system does
not automatically check if the student completed the
prerequisite courses you enter here. The user enrolling the
student must manually reference and research the information.
PowerLink (English)
PowerLink reads course-related text entered here when parents
and guardians access student information and select the
English option.
PowerLink (Español)
PowerLink reads course-related text entered here when parents
and guardians access student information and select the
Spanish option.
Grade Scale
Choose the grade scale from the Grade Scale pop-up menu. For
more information, see the section "
How to Assign Grade
Scales to Courses
."
District System Administrator User Guide
District Setup
© 2004 Apple Computer, Inc. All rights reserved.
252
Field
Description
Exclude from Attendance Select this checkbox if you do not want attendance and
enrollment in this section to be counted towards any ADA/ADM
calculations. Otherwise, leave blank.
GPA Added Value Points
Enter any added value for the grade points, such as 1 for one
additional grade point. You can also use fractions of a point.
Most schools do not enter added values.
Exclude from GPA?
Select the option to either include or exclude the grade from
the GPA calculation.
Exclude from Class Rank? Select the option to either include or exclude the grade from
the class rank calculation.
Exclude from Honor Roll? Select the option to either include or exclude the grade from
the honor roll calculation.
Use the Course for Lunch Select this checkbox to use all sections of this course for lunch.
Otherwise, leave blank.
Exclude on Report
Cards/Transcripts
Select this checkbox to exclude all sections of this course from
appearing on Report Cards/Transcripts. Otherwise, leave blank.
5. Click the Fees tab to access the Edit Course Enrollment Fees page.
Note: For more information on course fees, see the section "
Course Enrollment Fees
."
6. Click the Scheduling tab to access the Edit Course Scheduling Information page. This page
displays course-specific scheduling information used by the scheduling engine when
building a student's schedule. This information is either captured as part of the
PowerScheduler commit process or can be manually defined using this page.
7. Use the following table to enter information in the fields:
Field
Description
Allow Student Repeat in
Same Term
Select this checkbox to allow the system to schedule a student
in more than one section of this course in the same term. For
example, occasionally students need to double-up on a course
within the same term. This is usually done for elective courses,
such as Work Release.
Allow Student Repeat in
Different Term
Select this checkbox to allow the system to schedule a student
in more than one section of this course in different terms. Use
this option for either academic or elective courses.
Load Priority
Enter a numerical value of 1 to 99 (1 being the highest priority)
to prioritize in which course the system should schedule a
District System Administrator User Guide
District Setup
© 2004 Apple Computer, Inc. All rights reserved.
253
Field
Description
student when a conflict between two of the student's requests
arises. You can enter the same load priority number for several
courses. For example, enter a load priority of 10 for all academic
courses to ensure that students are loaded into these courses
first, 20 for academic electives, and 30 for non-academic
electives.
Load Type
Use the pop-up menu to choose whether this is an academic,
elective, or alternate course. The system uses this classification
to balance the types of courses in which the student is
scheduled during a schedule term. For example, if your school’s
scheduling terms are semesters, the system does not schedule
the student in all elective courses the first semester and all
academic courses the second semester.
Use Pre-Established
Teams
Select this checkbox if you want the system to reference teams
when scheduling students into this course.
Use Section Types
Select this checkbox if you want the system to schedule courses
according to section types.
Don't Allow Substitutions Select this checkbox if you do not want the system to attempt
to schedule a student in alternate courses if this course is full.
Global Substitution 1
Click Associate to select the first course substitution you want
the system to schedule for every student who cannot be
scheduled in this course.
Global Substitution 2
Click Associate to select the second course substitution you
want the system to schedule for every student who cannot be
scheduled in this course. The system will use this substitution if
Global Substitution 1 is no longer available.
Global Substitution 3
Click Associate to select the third course substitution you want
the system to schedule for every student who cannot be
scheduled in this course. The system will use this substitution if
Global Substitution 2 is no longer available.
8. Click the Relationships tab to access the Edit Course Relationships page. This page displays
course relationship information between two courses.
District System Administrator User Guide
District Setup
© 2004 Apple Computer, Inc. All rights reserved.
254
For each course, you can define related courses. The scheduling engine uses these course
relationships when building a student's schedule. If you define a relationship for a course
with another course, you do not have to define the relationship for both courses. But, you
can define the relationship for both courses so that it is easy to identify this relationship
regardless of which course you are viewing. The following three types of course
relationships are used in PowerSchool:
•
Prerequisite: Indicates relationship between two courses ensures that the student
will be scheduled into the specified course so that the course is completed prior to
the beginning of the second course.
•
Corequisite: Indicates relationship between two courses ensures that the student
will be scheduled into both courses so that the courses are taken concurrently.
•
Postrequisite: Indicates relationship between two courses ensures that the student
will be scheduled into the specified course after the student has completed the first
course in the relationship.
9. This information is either captured as part of the PowerScheduler commit process or can be
manually defined (added, edited, deleted) using this page:
•
To add a new relationship, click New. The Edit Course Relationship page appears.
Click the Associate button next to Course Number to select the number of the
course for which you want to define a relationship. Use the Relationship pop-up
menu to choose the appropriate relationship. Click Submit. The Course Relationships
page appears.
•
To edit an existing relationship, click the name of the course you want to edit. The
Edit Course Relationship page appears. Make the necessary changes. Click Submit.
The Course Relationships page appears.
•
To delete an existing relationship; click the name of the course for which you want
to delete a relationship. The Edit Course Relationship page appears. Click Delete. The
Selection Deleted page appears.
10. Click Submit. The Edit Course page displays the edited course.
How to Create a Course Group
To make it easier to associate courses, you have the option of creating course groups.
1. On the start page, choose School from the main menu. The School Setup page appears.
2. Choose Course Groups. The Course Groups page appears.
District System Administrator User Guide
District Setup
© 2004 Apple Computer, Inc. All rights reserved.
255
3. Click New in the courses menu. The Edit Course Group page appears.
District System Administrator User Guide
District Setup
© 2004 Apple Computer, Inc. All rights reserved.
256
4. Use the following table to enter information in the fields:
Field
Description
Name
Enter a name for the course group.
Note: If there are multiple high schools on your server, you may
want to create a system for naming your course groups so that
they sort in a certain way. For example, you might call Apple
Grove High School's course group containing ninth-grade core
courses AGHS-9-Core Courses. If you followed this system, all of
your high schools would sort together, as would the grade
levels within them.
District System Administrator User Guide
District Setup
© 2004 Apple Computer, Inc. All rights reserved.
257
Field
Description
Type
Choose the type of course group from the pop-up menu:
•
Scheduling Only: Course group is used for scheduling
purposes only.
•
Graduation Set Only: Course group is used for
graduation requirement purposes only.
•
Both: Course group is used for both scheduling and for
graduation requirement purposes.
Applies to
Set course groups to apply to all schools or to the current
school only. Existing groups are set to all schools by default.
5. Select the checkbox next to the name of each course that should belong to this group.
District System Administrator User Guide
District Setup
© 2004 Apple Computer, Inc. All rights reserved.
258
6. Click Submit.
How to Delete a Course Group
1. On the start page, choose School from the main menu. The School Setup page appears.
2. Choose Course Groups. The Course Groups page appears.
District System Administrator User Guide
District Setup
© 2004 Apple Computer, Inc. All rights reserved.
259
3. Choose the course group to be deleted from the courses menu. The Edit Course Group
page appears.
District System Administrator User Guide
District Setup
© 2004 Apple Computer, Inc. All rights reserved.
260
4. Click Delete. The Selection Deleted page appears.
How to Edit Course Status
Change a course's status from active to inactive or vice versa. Active courses are used to schedule
students. Additionally, use this page to remove all the courses from the master course list that do
not have sections taught in the current year.
1. On the start page, choose School from the main menu. The School Setup page appears.
2. Click Courses. The Courses page appears.
3. Click View Master Course List from the courses menu. The Master Course List page appears.
District System Administrator User Guide
District Setup
© 2004 Apple Computer, Inc. All rights reserved.
261
4. Select the checkbox next to the class you want to activate. Deselect the checkbox next to
the class you want to deactivate.
5. Select the checkbox to remove all courses from this school's course list that do not have any
sections taught this year (optional).
6. Click Submit. The Courses page appears.
District Information
Use this page to add, view, or edit your district's information. You may need to see this information
if you call PowerSchool Technical Support for a related issue.
To perform any of the following procedures, you must first switch schools to the district office. See
the section "
How to Change Schools
."
How to Add or Edit District Information
1. On the start page, choose District from the main menu.
2. Click District Info. The District Information page appears.
District System Administrator User Guide
District Setup
© 2004 Apple Computer, Inc. All rights reserved.
262
3. Use the following table to enter information in the fields:
Field
Description
Name of District
Enter your school district’s complete and official name.
District Number
Enter the number assigned to your district by your state.
District Address
Enter the address of the district office.
District City
Enter the city of the district office.
District State/Province
Choose your district's state or province from the pop-up menu.
District Postal Code
Enter the postal code for the district office.
District Country
Choose your district's country from the pop-up menu.
District Office Phone
Number
Enter the telephone number for the district office.
District Office FAX
Number
Enter the fax number for the district office.
Customer Support
Number
The PowerSchool customer support number appears.
PowerSchool District ID
The PowerSchool district ID number appears.
District System Administrator User Guide
District Setup
© 2004 Apple Computer, Inc. All rights reserved.
263
Field
Description
Superintendent's Name
Enter the name of the district superintendent.
Superintendent's Phone
Enter the telephone number of the district superintendent.
Superintendent's FAX
Enter the fax number of the district superintendent.
4. Click Submit. The District Information page displays the changes.
Districts of Residence
Use this page to add, edit, or delete districts of residence. Your state may require you to set up
districts of residents for reporting purposes.
Use the "Districts of Residence" feature to track where a student lives. Set the value for the student
on the Transfer Info student page. If a student changes residency districts, transfer out and then
reenroll him or her into your school to generate a reenrollment transaction record that reflects this
change. Use the Transfer Info page to also change the student's grade level and track number. Use
PowerSchool attendance-related reports to reflect such updates when these status changes occur.
For more information, see the sections "
Transfer Info
" and "
Attendance Reports
."
To perform any of the following procedures, you must first switch schools to the district office. See
the section "
How to Change Schools
."
How to Add Districts of Residence
1. On the start page, choose District from the main menu.
2. Click "Districts of Residence." The "Districts of Residence" page appears.
3. Click New. The "New District of Residence" page appears.
District System Administrator User Guide
District Setup
© 2004 Apple Computer, Inc. All rights reserved.
264
4. Use the following table to enter information in the fields:
Field
Description
Code
Enter a code for the district of residence, such as the state-
assigned district number.
Meaning
Enter a description for the code.
Sort Order
Enter a sort order to determine the order in which you want
this district of residence to appears on the "Districts of
Residence" page and in the pop-up menus on the Transfer Info
student pages menu.
5. Click Submit. The "Districts of Residence" page displays the new district of residence.
How to Edit Districts of Residence
1. On the start page, choose District from the main menu.
2. Click "Districts of Residence." The "Districts of Residence" page appears.
District System Administrator User Guide
District Setup
© 2004 Apple Computer, Inc. All rights reserved.
265
3. Click either District ID or District Name for the district to be edited. The "Edit District of
Residence" page appears.
4. Use the following table to edit information in the fields:
Field
Description
Code
Enter a code for the district of residence, such as the state-
assigned district number.
Meaning
Enter a description for the code.
Sort Order
Enter a sort order to determine the order in which you want
this district of residence to appear on the "Districts of
Residence" page and in the pop-up menus on the Transfer Info
student pages menu.
5. Click Submit. The "Districts of Residence" page displays the edited district of residence.
District System Administrator User Guide
District Setup
© 2004 Apple Computer, Inc. All rights reserved.
266
How to Delete Districts of Residence
1. On the start page, choose District from the main menu.
2. Click "Districts of Residence." The "Districts of Residence" page appears.
3. Click either District ID or District Name for the district to be deleted. The "Edit District of
Residence" page appears.
District System Administrator User Guide
District Setup
© 2004 Apple Computer, Inc. All rights reserved.
267
4. Click Delete. The Selection Deleted page appears.
Entry Codes
Use entry codes to identify the reasons why students enroll in and transfer to your school.
How to Add an Entry Code
You must log in to the district office before performing this procedure.
1. On the start page, choose District from the main menu.
2. Click Entry Codes. The Entry Codes page appears.
3. Click New. The Edit Entry Codes page appears.
District System Administrator User Guide
District Setup
© 2004 Apple Computer, Inc. All rights reserved.
268
4. Use the following table to enter information in the fields:
Field
Description
Code
Enter the code.
Meaning
Enter a description of the code.
5. Click Submit. The Entry Codes page displays the new code and its meaning. Any authorized
user can apply the new code to any student transferring out of your school.
How to Edit an Entry Code
Everyone who enrolls or transfers students will be affected by any changes you make to a code. You
may want to discuss changes with other users before making them.
You must log in to the district office before performing this procedure.
District System Administrator User Guide
District Setup
© 2004 Apple Computer, Inc. All rights reserved.
269
1. On the start page, choose District from the main menu.
2. Click Entry Codes. The Entry Codes page appears.
3. Click the code or the meaning of the code to be edited. The Edit Entry Codes page appears.
4. Use the following table to edit information in the fields:
Field
Description
Code
Edit the code.
Meaning
Edit a description of the code.
5. Click Submit. The Entry Codes page displays the edited code and its meaning. Authorized
users can apply the edited code to any student transferring out of your school.
District System Administrator User Guide
District Setup
© 2004 Apple Computer, Inc. All rights reserved.
270
How to Delete an Entry Code
Everyone who manages transfers will be affected by changes you make to a code. You may want to
discuss changes with other users before making them.
You must log in to the district office before performing this procedure.
1. On the start page, choose District from the main menu.
2. Click Entry Codes. The Entry Codes page appears.
District System Administrator User Guide
District Setup
© 2004 Apple Computer, Inc. All rights reserved.
271
3. Click the code or the meaning of the code to be deleted. The Edit Entry Codes page
appears.
4. Click Delete. The Entry Codes page displays without the deleted code:
Ethnicity Codes
Set up ethnicity codes to assign to students using the Demographics page. For more information
on assigning ethnicity codes, see the section "
How to Modify Student Demographics
."
How to Add an Ethnicity Code
You must log in to the district office before performing this procedure.
1. On the start page, choose District from the main menu.
2. Click Ethnicity Codes. The Ethnicity Codes page appears.
District System Administrator User Guide
District Setup
© 2004 Apple Computer, Inc. All rights reserved.
272
3. Click New. The Edit Ethnicity Code page appears.
4. Use the following table to enter information in the fields:
Field
Description
Code
Enter the ethnicity code.
Description
Enter a description for the code.
5. Click Submit. The Ethnicity Codes page displays the new ethnicity code.
District System Administrator User Guide
District Setup
© 2004 Apple Computer, Inc. All rights reserved.
273
How to Edit an Ethnicity Code
You must log in to the district office before performing this procedure.
1. On the start page, choose District from the main menu.
2. Click Ethnicity Codes. The Ethnicity Codes page appears.
3. Click the ethnicity code or description to be edited. The Edit Ethnicity Code page appears.
District System Administrator User Guide
District Setup
© 2004 Apple Computer, Inc. All rights reserved.
274
4. Use the following table to edit information in the fields:
Field
Description
Code
Edit the ethnicity code.
Description
Edit the description for the code.
5. Click Submit. The Ethnicity Codes page displays the edited ethnicity code.
How to Delete an Ethnicity Code
You must log in to the district office before performing this procedure.
1. On the start page, choose District from the main menu.
2. Click Ethnicity Codes. The Ethnicity Codes page appears.
District System Administrator User Guide
District Setup
© 2004 Apple Computer, Inc. All rights reserved.
275
3. Click the ethnicity code or description to be deleted. The Edit Ethnicity Code page appears.
4. Click Delete. The Selection Deleted page appears.
Exit Codes
Use exit codes to identify the reasons why students leave your school.
How to Add an Exit Code
You must log in to the district office before performing this procedure.
1. On the start page, choose District from the main menu.
2. Click Exit Codes. The Exit Codes page appears.
District System Administrator User Guide
District Setup
© 2004 Apple Computer, Inc. All rights reserved.
276
3. Click New. The Edit Exit Codes page appears.
4. Use the following table to enter information in the fields:
Field
Description
Code
Enter the code.
Meaning
Enter a description of the code.
5. Click Submit. The Exit Codes page displays the new code and its meaning. Authorized users
can apply the new code to any student transferring out of your school.
District System Administrator User Guide
District Setup
© 2004 Apple Computer, Inc. All rights reserved.
277
How to Edit an Exit Code
Everyone who transfers students out of your school will be affected by changes you make to a
code. You may want to discuss changes with other users before making them.
You must log in to the district office before performing this procedure.
1. On the start page, choose District from the main menu.
2. Click Exit Codes. The Exit Codes page appears.
District System Administrator User Guide
District Setup
© 2004 Apple Computer, Inc. All rights reserved.
278
3. Click the code or the meaning of the code to be edited. The Edit Exit Codes page appears.
4. Use the following table to edit information in the fields:
Field
Description
Code
Edit the code.
Meaning
Edit a description of the code.
5. Click Submit. The Exit Codes page displays the edited code and its meaning. Authorized
users can apply the edited code to any student transferring out of your school.
District System Administrator User Guide
District Setup
© 2004 Apple Computer, Inc. All rights reserved.
279
How to Delete an Exit Code
Everyone who manages transfers will be affected by changes you make to a code. You may want to
discuss changes with other users before making them.
You must log in to the district office before performing this procedure.
1. On the start page, choose District from the main menu.
2. Click Exit Codes. The Exit Codes page appears.
District System Administrator User Guide
District Setup
© 2004 Apple Computer, Inc. All rights reserved.
280
3. Click the code or the meaning of the code to be deleted. The Edit Exit Codes page appears.
4. Click Delete. The Exit Codes page displays without the deleted code.
District System Administrator User Guide
District Setup
© 2004 Apple Computer, Inc. All rights reserved.
281
Fees Management Overview
Fees Management spans PowerSchool, PowerSchool Teacher, and PowerSchool Parent Access. This
section covers the different features of Fees Management.
IMPORTANT: If you decide to upgrade to this release and use fees, you will need to perform a fee
conversion due to the restructuring of the data model. The conversion must be performed prior to
performing any fee functions. For more information, see the section "
Fee Conversion Process
."
Fee Categories
Fee Categories serve as the first tier within the Fees Management structure. To access Fee
Categories, log in at the district level, navigate to the District Setup page, and click Fee Categories.
Using the Fee Categories page, you can add, edit, and delete fee categories. It is advised that you
do not delete or modify the default fee categories.
There are two default categories, School and Course. Fees created using the fee category of School
are called school enrollment fees and are automatically assessed at the school level when students
enroll in a school. Fees created using the fee category of Course are called course enrollment fees
and are automatically assessed at the course level when students enroll in a course.
A third fee category of SOY (Start of Year) Balance may display if balances have been transferred
using the End-of-Year process or if you have performed the Fee Conversion. You cannot associate
fee types to this category, nor can you create fees using it. This information acts “behind the
scenes” and appears on the student Fee Transactions page.
District System Administrator User Guide
District Setup
© 2004 Apple Computer, Inc. All rights reserved.
282
In addition to School, Course, or SOY Balance, you can create as many other fee categories as your
district needs, such as Field Trip. Fees created using these other fee categories are called student
fees and are assessed manually.
Note: If you delete a fee category, you must then update any fee record containing that category
and select a new category. Transaction records already created are not affected.
Once fee categories have been created, you can create payment methods.
Payment Methods
Payment Methods indicate the method by which fees are paid. To access Payment Methods, log in
at the district level, navigate to the District Setup page, and click Payment Methods. Using the
Payment Methods page, you can add, edit, and delete payment methods. Although payment
methods can be deleted, it is preferred that you do not delete them in order to maintain uniformity
across the states for state reporting purposes.
There are six default methods of payment, cash, credit card, check, electronic fund transfer, money
order, and other. In addition, you can create as many other payment methods as your district
needs.
Note: If you delete a payment method, you must then update any fee record containing that
payment method and select a new payment method. Transaction records already created are not
affected.
Once fee categories and payment methods have been created, you can associate (create) fee types
under those fee categories.
Fee Types
Fee Types serve as the second tier within the Fees Management structure. For each fee category
created, you can then associate (create) fee types. Fee types created using the fee category of
School are called school enrollment fees and automatically assessed at the school level when
students enroll in a school. Fee types created using the fee category of Course are called course
enrollment fees and are automatically assessed at the course level when students enroll in a course.
Fee types created using fee categories other than School, Course, or SOY Balance are called student
fees and are assessed manually.
To access Fee Types, log in at the school level, navigate to the School Setup page, and click Fee
Types. Using the Fee Types page, you can add, edit, and delete fee types. Additionally, you can use
the Priority field to indicate the order by which a payment/credit is to be distributed
against/towards a student's fee balance. A value of 0 to 99 can be entered.
Note: If you delete a fee type, you must then update any fee record containing that fee type and
select a new fee type. Transaction records already created are not affected.
Once fee categories and payment methods have been created and fee types have been associated
(created) under those fee categories, you can create school enrollment fees, course enrollment fees,
and student fees.
District System Administrator User Guide
District Setup
© 2004 Apple Computer, Inc. All rights reserved.
283
School Enrollment Fees
School Enrollment Fees are used to automatically assess certain fees when a student enrolls in
school. To access School Enrollment Fees, log in at the district level, navigate to the Edit School
page, and scroll down to the School Enrollment Fee section where you can add, edit, and delete
school enrollment fees. Only those fee types with the fee category of School are available in the Fee
Type pop-up menu. When creating school enrollment fees, you can indicate whether or not you
want the fee pro ratable. If Pro Ratable is selected, the school fee will be assessed on the basis of
the number of school days in the year. If a student enrolls in school after the start date or withdraws
from school before the end date, the student will only be charged for that portion of the school
year.
Note: When importing students, school enrollment fees are not automatically assessed. You must
manually assess school enrollment fees using Fee Functions. For more information, see the section
“
Fee Functions
.”
Course Enrollment Fees
Course enrollment fees are used to automatically assess certain fees when a student enrolls in a
course. To access Course Enrollment Fees, log in at the school level, navigate to the Edit Course
page, and scroll down to the course Curse Enrollment fee information section where you can add,
edit, and delete course enrollment fees. Only those fee types with the fee category of Course are
available in the Fee Type pop-up menu. When creating course enrollment fees, you can indicate
whether or not you want the fee to be pro ratable. If Pro Ratable is selected, the course fee will be
assessed on the basis of the number of days within the term for the course section. If a student
enrolls in the course after the start date or drops the course before the end date, the student will
only be charged for that portion of the course.
Note: When importing students, course enrollment fees are not automatically assessed. You must
manually assess course enrollment fees using Fee Functions. For more information, see the section
“
Fee Functions
.”
Fee Exemption Status
Fee Exemption Status can be used to exempt an individual student or a group of students from
automatic fees, such as school or course fees.
To exempt an individual student, log in at the school level, search for and select a student, and click
Other Information. Using the Fee Exemption Status pop-up menu, you can exempt the student
from course fees, school fees, or all fees. If the student is enrolling in school, you can use the Enroll
a New Student page to select the student’s fee exemption status.
To exempt a group of students in a school, log in at the district level, navigate to the Edit School
page, and scroll down to the School Fee Information section. Using the Fee Exemption Status pop-
up menu, you can exempt group of students (per school) from course fees, school fees, or all fees.
Note: While you can indicate to the system that fees are not being assessed automatically, this does
not prohibit fees being assessed manually.
District System Administrator User Guide
District Setup
© 2004 Apple Computer, Inc. All rights reserved.
284
Student Fees
Student Fees are used to manually assess fees other than school or course fees, which are assessed
automatically. You can manually assess student fees to an individual student or to a group of
student.
To manually assess student fees to an individual student, log in at the district or school level, search
for and select a student, and click Fee Transactions. Using the Fee Transactions page, you can create
and assess student fees, as well as view existing fee information.
To manually assess student fees to a group of students, log in at the district or school level, search
for and select a group of students, and then select Fee Functions from the pop-up menu. The Fee
Functions page is also accessible via the Special Functions link on the start page. Using the Fee
Functions pages, you can create and assess student fees to a group of students.
Fee Transactions
Fee Transactions represent the exchanges of funds for a student within PowerSchool. To access Fee
Transactions, log in at the district or school level, search for and select a student, and click Fee
Transactions. The Fee Transaction page displays the student’s fee and transaction information for
the current school year. Using this page, you can view transaction information, create new
transactions, distribute payments, and issue refunds. When distributing a payment, funds are
allocated based on the priority established on the Fee Types page.
Fee Functions
Fee Functions offers similar functionality as Fee Transactions but for a selected group of students.
You can access Fee Functions one of two ways; using the Special Functions link on the start page or
by searching for and selecting a group of students, and choosing Fee Functions from the pop-up
menu on the Student Selection page. From the Fee Functions page, you can create transactions,
assess school and course fees, and clear current balances. Each time you perform a group fee
function, the system generates a group ID. The group ID can then be used to perform additional
actions, such as reversing fee assessments or transactions and for generating reports.
Note: Fee Functions is accessible at the school level.
Searching and Selecting Students
Searching and selecting students based on fee and transaction information can be performed at
the district or school level via the start page. For example, to search for students who have one or
more fees and/or transactions associated to them, enter *fee.fee_balance>0 in the Search Students
field on the PowerSchool start page.
End-of-Year Processing
End-of-Year Processing now includes a Fees Transfer Method section, which you can use to indicate
to the system how you want balances handled at the end of the year. To view this new option, log
in at the school level, navigate to the System Administrator page, and click End-of-Year. Scroll down
District System Administrator User Guide
District Setup
© 2004 Apple Computer, Inc. All rights reserved.
285
to the bottom of the page. Note the Fees Transfer Method section. You can Roll over the current
balance or you can Zero the current balance. If you rollover the balance, students with a balance
remaining will receive a SOY Balance at the start of the next school year.
Reports
Use object reports containing fee and transaction information to create a variety of reports to suit
your needs. To access Object Reports, log on at the district or school level, navigate to the Report
Setup page and click Object Reports. The Object Reports page displays the list of any object report
templates created for your school. When creating or editing an object report, you can include fee-
related information using the Fee List object.
PowerSchool Teacher
If a student has a fee transactions balance, the Balance icon and the balance amount display on the
student pages in order to indicate and make the staff members aware of this information.
Note: If the Fee Transactions section on the Balance page does not display in PowerSchool Teacher,
log in to PowerSchool at the district level, and then navigate to the Miscellaneous page. Verify that
the “Do not show the lunch balance on parent/student pages” checkbox is not selected. If it is,
deselect the checkbox and click Submit.
PowerSchool Parent
Parents can view their students’ fee transactions information via the Balance page. The Fee
Transaction section displays current balance information, as well as detailed information per
fee/transaction.
Note: If the Fee Transactions section on the Balance page does not display in PowerSchool Parent,
log in to PowerSchool at the district level, and then navigate to the Miscellaneous page. Verify that
the “Do not show the lunch balance on parent/student pages” checkbox is not selected. If it is,
deselect the checkbox and click Submit.
Fee Categories
Fee Categories serve as the first tier within the Fees Management structure. To access fee
categories, log in at the district level, navigate to the District Setup page, and click the Fee
Categories link. Using the Fee Categories page, you can add, edit, and delete fee categories. It is
advised that you do not delete or modify the default fee categories.
There are two default categories, School and Course. Fees created using the fee category of School
are called school enrollment fees and are automatically assessed at the school level when students
enroll in a school. Fees created using the fee category of Course are called course enrollment fees
and are automatically assessed at the course level when student enroll in a course.
District System Administrator User Guide
District Setup
© 2004 Apple Computer, Inc. All rights reserved.
286
A third fee category of SOY Balance may display if balances have been transferred using the End-of-
Year process or if you have performed the Fee Conversion. You cannot associate fee types to this
category, nor can you create fees using it. This information acts “behind the scenes” and is used on
the student Fee Transactions page.
In addition to School, Course, or SOY Balance, you can create as many other fee categories as your
district needs, such as Trip. Fees created using these other fee categories are called student fees
and are assessed manually. Once fee categories have been created, you can create payment
methods.
Notes
•
This option does not apply to lunch account balances. For information on lunch
transactions, see the section “
Lunch Transactions
.”
•
Fee information can appear on object reports; for more information, see the section
“
Object Reports
.”
How to View Fee Categories
You must log in to the district office before performing this procedure.
1. On the start page, choose District from the main menu.
2. Click Fee Categories. The Fee Categories page appears.
How to Add Fee Categories
You must log in to the district office before performing this procedure.
1. On the start page, choose District from the main menu.
2. Click Fee Categories. The Fee Categories page appears.
District System Administrator User Guide
District Setup
© 2004 Apple Computer, Inc. All rights reserved.
287
3. Click New. The New Fee Category page appears.
4. Enter the name of the fee category in the Fee Category field, such as Trip.
5. Click Submit. The Fee Categories page displays the new fee category.
District System Administrator User Guide
District Setup
© 2004 Apple Computer, Inc. All rights reserved.
288
How to Edit Fee Categories
You must log in to the district office before performing this procedure.
1. On the start page, choose District from the main menu.
2. Click Fee Categories. The Fee Categories page appears.
3. Click the fee category to be edited. The Edit Fee Category page appears.
4. Edit the name of the fee category in the Fee Category field.
5. Click Submit. The Fee Categories page displays the edited fee category.
District System Administrator User Guide
District Setup
© 2004 Apple Computer, Inc. All rights reserved.
289
How to Delete Fee Categories
You must log in to the district office before performing this procedure.
Note: If you delete a fee category, you must then update any fee record containing that category
and select a new category. Transaction records already created are not affected.
1. On the start page, choose District from the main menu.
2. Click Fee Categories. The Fee Categories page appears.
3. Click the fee category to be deleted. The Edit Fee Category page appears.
District System Administrator User Guide
District Setup
© 2004 Apple Computer, Inc. All rights reserved.
290
4. Click Delete. The Selection Deleted page appears.
School Enrollment Fees
Once fee categories and payment methods have been created, and fee types have been associated
(created) under those fee categories, you can create school enrollment fees.
School enrollment fees are used to automatically assess certain fees when a student enrolls in
school. To access school enrollment fees, log in at the district level, navigate to the Edit School
page, and scroll down to the School Enrollment Fee section where you can add, edit, and delete
school enrollment fees.
Note: When importing students, school enrollment fees are not automatically assessed. You must
manually assess school enrollment fees using Fee Functions. For more information, see the section
“
Fee Functions
.”
When creating school enrollment fees, you can indicate whether or not you want the fee pro
ratable. If Pro Ratable is selected, the school enrollment fee will be assessed on the basis of the
number of school days in the year. If a student enrolls in school after the start date or withdraws
from school before the end date, the student will only be charged for that portion of the school
year.
Fee Exemption Status
Fee Exemption Status can be used to exempt an individual student or a group of students from
school enrollment fees. To exempt an individual student, log in at the school level, search for and
select a student, and click the Other Information link. For information on exempting individual
students from course fees, see the section “
Other Information
.” If the student is enrolling in
school, you can use the Enroll a New Student page to select the student’s fee exemption status. For
information on exempting individual students from course fees, see the section “
Work With an
Individual Student
.” To exempt a group of students (by school), log in at the district level,
navigate to the Edit School page, and scroll down to the School Enrollment Fee section. For
information on exempting a group of students, see the section “
School Information
.”
District System Administrator User Guide
District Setup
© 2004 Apple Computer, Inc. All rights reserved.
291
Notes
•
This option does not apply to lunch account balances. For information on lunch
transactions, see the section “
Lunch Transactions
.”
•
Fee information can appear on object reports; for more information, see the section
“
Object Reports
.”
How to View School Enrollment Fees
You must log in to the district office before performing this procedure.
1. On the start page, choose School from the main menu.
2. Click Schools/School Info. The Schools/School Info page appears.
3. Click the name of a school. The Edit School page appears.
District System Administrator User Guide
District Setup
© 2004 Apple Computer, Inc. All rights reserved.
292
4. Scroll down to the School Enrollment Fee section.
District System Administrator User Guide
District Setup
© 2004 Apple Computer, Inc. All rights reserved.
293
How to Create School Enrollment Fees
You must log in to the district office before performing this procedure.
Note: Before adding school enrollment fees, the fee category of School must be created and fee
types associated to it. For more information, see the section “
Fee Categories
” and “
Fee Types
.”
1. On the start page, choose District from the main menu.
2. Click Schools/School Info. The Schools/School Info page appears.
3. Click the name of a school. The Edit School page appears.
District System Administrator User Guide
District Setup
© 2004 Apple Computer, Inc. All rights reserved.
294
4. Scroll down to the School Enrollment Fee section.
5. Click New. The New School Enrollment Fee page appears.
District System Administrator User Guide
District Setup
© 2004 Apple Computer, Inc. All rights reserved.
295
6. Use the following table to edit information in the fields:
Field
Description
School Name
The selected school's full name.
Fee Type
Choose the type of fee from the pop-up menu. Only those fee
types with the fee category of School appear in the Fee Type
pop-up menu.
Note: For more information on fee types, see the section “
Fee
Types
.”
Department
Choose the department you want to associate the fee to from
the pop-up menu, if any.
Amount
Enter the amount of the fee to be assessed.
Date
Enter the date the fee becomes applicable. The default is set to
today's date.
Pro Ratable
Select this checkbox to indicate that the fee is to be assessed
based on the number of school days in the year. If a student
enrolls in school after the start date or withdraws from school
before the end date, the student will only be charged for that
portion of the school year.
7. Click Submit. The Fee Types page displays the new fee type.
District System Administrator User Guide
District Setup
© 2004 Apple Computer, Inc. All rights reserved.
296
How to Edit School Enrollment Fees
You must log in to the district office before performing this procedure.
1. On the start page, choose District from the main menu.
2. Click Schools/School Info. The Schools/School Info page appears.
3. Click the name of a school. The Edit School page appears.
District System Administrator User Guide
District Setup
© 2004 Apple Computer, Inc. All rights reserved.
297
4. Scroll down to the School Enrollment Fee section.
5. Click the fee type to be edited. The Edit School Enrollment Fee page appears.
District System Administrator User Guide
District Setup
© 2004 Apple Computer, Inc. All rights reserved.
298
6. Use the following table to edit information in the fields:
Field
Description
School Name
The selected school's full name.
Fee Type
Choose the type of fee from the pop-up menu. Only those fee
types with the fee category of School appear in the Fee Type
pop-up menu.
Note: For more information on fee types, see the section “
Fee
Types
.”
Department
Choose the department you want to associate the fee to from
the pop-up menu.
Amount
Enter the amount of the fee to be assessed.
Date
Enter the date the fee becomes applicable. The default is set to
today's date.
Pro Ratable
Select this checkbox to indicate that the fee is to be assessed
based on the number of school days in the year. If a student
enrolls in school after the start date or withdraws from school
before the end date, the student will only be charged for that
portion of the school year.
7. Click Submit. The Fee Types page displays the updated fee type.
District System Administrator User Guide
District Setup
© 2004 Apple Computer, Inc. All rights reserved.
299
How to Delete School Enrollment Fees
You must log in to the district office before performing this procedure.
1. On the start page, choose District from the main menu.
2. Click Schools/School Info. The Schools/School Info page appears.
3. Click the name of a school. The Edit School page appears.
District System Administrator User Guide
District Setup
© 2004 Apple Computer, Inc. All rights reserved.
300
4. Scroll down to the School Enrollment Fee section.
5. Click the fee type to be deleted. The Edit School Enrollment Fee page appears.
District System Administrator User Guide
District Setup
© 2004 Apple Computer, Inc. All rights reserved.
301
6. Click Delete. The Selection Deleted page appears.
Log Entry Fields
Log entries are used to create a record regarding a student's behavior, performance, or activity.
Many schools use log entries to chronicle disciplinary actions. Log entries can also be used to
record students' positive achievements.
The default Log Entries page contains over forty fields, which may or may not be applicable to your
district. Based on your needs, you can customize the page to eliminate superfluous fields thereby
enhancing the function of entering a log. Any Log Entries page customizations made are reflected
on both PowerSchool's Log Entries page and PowerGrade's Submit Log Entry page.
To access log entry fields, log in at the district level, navigate to the District Setup page, and click
Log Entry Fields. Using the Log Entry Setup page, you can determine which fields appear and the
selections for each field, the format in which the field appears, and the order in which the field
appears on the page.
Note: If you have customized the HTML in the Log Entries page in a previous release and have now
updated to PowerSchool 4.0, you will need to enter the customized values in the "Data for Popup
or Radio Buttons" field on the Log Entry Setup page in order to maintain data integrity.
How to Customize the Log Entries Page
You must log in to the district office before performing this procedure.
1. On the start page, choose District from the main menu.
2. Click Log Entry Fields. The Log Entry Setup page appears.
District System Administrator User Guide
District Setup
© 2004 Apple Computer, Inc. All rights reserved.
302
The following information displays for each of the 44 configurable log entry fields:
Field
Description
Field Name
Name of all the log entry field as it appears in the database. To
edit this information, click the corresponding Field Name link.
Field Label
Title of field name, which appears on the Log Entries page.
Description
Description of field name. This information is for reference only
and does not appear on the Log Entries page.
Sort Order
Indicates the order in which field appears on the Log Entries
page. A value of 1 to 44 can be assigned. If two or more fields
are given the same value, the fields appear in ascending
alphabetical order within the selected sort order.
If you do not want a field to appear on the Log Entries page,
choose Hide. Fields that are not assigned a value appear in
District System Administrator User Guide
District Setup
© 2004 Apple Computer, Inc. All rights reserved.
303
Field
Description
ascending alphabetical order at the bottom of this page.
Note: The Hide menu item cannot be applied to the following
fields: Entry_Date, Entry_Time, Entry_Author, LogType, Subtype,
Consequence, Subject, and Entry.
3. Click the Field Name link of the appropriate field you wan to customize. The Edit Log Entry
Field page appears. The page varies based on the field you selected.
4. Use the following table to edit information in the fields:
Field
Description
Field Name
Name of the log entry field as it appears in the database.
Field Label (Original)
The default title of the field name as it appears on the Log
Entries page.
Field Label
Enter the title of the field name, which you want to appear on
the Log Entries page. HTML formatting is supported.
Note: The Field Label cannot be modified for the following
fields: Entry_Date, Entry_Time, Entry_Author, LogType, Subtype,
Consequence, Subject, and Entry.
District System Administrator User Guide
District Setup
© 2004 Apple Computer, Inc. All rights reserved.
304
Field
Description
Input Type
Use the pop-up menu to select the form in which you want the
field to appear:
•
Entry field
•
Static field
•
Checkbox
•
Popup menu
•
Radio buttons
•
Entry box
Not all menu items are available for each Field Name. Only
those menu items that are applicable Input Types appear.
Note: The Input Type cannot be modified for the following
fields: Entry_Date, Entry_Time, Entry_Author, LogType, Subtype,
Consequence, Subject, and Entry.
Width
If the Field Type of "Entry field" or "Entry box" is selected, enter
a value to indicate the width of the field/box.
Height
If the Field Type of "Entry field" or "Entry box" is selected, enter
a value to indicate the height of the field/box.
Data for Popup or Radio
buttons
If the Input Type of "Popup menu" or "Radio buttons" is
selected, enter the information you want to appear.
A "Popup menu" contains values, which consists of two
segments. The first segment is the value that is stored in the
database. This value is not visible on the Log Entries page. The
second segment is the label, which appears within the "Popup
menu." The first and second segments use a semi-colon as a
delimiter. To set a default value for a "Popup menu," enter a
semi-colon as the delimiter and then enter an asterisk at the
end of the default entry. The following is an example of a
properly formatted data for a "Popup menu" where "P;Police" is
the default entry:
S;Student T;Teacher A;Administrator O;Other School Staff
P;Police;* N;Non-School Individual U;Unknown
Some fields in the Log table are called "flag fields" because they
end with "Flag," such as "Discipline_FelonyFlag" and
"Discipline_LikelyInjuryFlag." Flag fields are stored as numeric
values. No is stored as a 0 while Yes is stored as 1. The following
is an example of properly formatted flag fields:
District System Administrator User Guide
District Setup
© 2004 Apple Computer, Inc. All rights reserved.
305
Field
Description
0;No 1;Yes
A "Radio button" follows the same rules as a "Popup menu."
The only difference is with a "Popup menu" you can enter
numerous sets of values. Whereas, with a "Radio button," you
are limited to only two sets of values.
5. Once you have entered the appropriate data on the Edit Log Entry Field page, click Submit.
Upon submitting your customizations, data validation is performed. An error page appears
if one or more invalid entries are found due to the following:
•
An empty entry.
•
More than one default value.
•
An entry that has only one segment.
•
An entry that has only one segment where that entry is marked as the default entry.
The error page lists the line numbers where the error occurred and instructs you to return
to the Edit Log Entry Field page to make corrections. The following are example of error
messages you may encounter:
•
The entry in line 2 of the popup values is invalid.
•
The entries in these lines of the popup values are invalid: 2 and 4.
•
The entries in these lines of the popup values are invalid: 2, 3, and 4.
Note: Additionally, the system removes nulls (Char(0)) though no alert page is returned.
6. Once you have made all of your Log Entry Field customizations, click Submit.
Log Entry Fields
Field
Description
Entry_Date
The date the log entry is entered, such as 5/17/2004. By default
this field appears as an "Entry field" on the Log Entries student
page and is auto-populated with today's date.
Entry_Time
The time the log entry is entered, such as 3:41 PM. By default
this field appears as an "Entry field" on the Log Entries page as
is auto-populated with the current time.
Entry_Author
The name of the staff member making the log entry. By default
this field appears as an "Entry field" on the Log Entries page and
is auto-populated with the author's username.
LogType
Classification indicating the nature of a log entry. By default this
field appears as a "Popup menu" on the Log Entries page To
District System Administrator User Guide
District Setup
© 2004 Apple Computer, Inc. All rights reserved.
306
Field
Description
field appears as a "Popup menu" on the Log Entries page. To
modify the field selections, see the sections "
Log Types
."
Subtype
Further characterization of a log entry associated to a specific
LogType. By default this field appears as a "Popup menu" on
the Log Entries page. To modify the field selections, see the
sections "
Log Types
."
Consequence
Action resulting from the log entry. By default this field appears
as a "Popup menu" on the Log Entries page.
Subject
The title for the log entry. By default this field appears as an
"Entry field" on the Log Entries page.
Entry
Description for making the log entry. By default this field
appears as an "Entry box" on the Log Entries page. There is no
limit to the length of the entry.
Custom
Custom field created by your district to display a variety of
information about students, staff, courses, and sections.
The following fields were incorporated into PowerSchool in order to address the Federal Gun-Free
Schools Act.
Field
Description
Discipline_IncidentType
The type of incident. Discipline incident types indicate the
nature of an incident. By default this field appears as a "Popup
menu” on the Log Entries page.
Discipline_IncidentTypeC
ategory
The category of incident. Discipline incident categories are the
general groups of incidents. Add a discipline incident category
to further classify group incidents. By default this field appears
as a "Popup menu" and an "Entry field" on the Log Entries page.
Discipline_IncidentType
Detail
The details of the incident. Discipline incident details include
specific information about incidents. Use discipline incident
details to record additional information about an incident. By
default this field appears as a "Popup menu" and an "Entry
field" on the Log Entries page.
Discipline_IncidentDate
The date the incident occurred, such as 5/17/2004. By default
this field appears as an "Entry field" on the Log Entries page and
is auto-populated with today's date.
Discipline_IncidentConte
xt
Indicates if the incident occurred during or outside school
hours and if it occurred at a school-sponsored activity. By
District System Administrator User Guide
District Setup
© 2004 Apple Computer, Inc. All rights reserved.
307
Field
Description
xt
default this field appears as a "Popup menu" on the Log Entries
page.
Discipline_IncidentLocati
on
Indicates if the incident occurred on campus, during an off-
campus school activity, or while using school-sponsored
transportation. By default this field appears as a "Popup menu"
on the Log Entries page.
Discipline_IncidentLocDe
tail
Discipline location details include specific information about
incident locations. By default this field appears as an "Entry
field" on the Log Entries page.
Discipline_Offender
Category of the person committing the incident. By default this
field appears as a "Popup menu" on the Log Entries page.
Discipline_Reporter
Category of the person reporting the incident. By default this
field appears as a "Popup menu” on the Log Entries page.
Discipline_ReporterID
Identification number of the person reporting the incident. By
default this field appears as an "Entry field" on the Log Entries
page.
Discipline_VictimType
Category of the person victimized by the incident. By default
this field appears as a "Popup menu" on the Log Entries page.
Discipline_FelonyFlag
Indicates if the incident was a felony. By default this field
appears as a Yes or No "Popup menu" on the Log Entries page.
Discipline_LikelyInjuryFla
g
Indicates if the incident likely resulted in an injury. By default
this field appears as a Yes or No "Popup menu" on the Log
Entries page.
Discipline_SchoolRulesVi
oFlag
Indicates if the incident was a violation of school rules. By
default this field appears as a Yes or No "Popup menu" on the
Log Entries page.
Discipline_PoliceInvolved
Flag
Indicates if there were police involved in the incident. By
default this field appears as a Yes or No "Popup menu" on the
Log Entries page.
Discipline_HearingOfficer
Flag
Indicates if there was a hearing officer involved in the incident.
By default this field appears as a Yes or No "Popup menu" on
the Log Entries page.
Discipline_GangRelatedF
lag
Indicates if the incident was gang-related. By default this field
appears as a Yes or No "Popup menu” on the Log Entries page.
District System Administrator User Guide
District Setup
© 2004 Apple Computer, Inc. All rights reserved.
308
Field
Description
Discipline_HateCrimeRel
atedFlag
Indicates if the incident was a hate crime. By default this field
appears as a Yes or No "Popup menu" on the Log Entries page.
Discipline_AlcoholRelate
dFlag
Indicates if the incident was alcohol-related. By default this field
appears as a Yes or No "Popup menu" on the Log Entries page.
Discipline_DrugRelatedFl
ag
Indicates if the incident was drug-related. By default this field
appears as a Yes or No "Popup menu" on the Log Entries page.
Discipline_DrugTypeDet
ail
Discipline drug details include specific information about drug-
related incidents. By default this field appears as a "Popup
menu" on the Log Entries page.
Discipline_WeaponRelate
dFlag
Indicates if a weapon was used during the incident. By default
this field appears as a Yes or No "Popup menu" on the Log
Entries page.
Discipline_WeaponType
Indicates the type of weapon. By default this field appears as a
"Popup menu" on the Log Entries page.
Discipline_WeaponType
Notes
Notes relating to the weapon type. By default this field appears
as an "Entry field" on the Log Entries page. A maximum of 79
characters can be entered.
Discipline_MoneyLossVal
ue
The amount of money lost in the incident, if the incident results
in a dollar loss amount for any party. By default this field
appears as an "Entry field" on the Log Entries page.
Discipline_ActionDate
The date the discipline action was taken, such as 5/17/2004. By
default this field appears as an "Entry field" on the Log Entries
page and is auto-populated with today's date.
Discipline_ActionTaken
The disciplinary action taken against a student. By default this
field appears as a "Popup menu" on the Log Entries page.
Discipline_ActionTakenD
etail
Specific information about disciplinary action taken against a
student. By default this field appears as a "Popup menu" on the
Log Entries page.
Discipline_ActionTakenE
ndDate
The date the discipline action ends. By default this field appears
as an "Entry field" on the Log Entries page.
Discipline_DurationAssig
ned
The assigned duration of the discipline action. By default this
field appears as an "Entry field" on the Log Entries page.
Discipline_DurationActu
al
The actual duration of the discipline action. By default this field
appears as an "Entry field" on the Log Entries page.
District System Administrator User Guide
District Setup
© 2004 Apple Computer, Inc. All rights reserved.
309
Field
Description
Discipline_DurationChan
geSource
Reasons for any difference in the values of the
Discipline_DurationActual from the
Discipline_DurationAssigned fields. By default this field appears
as a "Popup menu" on the Log Entries page.
Discipline_DurationNote
s
Notes relating to the duration of the discipline action. By
default this field appears as an "Entry field" on the Log Entries
page. A maximum of 79 characters can be entered.
Discipline_Sequence
The numerical sequence of this log entry if entering more than
one log entry for the incident. By default this field appears as an
"Entry field" on the Log Entries page.
Log Types
Log entries are used to create a record regarding a student's behavior, performance, or activity.
Many schools use log entries to chronicle disciplinary actions. Log entries can also be used to
record students' positive achievements.
Log types are used to group log entries by classification indicating the nature of a log entry.
Additionally, subtypes can be created within each log type to further characterize the log entry. For
example, a log entry related to cheating on a test is discipline-related. Discipline is the log type, and
cheating is the subtype. For more information on log entries and the use of log types, see the
sections “
Log Entry Fields
” and "
Log Entries
."
To access log types, log in at the district level, navigate to the District Setup page, and click Log
Types. Using the Log Types page, you can add, edit, and delete log types and subtypes.
How to Add a Log Type
You must log in to the district office before performing this procedure.
1. On the start page, choose District from the main menu.
2. Click Log Types. The Log Types page appears.
District System Administrator User Guide
District Setup
© 2004 Apple Computer, Inc. All rights reserved.
310
3. Click New. The Edit Log Types page appears.
4. Enter a log type in the Log Type field.
5. Click Submit. The Log Types page displays the new log type. To add subtypes, see the
section "
How to Add a Log Subtype
."
District System Administrator User Guide
District Setup
© 2004 Apple Computer, Inc. All rights reserved.
311
How to Edit a Log Type
You must log in to the district office before performing this procedure.
1. On the start page, choose District from the main menu.
2. Click Log Type. The Log Types page appears.
District System Administrator User Guide
District Setup
© 2004 Apple Computer, Inc. All rights reserved.
312
3. Click the log type to be edited. The Edit Log Type page appears.
4. Edit the log type.
5. Click Submit. The Log Types page displays the edited log type. To edit subtypes, see the
section "
How to Edit a Log Subtype
."
District System Administrator User Guide
District Setup
© 2004 Apple Computer, Inc. All rights reserved.
313
How to Delete a Log Type
You must log in to the district office before performing this procedure.
1. On the start page, choose District from the main menu.
2. Click Log Types. The Log Types page appears.
District System Administrator User Guide
District Setup
© 2004 Apple Computer, Inc. All rights reserved.
314
3. Click the log type to be deleted. The Edit Log Type page appears.
4. Click Delete. The Log Types page displays without the deleted log type.
District System Administrator User Guide
District Setup
© 2004 Apple Computer, Inc. All rights reserved.
315
How to Add a Log Subtype
You must log in to the district office before performing this procedure.
1. On the start page, choose District from the main menu.
2. Click Log Types. The Log Types page appears.
District System Administrator User Guide
District Setup
© 2004 Apple Computer, Inc. All rights reserved.
316
3. Click Edit Subtypes next to the log type to be edited. The Edit Subtypes page appears.
4. Click New. The Edit Subtype page appears.
5. Use the following table to enter information in the fields:
Field
Description
Log Code
Enter the code for the log subtype.
Description
Enter a description of the log subtype. This appears in the
Subtype pop-up menu when using log entries.
6. Click Submit. The Edit Subtypes page appears.
District System Administrator User Guide
District Setup
© 2004 Apple Computer, Inc. All rights reserved.
317
How to Edit a Log Subtype
You must log in to the district office before performing this procedure.
1. On the start page, choose District from the main menu.
2. Click Log Types. The Log Types page appears.
3. Click Edit Subtypes next to the log type you want to edit. The Edit Subtypes page appears.
4. Click either the code or description of the subtype want to edit. The Edit Subtype page
appears.
District System Administrator User Guide
District Setup
© 2004 Apple Computer, Inc. All rights reserved.
318
5. Edit the log subtype.
6. Click Submit. The Edit Subtypes page displays the edited log subtype.
How to Delete a Log Subtype
You must log in to the district office before performing this procedure.
1. On the start page, choose District from the main menu.
2. Click Log Types. The Log Types page appears.
3. Click Edit Subtypes next to the log type to be edited. The Edit Subtypes page appears.
District System Administrator User Guide
District Setup
© 2004 Apple Computer, Inc. All rights reserved.
319
4. Click either the code or description of the subtype you want to delete. The Edit Subtype
page appears.
5. Click Delete. The Edit Subtypes page appears.
Payment Methods
Payment Methods indicate the method by which fees are paid. To access payment methods, log in
at the district level, navigate to the District Setup page, and click the Payment Methods link. Using
the Payment Methods page, you can add, edit, and delete payment methods. Although payment
methods can be deleted, it is preferred that you do not delete them in order to maintain uniformity
across the states (state reporting).
There are six default methods of payment, cash, credit card, check, electronic fund transfer, money
order, and other. In addition, you can create as many other payment methods as your district
needs.
Once fee categories and payment methods have been created, you can associate (create) fee types
under those fee categories.
Notes
•
This option does not apply to lunch account balances. For information on lunch
transactions, see the section “
Lunch Transactions
.”
District System Administrator User Guide
District Setup
© 2004 Apple Computer, Inc. All rights reserved.
320
•
Fee information can appear on object reports; for more information, see the section
“
Object Reports
.”
How to View Payment Methods
You must log in to the district office before performing this procedure.
1. On the start page, choose District from the main menu.
2. Click Payment Methods. The Payment Methods page appears.
How to Add Payment Methods
You must log in to the district office before performing this procedure.
1. On the start page, choose District from the main menu.
2. Click Payment Methods. The Payment Methods page appears.
District System Administrator User Guide
District Setup
© 2004 Apple Computer, Inc. All rights reserved.
321
3. Click New. The New Payment Method page appears.
4. Enter the name of the method of payment in the Code field, such as CP.
5. Enter a description of the method of payment in the Description field, such as Coupon.
6. Click Submit. The Payment Methods page displays the new payment method.
District System Administrator User Guide
District Setup
© 2004 Apple Computer, Inc. All rights reserved.
322
How to Edit Payment Methods
You must log in to the district office before performing this procedure.
1. On the start page, choose District from the main menu.
2. Click Payment Methods. The Payment Method page appears.
3. Click the payment method to be edited. The Edit Payment Method page appears.
District System Administrator User Guide
District Setup
© 2004 Apple Computer, Inc. All rights reserved.
323
4. Edit the name of the method of payment in the Code field, if needed.
5. Edit the description of the method of payment in the Description field, if needed.
6. Click Submit. The Payment Methods page displays the edited payment method.
How to Delete Payment Methods
You must log in to the district office before performing this procedure.
Note: If you delete a payment method, you must then update any fee record containing that
payment method and select a new payment method. Transaction records already created are not
affected.
1. On the start page, choose District from the main menu.
District System Administrator User Guide
District Setup
© 2004 Apple Computer, Inc. All rights reserved.
324
2. Click Payment Methods. The Payment Method page appears.
3. Click the payment method to be deleted. The Edit Payment Method page appears.
4. Click Delete. The Selection Deleted page appears.
Course Enrollment Fees
Once fee categories and payment methods have been created, and fee types have been associated
(created) under those fee categories, you can create course enrollment fees.
Course enrollment fees are used to automatically assess certain fees when a student enrolls in a
course. To access course enrollment fees, log in at the district or school level, navigate to the Edit
Course page, and click the Fees tab to access the Edit Course Enrollment Fees page where you can
District System Administrator User Guide
District Setup
© 2004 Apple Computer, Inc. All rights reserved.
325
add, edit, and delete course fees. Only those fee types with the fee category of Course are available
in the Fee Type pop-up menu.
Note: When importing students, course enrollment fees are not automatically assessed. You must
manually assess course enrollment fees using Fee Functions. For more information, see the section
“
Fee Functions
.”
W hen creating course enrollment fees, you can indicate whether or not you want the fee to be pro
ratable. If Pro Ratable is selected, the course enrollment fee will be assessed on the basis of the
number of days within the term for the course section. If a student enrolls in the course after the
start date or drops the course before the end date, the student will only be charged for that portion
of the course.
Fee Exemption Status
Fee Exemption Status can be used to exempt an individual student or a group of students from
course enrollment fees. To exempt an individual student, log in at the school level, search for and
select a student, and click the Other Information link. For information on exempting individual
students from course fees, see the section “
Other Information
.” If the student is enrolling in
school, you can use the Enroll a New Student page to select the student’s fee exemption status. For
information on exempting individual students from course fees, see the section “
Work With an
Individual Student
.” To exempt a group of students (by school), log in at the district level,
navigate to the Edit School page, and scroll down to the School Enrollment Fee section. For
information on exempting a group of students, see the section “
School Information
.”
Notes
•
When scheduling students using Walk-in Scheduling or Power Scheduler, enrollment fees
that are associated to a course will be assessed to those students enrolling in the course.
•
This option does not apply to lunch account balances. For information on lunch
transactions, see the section “
Lunch Transactions
.”
•
Fee information can appear on object reports; for more information, see the section
“
Object Reports
.”
How to View Course Enrollment Fees
Determine if fees will be applied to student accounts when students are scheduled in a particular
course section.
1. On the start page, choose School from the main menu.
2. On the School Setup page, click Courses. The Courses page appears.
District System Administrator User Guide
District Setup
© 2004 Apple Computer, Inc. All rights reserved.
326
3. Click the name of a course. The Edit Course page appears.
4. Click the Fees tab. The Edit Course Enrollment Fees page appears. If there are any
enrollment fees associated to this course, they will appear in the Course Enrollment Fees
section.
District System Administrator User Guide
District Setup
© 2004 Apple Computer, Inc. All rights reserved.
327
How to Add Course Enrollment Fees
Add a fee that will be charged to each student scheduled in a particular course. Multiple fees can
be added to a course by repeating this procedure.
Note: Before adding course enrollment fees, the fee category of Course must be created and fee
types associated to it. For more information, see the section “
Fee Categories
” and “
Fee Types
.”
1. On the start page, choose School from the main menu.
District System Administrator User Guide
District Setup
© 2004 Apple Computer, Inc. All rights reserved.
328
2. On the School Setup page, click Courses. The Courses page appears.
3. Choose the name of the course from the courses menu. The Edit Course page appears.
4. Click the Fees tab. The Edit Course Enrollment Fees page appears.
5. Click New in the Course Enrollment Fees section. The New Course Fee page appears.
District System Administrator User Guide
District Setup
© 2004 Apple Computer, Inc. All rights reserved.
329
6. Use the following table to enter information in the fields:
Field
Description
Course Name
The name of the course appears.
Course Number
The number used to identify the course appears.
Fee Type
Choose the type of fee from the pop-up menu. The menu only
contains fee types for the selected school that fall under the
category type of Course.
Note: For more information on fee types, see the section “
Fee
Types
.”
Department
Choose the name of the department you want to associate the
fee to from the pop-up menu.
Amount
Enter the amount of the fee to be assessed.
Date
Enter the date the fee becomes applicable. The default is set to
today's date.
Description
Enter an descriptive explanation of the fee.
Pro Ratable
Select this checkbox to indicate that the fee is to be assessed
based on the number of days within the term for the course
section. If a student enrolls in the course after the start date or
drops the course before the end date, the student will only be
charged for that portion of the course.
7. Click Submit. The Courses page appears.
How to Edit Course Enrollment Fees
Use this procedure to change the fee or the type of fee for a course.
1. On the start page, choose School from the main menu.
2. On the School Setup page, click Courses. The Courses page appears.
District System Administrator User Guide
District Setup
© 2004 Apple Computer, Inc. All rights reserved.
330
3. Choose the name of the course from the courses menu. The Edit Course page appears.
4. Click the Fees tab. The Edit Course Enrollment Fees page appears.
5. Click the course enrollment fee in the Fee Type column that you want to edit. The Edit
Course Fee page appears.
District System Administrator User Guide
District Setup
© 2004 Apple Computer, Inc. All rights reserved.
331
6. Use the following table to edit information in the fields:
Field
Description
Course Name
The name of the course appears.
Course Number
The number used to identify the course appears.
Fee Type
Choose the type of fee from the pop-up menu. The menu only
contains fee types for the selected school that fall under the
category type of Course.
Note: For more information on fee types, see the section “
Fee
Types
.”
Department
Choose the name of the department you want to associate the
fee to from the pop-up menu.
Amount
Enter the amount of the fee to be assessed.
Date
Enter the date the fee becomes applicable. The default is set to
today's date.
Description
Enter an descriptive explanation of the fee.
Pro Ratable
Select this checkbox to indicate that the fee is to be assessed
based on the number of days within the term for the course
section. If a student enrolls in the course after the start date or
drops the course before the end date, the student will only be
charged for that portion of the course.
7. Click Submit. The Courses page appears.
How to Delete Course Enrollment Fees
Use this procedure to delete a course fee.
1. On the start page, choose School from the main menu.
2. On the School Setup page, click Courses. The Courses page appears.
District System Administrator User Guide
District Setup
© 2004 Apple Computer, Inc. All rights reserved.
332
3. Choose the name of the course from the courses menu. The Edit Course page appears.
4. Click the Fees tab. The Edit Course Enrollment Fees page appears.
5. Click the course fee in the Fee Type column. The Edit Course Fee page appears.
6. Click Delete. The Courses page appears.
District System Administrator User Guide
District Setup
© 2004 Apple Computer, Inc. All rights reserved.
333
Special Program Setup
Use this page to view a list of special programs already defined for your school and all the schools
that use your PowerSchool server or to view the students enrolled in a special program. You can
print enrollment reports for each special program.
Create a new program on the PowerSchool system. Then, any PowerSchool user with the proper
access can add students to that program. To add a student to a special program, see the section
"
Special Programs
."
Note: The Special Programs page for Utah schools displays the link "Utah schools click here." Click
the link to display the Utah Special Programs page, which describes state-specific special program
information.
How to View Students in a Special Program
You must log in to the district office before performing this procedure.
1. On the start page, choose District from the main menu.
2. Click Special Programs. The Special Programs page appears.
3. Click Display next to the program to be viewed. The Enrolled Students: [program name]
page displays the students enrolled in the special program.
District System Administrator User Guide
District Setup
© 2004 Apple Computer, Inc. All rights reserved.
334
How to Add a Special Program
You must log in to the district office before performing this procedure.
1. On the start page, choose District from the main menu.
2. Click Special Programs. The Special Programs page appears.
District System Administrator User Guide
District Setup
© 2004 Apple Computer, Inc. All rights reserved.
335
3. Click New. The Special Program Information page appears.
4. Use the following table to enter information in the fields:
Field
Description
Program name
Enter the name of the program.
Qualifies as a special
education program
Select this checkbox if the special program is considered a
special education program.
5. Click Submit. The Special Programs page displays the new program.
District System Administrator User Guide
District Setup
© 2004 Apple Computer, Inc. All rights reserved.
336
Any authorized PowerSchool user can add students to the program.
How to Edit a Special Program
You must log in to the district office before performing this procedure.
1. On the start page, choose District from the main menu.
2. Click Special Programs. The Special Programs page appears.
3. Click the program name for the program to be edited. The Special Program Information
page appears.
District System Administrator User Guide
District Setup
© 2004 Apple Computer, Inc. All rights reserved.
337
4. Use the following table to edit information in the fields:
Field
Description
Program name
Edit the name of the program.
Qualifies as a special
education program
Select this checkbox if the special program is considered a
special education program.
5. Click Submit. The Special Program page displays the edited program.
How to Delete a Special Program
You must log in to the district office before performing this procedure.
1. On the start page, choose District from the main menu.
2. Click Special Programs. The Special Programs page appears.
District System Administrator User Guide
District Setup
© 2004 Apple Computer, Inc. All rights reserved.
338
3. Click the program name for the program to be deleted. The Special Program Information
page appears.
4. Click Delete. The Selection Deleted page appears.
School Information
The School Information page provides information about the selected school. Use this page to add
a new school to the system or to edit information about a school already in the system.
How to Add a School
Once you add a school to the system, you cannot delete it. You must log in to the district office
before performing this procedure.
1. On the start page, choose District from the main menu.
2. Click Schools/School Info. The Schools/School Info page appears.
District System Administrator User Guide
District Setup
© 2004 Apple Computer, Inc. All rights reserved.
339
3. Click New. The Edit School page appears.
District System Administrator User Guide
District Setup
© 2004 Apple Computer, Inc. All rights reserved.
340
4. Use the following table to enter information in the fields:
Field
Description
School Name
Enter the school's full name.
School Abbreviation
Enter an abbreviation for the school to be used in PowerSchool.
School Address (Full)
Enter the school's address.
School Address
Enter the school's street address.
School City
Enter the school's city.
School State/Province
Select the school's state from the pop-up menu.
District System Administrator User Guide
District Setup
© 2004 Apple Computer, Inc. All rights reserved.
341
Field
Description
School Postal/Zip Code
Enter the school's postal/zip code.
School Phone Number
Enter the school's phone number including are code.
School FAX Number
Enter the school's fax number including area code.
School Number
Enter the school's number. A maximum of nine digits can be
used. Once you submitted to the system, do not change.
Note: States usually assign school numbers.
Alternate School Number If you wish to use an number other than what is listed above to
identify the school, enter the number here. Otherwise, leave
blank.
Exclude From State
Reporting?
Select this checkbox is you want to exclude this school from
being included in state reporting.
Grades
Enter the lowest and highest grade levels at the school. Only
historical data in this range of grade levels is used for
cumulative GPAs, graduation, credit, etc. Students at the
highest level are affected by the end-of-year process. For more
information, see the section “
End of Year Process
.”
Historical Grade Levels
Enter the range of grade levels from which historical data is
pulled, such as cumulative GPAs and graduation credit.
Default Next School
Enter the number of the school where students who graduate
from this school will be sent. Otherwise, leave as 0 for none.
Sort Order
Enter the number that indicates the order in which this school
appears on school lists and pop-up menus.
When Scheduling,
Display Courses From
Use the pop-up menu to choose the school from which you
want to view the course list when you create student schedules
for next year:
•
Current school
•
Next school: The system only displays courses from the
next school for students whom you have indicated a
next school.
5. Note the School Administration Information section.
District System Administrator User Guide
District Setup
© 2004 Apple Computer, Inc. All rights reserved.
342
6. Use the following table to edit information in the fields in the School Administration
Information section:
Field
Description
Principal's Name
Enter the name of the school's principal.
Principal's Phone
Enter the telephone number of the school's principal.
Principal's Email
Enter the email address of the school's principal.
Assistant/Vice-Principal's
Name
Enter the name of the school's assistant or vice-principal.
Assistant/Vice-Principal's
Phone
Enter the telephone number of the school's assistant or vice-
principal.
Assistant/Vice-Principal's
Email
Enter the email address of the school's assistant or vice-
principal.
Bulletin Email
Enter the email address of the person responsible for including
items in the daily bulletin. This address appears on the Daily
Bulletin page for users to link to when submitting daily bulletin
items.
Attendance Secretary
Email
Enter the email address of the attendance secretary.
Registrar Email
Enter the email address of the registrar.
District System Administrator User Guide
District Setup
© 2004 Apple Computer, Inc. All rights reserved.
343
Field
Description
Email Copies of New
Teacher Log Entries To
Enter the email address(es) of anyone who wants a copy of new
log entries submitted by teachers. Separate multiple entries
with commas.
7. Note the County Information section.
8. Use the following table to edit information in the fields in the County Information section:
Field
Description
County Name
Enter the name of the school's county.
County Number
Enter the number for the school's county.
9. Note the School Fee Information section.
10. Use the following table to edit information in the fields in the School Fee Information
section:
Field
Description
Fee Exemption Status
School and course enrollment fees are automatically assigned
to students when they enroll in school or in a course. Students
can be exempted from having these fees assigned to them
automatically by using this pop-up menu. While you can
indicate to the system that school and/or course enrollments
fees are not be assigned, this does not prohibit fees being
assigned manually.
Choose the students' fee exemption status the pop-up menu in
District System Administrator User Guide
District Setup
© 2004 Apple Computer, Inc. All rights reserved.
344
Field
Description
the School Fee Information section:
•
Students not Exempted
•
Students Exempted from Course Fees
•
Students Exempted from School Fees
•
Students Exempted from All Fees
Note: For information on exempting an individual student at a
particular school, see the section “
Other Information
.”
Fee Type
Use the School Enrollment Fee section to add, edit, and delete
school enrollment fees. For information, see the section
“
School Enrollment Fees
.”
11. Click Submit. The Schools/School Info page displays the new school.
How to Edit School Information
Although you cannot delete a school, you can edit school information. You must log in to the
district office before performing this procedure.
1. On the start page, choose District from the main menu.
2. Click Schools/School Info. The Schools/School Info page appears.
District System Administrator User Guide
District Setup
© 2004 Apple Computer, Inc. All rights reserved.
345
3. Click the school name in the Schools column for the school to be edited. The Edit School
page appears.
4. Use the following table to edit information in the fields:
Field
Description
School Name
Enter the school's full name.
School Abbreviation
Enter an abbreviation for the school to be used in PowerSchool.
School Address (Full)
Enter the school's address.
District System Administrator User Guide
District Setup
© 2004 Apple Computer, Inc. All rights reserved.
346
Field
Description
School Address
Enter the school's street address.
School City
Enter the school's city.
School State/Province
Select the school's state from the pop-up menu.
School Postal/Zip Code
Enter the school's postal/zip code.
School Phone Number
Enter the school's phone number including are code.
School FAX Number
Enter the school's fax number including area code.
School Number
Enter the school's number. A maximum of nine digits can be
used. Once you submitted to the system, do not change.
Note: States usually assign school numbers.
Alternate School Number If you wish to use an number other than what is listed above to
identify the school, enter the number here. Otherwise, leave
blank.
Exclude From State
Reporting?
Select this checkbox is you want to exclude this school from
being included in state reporting.
Grades
Enter the lowest and highest grade levels at the school. Only
historical data in this range of grade levels is used for
cumulative GPAs, graduation, credit, etc. Students at the
highest level are affected by the end-of-year process. For more
information, see the section “
End of Year Process
.”
Historical Grade Levels
Enter the range of grade levels from which historical data is
pulled, such as cumulative GPAs and graduation credit.
Default Next School
Enter the number of the school where students who graduate
from this school will be sent. Otherwise, leave as 0 for none.
Sort Order
Enter the number that indicates the order in which this school
appears on school lists and pop-up menus.
When Scheduling,
Display Courses From
Use the pop-up menu to choose the school from which you
want to view the course list when you create student schedules
for next year:
•
Current school
•
Next school: The system only displays courses from the
next school for students whom you have indicated a
next school.
District System Administrator User Guide
District Setup
© 2004 Apple Computer, Inc. All rights reserved.
347
5. Note the School Administration Information section.
6. Use the following table to edit information in the fields in the School Administration
Information section:
Field
Description
Principal's Name
Enter the name of the school's principal.
Principal's Phone
Enter the telephone number of the school's principal.
Principal's Email
Enter the email address of the school's principal.
Assistant/Vice-Principal's
Name
Enter the name of the school's assistant or vice-principal.
Assistant/Vice-Principal's
Phone
Enter the telephone number of the school's assistant or vice-
principal.
Assistant/Vice-Principal's
Email
Enter the email address of the school's assistant or vice-
principal.
Bulletin Email
Enter the email address of the person responsible for including
items in the daily bulletin. This address appears on the Daily
Bulletin page for users to link to when submitting daily bulletin
items.
Attendance Secretary
Email
Enter the email address of the attendance secretary.
Registrar Email
Enter the email address of the registrar.
District System Administrator User Guide
District Setup
© 2004 Apple Computer, Inc. All rights reserved.
348
Field
Description
Email Copies of New
Teacher Log Entries To
Enter the email address(es) of anyone who wants a copy of new
log entries submitted by teachers. Separate multiple entries
with commas.
7. Note the County Information section.
8. Use the following table to edit information in the fields in the County Information section:
Field
Description
County Name
Enter the name of the school's county.
County Number
Enter the number for the school's county.
9. Note the School Fee Information section.
10. Use the following table to edit information in the fields in the School Fee Information
section:
Field
Description
Fee Exemption Status
School and course enrollment fees are automatically assigned
to students when they enroll in school or in a course. Students
can be exempted from having these fees assigned to them
automatically by using this pop-up menu. While you can
indicate to the system that school and/or course enrollments
fees are not be assigned, this does not prohibit fees being
assigned manually.
Choose the student's fee exemption status the pop-up menu in
District System Administrator User Guide
District Setup
© 2004 Apple Computer, Inc. All rights reserved.
349
Field
Description
the School Fee Information section:
•
Students not Exempted
•
Students Exempted from Course Fees
•
Students Exempted from School Fees
•
Students Exempted from All Fees
Note: For information on exempting an individual student at a
particular school, see the section “
Other Information
.”
Fee Type
Use the School Enrollment Fee section to add, edit, and delete
school enrollment fees. For information, see the section
“
School Enrollment Fees
.”
11. Click Submit. The Schools/School Info page displays the edited school.
Years and Terms
Define years and terms for your school. The years and terms affect many parts of the system, such
as the calendar setup, scheduling, enrollment, and final grades.
First, add a new school year for your school. Then, define the terms in that school year.
How to Add a School Year
Once you add a school year for a school, you cannot delete it.
1. On the start page, choose School from the main menu.
2. Click Years & Terms. The Years & Terms page appears.
District System Administrator User Guide
District Setup
© 2004 Apple Computer, Inc. All rights reserved.
350
3. Click New. The Create New School Year page appears.
4. Use the following table to enter information in the fields:
Type
Description
Name of School Year
Enter the school year name.
Abbreviation
Enter the abbreviation of the school year.
First Day of School
Enter the start date of the school year using the format
mm/dd/yyyy or mm-dd-yyyy. If you do not use this format, an
alert appears. If you submit the date with an incorrect format,
the date field will be submitted as a blank entry.
District System Administrator User Guide
District Setup
© 2004 Apple Computer, Inc. All rights reserved.
351
Type
Description
Last Day of School
Enter the end date of the school year using the format
mm/dd/yyyy or mm-dd-yyyy. If you do not use this format, an
alert appears. If you submit the date with an incorrect format,
the date field will be submitted as a blank entry.
5. Click Submit. The Years & Terms page displays the new school year.
How to Edit a School Year
Once you add a school year for a school, you cannot edit only the name and abbreviation of the
school year.
1. On the start page, choose School from the main menu.
2. Click Years & Terms. The Years & Terms page appears.
District System Administrator User Guide
District Setup
© 2004 Apple Computer, Inc. All rights reserved.
352
3. Click the year of the school year to be edited. The Edit School Year page appears.
4. Use the following table to edit information in the fields:
Type
Description
Name of School Year
Edit the school year name.
Abbreviation
Edit the abbreviation of the school year.
First Day of School
The first day of the school year appears.
Last Day of School
The last day of the school year appears.
District System Administrator User Guide
District Setup
© 2004 Apple Computer, Inc. All rights reserved.
353
5. Click Submit. The Years & Terms page displays the edited school year.
How to Define Terms
Once you add a term to a school year, you cannot delete it. However, you can edit the term. For
more information, see the section "
How to Edit Terms
."
1. On the start page, choose School from the main menu.
2. Click Years & Terms. The Years & Terms page appears.
District System Administrator User Guide
District Setup
© 2004 Apple Computer, Inc. All rights reserved.
354
3. Click Edit Terms next to the school year for which you want to define terms. The Term Setup
page appears.
4. Click New. The Edit Term page appears.
District System Administrator User Guide
District Setup
© 2004 Apple Computer, Inc. All rights reserved.
355
5. Use the following table to enter information in the fields:
Field
Description
Name of the Term
Enter the name of the term, which indicates when it occurs
during the academic year. For example, enter Semester 1.
Abbreviation
Enter an abbreviation for the term. The first character of the
abbreviation must be a letter. For example, enter S1 for
Semester 1.
First Day of Term
Enter the date of the first day of the term using the format
mm/dd/yyyy or mm-dd-yyyy. If you do not use this format, an
alert appears. If you submit the date with an incorrect format,
the date field will be submitted as a blank entry.
Last Day of Term
Enter the date of the last day of the term using the format
mm/dd/yyyy or mm-dd-yyyy. If you do not use this format, an
alert appears. If you submit the date with an incorrect format,
the date field will be submitted as a blank entry.
District System Administrator User Guide
District Setup
© 2004 Apple Computer, Inc. All rights reserved.
356
Field
Description
What portion of the
school year this term
represents
Use the pop-up menu to choose the fraction or item that
represents the portion of the school year during which the term
takes place. For example, if you define Semester 1 and your
school operates with trimesters, Semester 1 represents one-
third of your school year.
Import File Term #
If you plan to import schedule or historical data from another
system and the data is different from the abbreviation you
define, enter the term code the other system uses to represent
this term.
For example, you might want to import data from a system that
uses 1, 2, 3, and 4 to represent quarter terms. But in your
PowerSchool system, you define quarters with Q1, Q2, Q3, and
Q4. Therefore, when you define Q1, enter 1 in this field. Then,
when you import any schedule, grade, or historical data from
the other system, PowerSchool knows to save any information
from Term 1 as Term Q1 in your system.
6. Click Submit. The Term Setup page displays the edited terms.
7. Repeat Step 4 through Step 6 for each term, including semesters, trimesters, or quarters.
How to Edit Terms
1. On the start page, choose School from the main menu.
2. Click Years & Terms. The Years & Terms page appears.
District System Administrator User Guide
District Setup
© 2004 Apple Computer, Inc. All rights reserved.
357
3. Click Edit Terms next to the school year to be edited. The Term Setup page appears.
4. Click the term to be edited. The Edit Term page appears.
District System Administrator User Guide
District Setup
© 2004 Apple Computer, Inc. All rights reserved.
358
5. Use the following table to edit information in the fields:
Field
Description
Name of the Term
Edit the name of the term, which indicates when the term
occurs during the academic year. For example, enter Semester
1.
Abbreviation
Edit an abbreviation for the term. The first character of the
abbreviation must be a letter. For example, enter S1 for
Semester 1.
First Day of Term
Edit the date of the first day of the term using the format
mm/dd/yyyy or mm-dd-yyyy. If you do not use this format, an
alert appears. If you submit the date with an incorrect format,
the date field will be submitted as a blank entry.
Last Day of Term
Enter the date of the last day of the term using the format
mm/dd/yyyy or mm-dd-yyyy. If you do not use this format, an
alert appears. If you submit the date with an incorrect format,
the date field will be submitted as a blank entry.
What portion of the
school year this term
represents
Use the pop-up menu to choose the fraction or item that
represents the portion of the school year during which the term
takes place. For example, if you define Semester 1 and your
school operates with trimesters, Semester 1 represents one-
third of your school year.
District System Administrator User Guide
District Setup
© 2004 Apple Computer, Inc. All rights reserved.
359
Field
Description
Import File Term #
If you plan to import schedule or historical data from another
system and the data is different from the abbreviation you
define, enter the term code the other system uses to represent
this term.
For example, you might want to import data from a system that
uses 1, 2, 3, and 4 to represent quarter terms. But in your
PowerSchool system, you define quarters with Q1, Q2, Q3, and
Q4. Therefore, when you define Q1, enter 1 in this field. Then,
when you import any schedule, grade, or historical data from
the other system, PowerSchool knows to save any information
from Term 1 as Term Q1 in your system.
6. Click Submit. The Term Setup page displays the edited term.
Grading
District Web Assignments
Use this page to add, edit, or delete web assignments at the district level. Enter assignments and
assignment categories, then follow the procedure "
How to Create Teacher Web
Assignments
" to create web assignments for all sections of courses for which you created
assignments.
To perform any of the following procedures, you must first switch schools to the district office. See
the section "
How to Change Schools
."
District System Administrator User Guide
District Setup
© 2004 Apple Computer, Inc. All rights reserved.
360
How to Add a District Web Assignment
1. On the start page, choose District from the main menu.
2. Click Course Assignments.
3. Choose a course name from the courses menu. The [course number] [course name] page
appears.
Note: To sort the course list by course name, choose "name" from the top of the menu. To
sort the course list by course number, choose "number."
4. Click New. The District Web Assignment: Course [course number] page appears.
5. Use the following table to enter information in the fields:
Field
Description
Category
Choose an assignment category from the pop-up menu. To
create or edit categories, see the sections "
How to Add a
District Web Assignment Category
" and "
How to Edit a
District System Administrator User Guide
District Setup
© 2004 Apple Computer, Inc. All rights reserved.
361
Field
Description
District Web Assignment Category
," respectively.
Name
Enter the name of the assignment.
Abbreviation
Enter an abbreviation for the assignment name.
Points Possible
Enter the total points possible for the assignment.
Weight
Enter the weight of this assignment. Grade weighting is an
important part of how final grades are calculated. Weight
grades to make certain assignments count for more or less
towards the final grade.
Due Date
Enter the date the assignment is due using the format
mm/dd/yyyy or mm-dd-yyyy. If you do not use this format, an
alert appears. If you submit the date with an incorrect format,
the date field will be submitted as a blank entry.
Description
Enter a description of the assignment.
Standards
Enter any associated standards for this assignment.
6. Click Submit. The [course number] [course name] page displays the new assignment.
How to Edit a District Web Assignment
1. On the start page, choose District from the main menu.
2. Click Course Assignments.
3. Choose a course name from the courses menu. The [course number] [course name] page
appears.
District System Administrator User Guide
District Setup
© 2004 Apple Computer, Inc. All rights reserved.
362
Note: To sort the course list by course name, choose "name" from the top of the menu. To
sort the course list by course number, choose "number."
4. Click the name of the assignment to be edited. The District Web Assignment: Course [course
number] page appears.
5. Use the following table to enter information in the fields:
Field
Description
Category
Choose an assignment category from the pop-up menu. To
create or edit categories, see the sections "
How to Add a
District Web Assignment Category
" and "
How to Edit a
District Web Assignment Category
," respectively.
Name
Enter the name of the assignment.
Abbreviation
Enter an abbreviation for the assignment name.
District System Administrator User Guide
District Setup
© 2004 Apple Computer, Inc. All rights reserved.
363
Field
Description
Points Possible
Enter the total points possible for the assignment.
Weight
Enter the weight of this assignment. Grade weighting is an
important part of how final grades are calculated. Weight
grades to make certain assignments count for more or less
towards the final grade.
Due Date
Enter the date the assignment is due using the format
mm/dd/yyyy or mm-dd-yyyy. If you do not use this format, an
alert appears. If you submit the date with an incorrect format,
the date field will be submitted as a blank entry.
Description
Enter a description of the assignment.
Standards
Enter any associated standards for this assignment.
6. Click Submit. The [course number] [course name] page displays the edited assignment.
How to Delete a District Web Assignment
1. On the start page, choose District from the main menu.
2. Click Course Assignments.
3. Choose a course name from the courses menu. The [course number] [course name] page
appears.
District System Administrator User Guide
District Setup
© 2004 Apple Computer, Inc. All rights reserved.
364
Note: To sort the course list by course name, choose "name" from the top of the menu. To
sort the course list by course number, choose "number."
4. Click the name of the assignment to be deleted. The District Web Assignment: Course
[course number] page appears.
5. Click Delete. The [course number] [course name] page displays without the deleted
assignment.
How to Add a District Web Assignment Category
1. On the start page, choose District from the main menu.
2. Click Course Assignments.
3. Choose Edit Categories from the courses menu. The District Web Assignment Categories
page appears.
District System Administrator User Guide
District Setup
© 2004 Apple Computer, Inc. All rights reserved.
365
4. Click New. The Edit District Assignment Category page appears.
5. Use the following table to enter information in the fields:
Field
Description
Abbreviation
Enter an abbreviation for the assignment category.
Category
Enter a full name for the assignment category.
6. Click Submit. The District Web Assignment Categories page displays the new assignment
category.
District System Administrator User Guide
District Setup
© 2004 Apple Computer, Inc. All rights reserved.
366
How to Edit a District Web Assignment Category
1. On the start page, choose District from the main menu.
2. Click Course Assignments.
3. Choose Edit Categories from the courses menu. The District Web Assignment Categories
page appears.
4. Click the name of the assignment category to be edited. The Edit District Assignment
Category page appears.
District System Administrator User Guide
District Setup
© 2004 Apple Computer, Inc. All rights reserved.
367
5. Use the following table to enter information in the fields:
Field
Description
Abbreviation
Enter an abbreviation for the assignment category.
Category
Enter a full name for the assignment category.
6. Click Submit. The District Web Assignment Categories page displays the edited assignment
category.
How to Delete a District Web Assignment Category
1. On the start page, choose District from the main menu.
2. Click Course Assignments.
3. Choose Edit Categories from the courses menu. The District Web Assignment Categories
page appears.
District System Administrator User Guide
District Setup
© 2004 Apple Computer, Inc. All rights reserved.
368
4. Click the name of the assignment category to be deleted. The Edit District Assignment
Category page appears.
5. Click Delete. The District Web Assignment Categories page displays without the deleted
assignment category.
How to Create Teacher Web Assignments
Create teacher web assignments to commit the assignments you created for each course.
District System Administrator User Guide
District Setup
© 2004 Apple Computer, Inc. All rights reserved.
369
1. On the start page, choose District from the main menu.
2. Click Course Assignments.
3. Choose Create Assignments from the courses menu. The Create District Web Assignments
page appears.
4. Select the checkbox to verify that you want to create assignments for each section of each
course with assignments.
5. Click Submit. The Changes Recorded page appears.
Grade Scales
Create multiple grade scales and assign them to different courses or sections. For example, grades
given for AP Calculus count more towards a student's GPA than grades for Basic Math. Assign the
two courses to different grade scales. For more information on assigning grade scales to courses,
see the section "
Course Grade Scales
."
The grade scales you define become the set of grades that are possible to use at all schools on your
PowerSchool system. After you set up the grade scales in PowerSchool, the system sends the
grades you select for PowerGrade to each teacher's PowerGrade default grade scale.
The value of a grade is determined when an historical grade is given to a student taking a particular
course. Even if the grade scale for that course changes, the values of that student's grade do not
change.
How to Create a Grade Scale
The grade scales you create are shared by all of the schools on your system. You must log in to the
district office before performing this procedure.
District System Administrator User Guide
District Setup
© 2004 Apple Computer, Inc. All rights reserved.
370
1. On the start page, choose District from the main menu.
2. Click Grade Scales. The Grade Scales page appears.
3. Click New. The New Grade Scale page appears.
4. Use the following table to enter information in the fields:
Type
Description
Name
Enter a name for the grade scale.
Teacher Can Modify
Use this checkbox to indicate whether or not teachers can edit
this grade scale in PowerGrade.
Do one of the following:
•
Select this checkbox to allow teachers to edit this grade
scale in PowerGrade.
•
Deselect this checkbox to restrict teachers from editing
this grade scale in PowerGrade.
District System Administrator User Guide
District Setup
© 2004 Apple Computer, Inc. All rights reserved.
371
Type
Description
Description
Enter a description for the grade scale.
5. Click Submit. The Grade Scales page displays the new grade scale.
6. Click Edit Scale next to the new grade scale. The Grade Scale: [Grade Scale] page appears.
7. Click New. The New Grade page appears.
District System Administrator User Guide
District Setup
© 2004 Apple Computer, Inc. All rights reserved.
372
8. Use the following table to enter information in the fields:
Field
Description
Grade
Enter the grade that you want to create for this grade scale,
such as A, B, or F.
Description
Enter a description of the grade in the field, such as Superior.
This description appears on grading reports.
Grade Points
Enter the number of grade points to include in the GPA. You
can enter up to and including the number 200.
For example, an A could be worth 4.0 grade points, a B worth
3.0 grade points, and an F worth 0 grade points.
Cutoff percent
Enter the lowest percentage students can earn to receive this
grade. For example, if you enter 93 for an A, then students must
earn at least 93% of the total points to receive an A. The system
uses the next highest cutoff percentage you define for a
different grade to determine the highest percent grade
students can earn to receive this grade.
Note: This is a suggested cutoff for your teachers to use.
District System Administrator User Guide
District Setup
© 2004 Apple Computer, Inc. All rights reserved.
373
Field
Description
Teachers can define their own cutoff percentages for this grade
in PowerGrade.
Gradebook value
This field indicates the value of a letter grade when teachers
give letter grades instead of numeric grades. Enter a number
for the value of the letter grade; usually, this is in the middle of
the range for the grade, such as 88 for a B+.
Counts in GPA?
Select this checkbox to determine that this grade calculates in
the GPA.
Receives added value?
Select this checkbox if users can enter a value for this grade
that exceeds the normal grade points.
Earns graduation credit?
Select this checkbox to determine that this grade earns credit
towards graduation requirements.
Teachers grade scale?
Select this checkbox to indicate that teachers use this grade
scale.
PowerLink (English)
If your school uses PowerLink, enter the phonetic English
spelling of this grade.
PowerLink (Spanish)
If your school uses PowerLink, enter the phonetic Spanish
spelling of this grade.
9. Click Submit. The Grade Scale: [grade scale] page appears.
10. Repeat Step 8 through Step 9 for each grade in this grade scale.
District System Administrator User Guide
District Setup
© 2004 Apple Computer, Inc. All rights reserved.
374
How to Edit a Grade Scale Grade
Edits to any grade scales affect the grade scales for all of the schools on your system. Use caution
when editing a grade scale, because changes to a grade scale entry affect current GPA calculations.
Modifications to a grade scale are possible only if the "Permit modification of grade scales"
checkbox is selected on the GPA Options - Calculations page. For more information, see the section
"
GPA Calculations
."
Note: On the Edit Section page for each course, there is an option to override a course's grade scale
with either "Same as Course," Default, or any other grade scales.
1. On the start page, choose School from the main menu.
2. Click Grade Scales. The Grade Scales page appears.
3. Click Edit Scale next to the name of the grade scale to be edited. The Grade Scale: [grade
scale] page appears.
4. Click the grade to be edited. The Edit Grade page appears.
District System Administrator User Guide
District Setup
© 2004 Apple Computer, Inc. All rights reserved.
375
5. Use the following table to edit information in the fields:
Field
Description
Grade
Enter the grade that you want to create for this grade scale,
such as A, B, or F.
Description
Enter a description of the grade in the field, such as Superior.
This description appears on grading reports.
Grade Points
Enter the number of grade points to include in the GPA. You
can enter up to and including the number 200.
For example, an A could be worth 4.0 grade points, a B worth
3.0 grade points, and an F worth 0 grade points.
Cutoff percent
Enter the lowest percentage students can earn to receive this
grade. For example, if you enter 93 for an A, then students must
earn at least 93% of the total points to receive an A. The system
uses the next highest cutoff percentage you define for a
different grade to determine the highest percent grade
students can earn to receive this grade.
Note: This is a suggested cutoff for your teachers to use.
District System Administrator User Guide
District Setup
© 2004 Apple Computer, Inc. All rights reserved.
376
Field
Description
Teachers can define their own cutoff percentages for this grade
in PowerGrade.
Gradebook value
This field indicates the value of a letter grade when teachers
give letter grades instead of numeric grades. Enter a number
for the value of the letter grade; usually, this is in the middle of
the range for the grade, such as 88 for a B+.
Counts in GPA?
Select this checkbox to determine that this grade calculates in
the GPA.
Receives added value?
Select this checkbox if users can enter a value for this grade
that exceeds the normal grade points.
Earns graduation credit?
Select this checkbox to determine that this grade earns credit
towards graduation requirements.
Teachers grade scale?
Select this checkbox to indicate that teachers use this grade
scale.
PowerLink (English)
If your school uses PowerLink, enter the phonetic English
spelling of this grade.
PowerLink (Spanish)
If your school uses PowerLink, edit the phonetic Spanish
spelling of this grade.
6. Click Submit. The Grade Scale: [grade scale] page displays the edited grade scale.
How to Delete a Grade Scale Grade
Deleting a grade for a grade scale affects all of the schools on your system. Use caution when
deleting a grade scale grade because changes affect current GPA calculations.
District System Administrator User Guide
District Setup
© 2004 Apple Computer, Inc. All rights reserved.
377
1. On the start page, choose School from the main menu.
2. Click Grade Scales. The Grade Scales page appears.
3. Click Edit Scale next to the name of the grade scale to be edited. The Grade Scale: [grade
scale] page appears.
4. Click the grade to be edited. The Edit Grade page appears.
District System Administrator User Guide
District Setup
© 2004 Apple Computer, Inc. All rights reserved.
378
5. Click Delete. The Selection Deleted page appears.
How to Edit a Grade Scale
Edits to any grade scales affect the grade scales for all of the schools on your system.
1. On the start page, choose School from the main menu.
2. Click Grade Scales. The Grade Scales page appears.
District System Administrator User Guide
District Setup
© 2004 Apple Computer, Inc. All rights reserved.
379
3. Click the name of the grade scale you want to edit. The Edit Grade Scale page appears.
4. Use the following table to enter information in the fields:
Type
Description
Name
Edit the name for the grade scale.
Note: You cannot rename the default grade scale.
District System Administrator User Guide
District Setup
© 2004 Apple Computer, Inc. All rights reserved.
380
Type
Description
Teacher Can Modify
Use this checkbox to indicate whether or not teachers can edit
this grade scale in PowerGrade.
Do one of the following:
•
Select this checkbox to allow teachers to edit this grade
scale in PowerGrade.
•
Deselect this checkbox to restrict teachers from editing
this grade scale in PowerGrade.
Description
Edit the description for the grade scale.
5. Click Submit. The Grade Scales page displays the edited grade scale.
How to Delete a Grade Scale
Deleting a grade scale does not affect grades that have already been assigned. The system uses the
default grade scale for any course or section that is no longer associated with a grade scale.
Deleting a grade scale is possible only if the "Permit modification of grade scales" checkbox is
selected on the GPA Options - Calculations page. For more information, see the section "
GPA
Calculations
."
1. On the start page, choose School from the main menu.
2. Click Grade Scales. The Grade Scales page appears.
3. Click the name of the grade scale you want to delete. The Edit Grade Scale page appears.
District System Administrator User Guide
District Setup
© 2004 Apple Computer, Inc. All rights reserved.
381
Note: You cannot delete the default grade scale.
4. Click Delete. The Selection Deleted page appears.
GPA Calculations
Before running a grade-related report, such as a report card, set up the correct parameters to
calculate your school's grade point average. Some schools also choose to factor into the GPA
calculation the number of times a student takes a course. Since GPAs are calculated on-the-fly, any
changes take effect immediately and affect all schools on the server.
For information on setting the calculation methods and attempt types, see the following sections:
•
"
GPA Calculation Methods
"
•
"
GPA Attempt Types
"
For information on other GPA settings, see the section "
How to Set Other GPA Settings
."
GPA Calculation Methods
Create GPA calculation methods to define the formula and criteria for GPA calculations.
PowerSchool includes four standard calculation methods: Simple, Simple Percent, Weighted, and
Weighted Percent. You can modify the standard methods to meet your needs or create an
unlimited number of additional calculation methods.
Any changes or additions to the list of calculation methods affect all schools on your server. To
share a method with schools on other servers, export the method as a template. For more
information, see the section "
How to Export GPA Calculation Methods
." If you have the
proper permissions, you can remove a calculation method using DDA/DDE. For more information,
see the section "
Direct Database Export
."
District System Administrator User Guide
District Setup
© 2004 Apple Computer, Inc. All rights reserved.
382
Once GPA is calculated, the GPA code is used to present GPA information on reports, exports, and
student pages. This code always starts with *gpa and is followed by optional parameters that
include pairs of names and values.
Examples of the GPA code include:
•
~(*gpa) returns the cumulative weighted GPA for a student for all years at the school
•
~(*gpa method=weighted type=cumulative grade=12 credittypeCORE) returns a weighted
GPA for core classes for the student's senior year
The following table lists the parameters and values. All parameters except for "method" are
overridden by any settings in the calculation method. Parameters and values can be included in the
code in any sequence.
Parameter
Description
Example
method
Specifies the name of the specific calculation
method that should be used when performing
this calculation. If omitted, a method called
"weighted" will be used.
method=weighted
method=simple
method=honors
type
Specifies the type of the calculation. Valid
options are:
•
Cumulative: Uses values from
historical grades only.
•
Current: Uses the current (not stored)
grades sent by PowerGrade. If "current"
is specified, the term, grade, and year
attributes, if specified, are ignored;
only grades from the in-session school
year using the store code specified on
the Current Grade Display settings
page in District Setup will be used.
•
Projected: Uses the historical grades,
plus those projected grades as defined
in the calculation method.
If omitted, "cumulative" is used.
type=cumulative
type=current
type=projected
term
One or more term abbreviations. Only grades
whose store codes match the specified
abbreviations will be used in the calculation.
Separate multiple terms with commas. If
omitted, any store code is permitted. If one or
more term abbreviations are specified but no
grade or year, only grades from the current
school year are used.
term=S1 term=Q1,Q2,Q3
District System Administrator User Guide
District Setup
© 2004 Apple Computer, Inc. All rights reserved.
383
Parameter
Description
Example
grade
One or more grade levels. Only grades stored
at the specified grade levels will be used in the
calculation. Separate multiple grade levels
with commas. If omitted, the historical grade
range for the school is used.
grade=12 grade=7,8,9
year
One or more four-digit school years. Only
grades stored during the specified school
years will be used in the calculation. Specify
the start year of a school year that spans
multiple calendar years. For example, use 2003
for the 2003-2004 school year. Separate
multiple years with commas. If omitted, all
school years are used.
year=1999
year=1998,1999,2000
credittype
One or more credit types. Only grades that
match one or more of the specified credit
types will be used in the calculation. Separate
multiple credit types with commas. If omitted,
grades with any credit type, including no
credit type, are used.
credittype=English
credittype=ENG,SCI,MATH
credittype=Core,Electives
scale
The name of the grade scale to use for this
calculation. If a particular letter grade is not
present in the specified grade scale, that grade
will not be included in the calculation. If the
name of the grade scale specified is
unrecognized, a scale called Default is used. If
omitted, the GPA points from the grade itself
are used.
scale=Default
scale=Standard
scale=Honors
How to Add GPA Calculation Methods
You must log in to the district office before performing this procedure.
1. On the start page, choose District from the main menu.
2. Click GPA Calculations. The GPA Settings page appears.
District System Administrator User Guide
District Setup
© 2004 Apple Computer, Inc. All rights reserved.
384
3. Click Calculation Methods. The GPA Calculation Methods page appears.
4. Click New. The GPA Calculation Method page appears.
District System Administrator User Guide
District Setup
© 2004 Apple Computer, Inc. All rights reserved.
385
5. Use the following table to enter information in the fields:
Field
Description
Method name
Enter the name of the calculation method. This is the name that
will be referred to in GPA codes on other pages in PowerSchool.
Note: The standard methods Weighted and Simple cannot be
renamed.
Description
Enter a description of the calculation method. This description
appears on the GPA Calculation Methods page.
Formula
Enter the formula for the method used to determine the result
of the calculation. The formula closely resembles a formula
used on a spreadsheet.
District System Administrator User Guide
District Setup
© 2004 Apple Computer, Inc. All rights reserved.
386
Field
Description
Formulas can include functions, such as average, round, and
sum. Use standard operators, such as + (addition) and *
(multiplication), or use logical operators such as = (equal to)
and > (greater than).
For more information, see the section "
Formulas for
Calculation Methods
."
Calculation type
Choose an option from the pop-up menu:
•
Cumulative: Uses historical grades in the calculation
that match the query options specified.
•
Current: Uses current final grades in the calculation, as
determined in the School Setup area. A current
calculation type uses the current final grades from
PowerGrade. Terms, grade levels, and school years are
ignored with this calculation type.
•
Projected: Uses historical grades and additional grades
as defined in the Projected GPA Options area of the
GPA Calculation Method page. A projected calculation
type uses historical grades that match the query
options specified, plus additional grades determined by
any Projected GPA Options.
If the calculation type is specified, the type parameter of the
GPA code is ignored.
Grade scale
To override the GPA points used in the calculation with a single
grade scale, choose the grade scale from this pop-up menu. If a
specific letter grade is not found in the grade scale, it is not
used in the calculation.
Ordinarily, the GPA points associated with the stored grade are
used in the calculation. Typically, these are the weighted points.
A single grade scale may be specified to override these GPA
points with the values in the specified grade scale for this
calculation.
For example, a stored grade A may have 5 GPA points. That
same A may only be worth 4 GPA points on the Standard grade
scale. Use scales to calculate complex weighted GPAs for class
ranking and honor roll applications, while maintaining a
standard 4.0 scale to use on transcripts and college
applications.
If a grade scale is specified, the scale parameter of the GPA
code is ignored.
District System Administrator User Guide
District Setup
© 2004 Apple Computer, Inc. All rights reserved.
387
Field
Description
Terms
Optionally, specify one or more term abbreviations, such as Q1
or S2, to use in the calculation. Separate multiple values with
commas. Only grades whose store code matches one of the
term abbreviations will be included in the calculation.
If the calculation type is Current, terms are ignored. If terms are
specified, the term parameter of the GPA code is ignored.
Grade levels
Optionally, specify one or more grade levels to use in the
calculation. Use the numeric grade level, such as 11 for
eleventh grade or 0 for kindergarten. Separate multiple values
with commas. Only grades recorded when a student was at the
specified grade levels will be included in the calculation.
Note that only grades that fall within the historical grade levels
specified in the school's record in District Setup may be
specified. For example, if the historical range for the school is
9­12, specifying 8 in the GPA code will return zero.
Separate multiple grade levels with commas. If omitted, the
historical grade range for the school is used.
If the calculation type is Current, grade levels are ignored. If
grade levels are specified, the grade parameter of the GPA code
is ignored.
School years
Optionally, specify one or more four-digit school years to use in
the calculation. For example, enter 2003 for the 2003-2004
school year. Separate multiple values with commas. Only
grades recorded during the specified school years will be
included in the calculation.
School years are closely related to grade levels. As such, if the
school year specified translates to a student's grade level that is
outside the historical range for the school, zero will be returned.
For more information, refer to the "Grade levels" field.
If the calculation type is Current, school years are ignored. If
school years are specified, the year parameter of the GPA code
is ignored.
Credit types
Optionally, specify one or more credit types to use in the
calculation. Separate multiple values with commas. Only grades
whose credit type matches one of the types specified will be
included in the calculation.
In case of a current GPA, the course's credit type is used. In case
of a cumulative GPA, the credit type specified for the stored
grade is used if present; otherwise, the course's credit type is
District System Administrator User Guide
District Setup
© 2004 Apple Computer, Inc. All rights reserved.
388
Field
Description
used, if found.
If an historical grade does not have a credit type or if the
calculation type is Current, the course's credit type is used. If
credit types are specified, the credittype parameter of the GPA
code is ignored.
Only include grades
Select all, none, or a combination of the following checkboxes
to narrow the selection of grades used in the calculation:
•
That count in GPA: Includes only historical grades that
are specified to be included in the GPA. If the
calculation type is Current, only grades from courses
and sections that have been flagged to be included in
GPA will be included in the calculation.
•
That count in class rank: Includes only historical grades
that are specified to be included in the class rank. If the
calculation type is Current, only grades from courses
and sections that have been flagged to be included in
class rank will be included in the calculation.
•
That count in honor roll: Includes only historical grades
that are specified to be included in the honor roll. If the
calculation type is Current, only grades from courses
and sections that have been flagged to be included in
honor roll will be included in the calculation.
•
With potential credit: Includes only historical grades
that have a potential credit that is not zero. If the
calculation type is Current, the potential credit is
determined by referring to the corresponding course
record.
If you deselect all of these checkboxes, all historical grades will
be included in the calculation.
Projected grades are
If the calculation type is Projected, choose the type of grades
used for projected GPA calculations from this pop-up menu.
Projected grades are used to determine grades mid-term, such
as when colleges want grades for a twelfth-grade student for
admission purposes.
•
Current final grades: Uses current final grades from
PowerGrade, as determined in the School Setup area.
•
Stored grades from this term: Enter the term
abbreviation in the blank field.
District System Administrator User Guide
District Setup
© 2004 Apple Computer, Inc. All rights reserved.
389
Field
Description
Do not add grade if
If the calculation type is Projected, choose the term for the
grade to use in projected GPA calculations from this pop-up
menu:
•
A grade for the course exists in any term
•
A grade for the course exists in this term: Enter the term
abbreviation in the blank field.
A grade will not be added to the calculation if there already
exists an historical grade for the current school year with the
same course number for any store code or for the specified
store code.
Stored credit hours
If the calculation type is Projected, choose the credit hours
option used in projected GPA calculations from this pop-up
menu:
•
Use actual credit hours
•
Get potential credit from course
If projected grades are historical grades, specify whether to use
the actual potential and earned credit stored with the grade or
to use the potential credit hours from the corresponding
course.
Note: When using projected GPA options, most schools will set the last three options as:
"Projected grades are stored grades from this [specified] term;" "Do not add grade if a grade
for this course exists in any term;" and "Stored credit hours use the course's potential credit
hours."
6. Click Submit. The GPA Calculation Methods page displays the new method.
How to Edit GPA Calculation Methods
You must log in to the district office before performing this procedure.
1. On the start page, choose District from the main menu.
2. Click GPA Calculations. The GPA Settings page appears.
District System Administrator User Guide
District Setup
© 2004 Apple Computer, Inc. All rights reserved.
390
3. Click Calculation Methods. The GPA Calculation Methods page appears.
4. Click the name of the calculation method to be edited. The GPA Calculation Method page
appears.
District System Administrator User Guide
District Setup
© 2004 Apple Computer, Inc. All rights reserved.
391
5. Modify the GPA Calculation Method information. See the section "
How to Add GPA
Calculation Methods
" to enter information in the fields.
6. Click Submit. The GPA Calculation Methods page displays the edited method.
How to Export GPA Calculation Methods
After you create and save a calculation method, you can export the calculation method for use on
another PowerSchool server. The option to export the calculation method is available only for saved
methods.
You must log in to the district office before performing this procedure.
1. On the start page, choose District from the main menu.
2. Click GPA Calculations. The GPA Settings page appears.
District System Administrator User Guide
District Setup
© 2004 Apple Computer, Inc. All rights reserved.
392
3. Click Calculation Methods. The GPA Calculation Methods page appears.
4. Click the name of the calculation method to be exported. The GPA Calculation Method page
appears.
District System Administrator User Guide
District Setup
© 2004 Apple Computer, Inc. All rights reserved.
393
5. Click "Export as template." Save the file as a PowerSchool Template file (*.pst). You can now
share the file with other PowerSchool servers.
Formulas for Calculation Methods
Like a formula in a spreadsheet, create formulas for calculation methods in PowerSchool. Formulas
consist of functions and arguments, in most cases. Functions are used to perform operations on
values, such as calculating a sum or an average, including a grade point average.
There are five categories of functions:
•
Numeric: Such as rounded, truncated by specified number of places
•
Logical: Such as "if," "and," "or"
•
Statistical: Such as average, max, min, median, product, sum
District System Administrator User Guide
District Setup
© 2004 Apple Computer, Inc. All rights reserved.
394
•
Text: Such as ASCII characters, uppercase, repeat text by specified number of times
•
GPA functions: Such as number of grades counted in GPA, course numbers, GPA calculation
Results of GPA functions may be arrays of values, which are in braces and separated by commas.
For example, the function gpa_percent() may return the result {95.5,83.2,67.8,92} for a student.
When you combine the gpa_percent() function with the statistical function average, the formula
average(gpa_percent()) returns the result of 84.625 for those four grades.
Embed functions within each other to return the exact result you want. When appending the
Round function to the example above to create the formula round(average(gpa_percent()),2), the
result is 84.63. The value 2 in the formula indicates the number of digits to round from the decimal
point.
You can also use any standard numeric or text operators in a formula, such as + (addition), -
(subtraction), * (multiplication), / (division), \ (integer division), ^ (exponentiation), % (modulo), and
& (concatenation). The following comparison operators may be used in logical functions: < (less
than), <= (less than or equal to), > (greater than), >= (greater than or equal to), = (equal to), and <>
(not equal to). For example, use the formula if((average(gpa_percent()))>90,Outstanding Academic
Achievement,) to return the phrase Outstanding Academic Achievement if a student's average
percentage for the grades exceeds 90 percent. If not, the formula returns nothing.
For more information on functions, see the section "
Functions
." For a list of functions, see the
following sections:
•
"
Numerical Functions
"
•
"
Logical Functions
"
•
"
Statistical Functions
"
•
"
Text Functions
"
•
"
GPA Functions
"
After you work with GPA calculations, you may want to see the
GPA Quick Reference Card
for
sample functions and output, as well as a description and examples of using the GPA code for
reporting purposes. The GPA Quick Reference Card is in PDF format; you must have Adobe Acrobat
Reader to view the file. For more information on the PDF file type, see the section "
What Is a
PDF?
"
GPA Attempt Types
When calculating a student's GPA, it may be important to consider the number of times he or she
attempts to take a course. An attempt is a numerical expression to determine the length of the
term. The name of the attempt type is the first letter of the term abbreviation, such as Y for year or
S for semester. The corresponding number is the numeric expression, using decimals for fragments
of the term.
Attempt types are used by the gpa_attempts() function. Attempts for a grade are determined by
looking up the first character of the store code or term abbreviation, which is listed with the
District System Administrator User Guide
District Setup
© 2004 Apple Computer, Inc. All rights reserved.
395
attempt type. If a match is found, the value specified for the attempt type is returned. If a match is
not found, zero is returned as a result of that function. For more information on functions, see the
section "
Formulas for Calculation Methods
."
How to Add GPA Attempt Types
If you are using the gpa_attempts() function, set up GPA attempt types to factor in GPA calculations
the number of times a student takes a course. Otherwise, it is not necessary to create attempt types.
You must log in to the district office before performing this procedure.
1. On the start page, choose District from the main menu.
2. Click GPA Calculations. The GPA Settings page appears.
3. Click Attempt Types. The GPA Attempt Types page appears.
4. Click New. The GPA Attempt Type page appears.
District System Administrator User Guide
District Setup
© 2004 Apple Computer, Inc. All rights reserved.
396
5. Use the following table to enter information in the fields:
Field
Description
Name
Enter the name of the attempt type, which is the first letter of
the term abbreviation.
Value
Enter the value of the attempt type.
Description
Enter a description for the attempt type.
6. Click Submit. The GPA Attempt Types page displays the new attempt type.
How to Edit GPA Attempt Types
You must log in to the district office before performing this procedure.
1. On the start page, choose District from the main menu.
2. Click GPA Calculations. The GPA Settings page appears.
District System Administrator User Guide
District Setup
© 2004 Apple Computer, Inc. All rights reserved.
397
3. Click Attempt Types. The GPA Attempt Types page appears.
4. Click the name of the attempt type to be edited. The GPA Attempt Type page appears.
5. Use the following table to enter information in the fields:
District System Administrator User Guide
District Setup
© 2004 Apple Computer, Inc. All rights reserved.
398
Field
Description
Name
Enter the name of the attempt type, which is the first letter of
the term abbreviation.
Value
Enter the value of the attempt type.
Description
Enter a description for the attempt type.
6. Click Submit. The GPA Attempt Type page displays the edited attempt type.
How to Delete GPA Attempt Types
You must log in to the district office before performing this procedure.
1. On the start page, choose District from the main menu.
2. Click GPA Calculations. The GPA Settings page appears.
3. Click Attempt Types. The GPA Attempt Types page appears.
District System Administrator User Guide
District Setup
© 2004 Apple Computer, Inc. All rights reserved.
399
4. Click the name of the attempt type to be deleted. The GPA Attempt Type page appears.
5. Click Delete. The GPA Attempt Types page displays without the deleted attempt type.
District System Administrator User Guide
District Setup
© 2004 Apple Computer, Inc. All rights reserved.
400
How to Set Other GPA Settings
Modify other global settings related to GPA calculations, including the number of decimal places
used in credit hours and the ability to prevent modifications of grade scales.
You must log in to the district office before performing this procedure.
1. On the start page, choose District from the main menu.
2. Click GPA Calculations. The GPA Settings page appears.
3. Click Miscellaneous. The GPA Misc Settings page appears.
4. Use the following table to enter information in the fields:
Field
Description
Number of decimal
places in credit hours
Enter the number of places from the decimal point to display
for the credit hours.
Permit modification of
grade scales
Select this checkbox if you want users to be able to modify
grade scales. It is suggested that you deselect this checkbox
after the start of the school year to prevent users from
modifying grade scales. Regardless of this setting, grade scales
can still be modified in PowerGrade.
5. Click Submit. The Changes Recorded page appears.
District System Administrator User Guide
District Setup
© 2004 Apple Computer, Inc. All rights reserved.
401
Functions
Formulas consist of functions and arguments, in most cases. Functions are used to perform
operations on values, such as calculating a sum or an average, including a grade point average
(GPA).
There are five categories of functions:
•
Numerical functions: Such as rounded, truncated by specified number of places
•
Logical functions: Such as "if," "and," "or"
•
Statistical functions: Such as average, max, min, median, product, sum
•
Text functions: Such as ASCII characters, uppercase, repeat text by specified number of
times
•
GPA functions: Such as number of grades counted in GPA, course numbers, GPA calculation
Functions must always include the parentheses, even if no arguments are specified. When
specifying arguments to functions, be sure to enclose text values in quotation marks.
GPA Samples
Sample GPA formulas are listed below to illustrate the options available.
PowerSchool's traditional cumulative weighted GPA, rounded to 3 decimal places:
round((gpa_sum(gpa_gpapoints()*gpa_potentialcredit()/sum(gpa_potentialcredit()),3)
PowerSchool's traditional cumulative simple GPA, truncated to 2 decimal places:
trunc((average(gpa_gpapoints()),2)
A value added GPA:
average(gpa_gpapoints())+sum(gpa_addedvalue())
The number of A grades received:
countof(A,gpa_grade())+countof(A+,gpa_grade())+countof(A-,gpa_grade())
Total of all earned credit:
sum(gpa_earnedcredit())
The text "You are a star student!" if the student received more than 3 A+ grades:
District System Administrator User Guide
District Setup
© 2004 Apple Computer, Inc. All rights reserved.
402
if(countof(A+,gpa_grade())>=3,You are a star student!,)
The list of all letter grades, GPA points, and potential credit values used by the calculation:
gpa_grade()&&gpa_gpapoints()&&gpa_potentialcredit()
The result of one GPA calculation if the student has any grades with added value, or the result of
another if not:
if(sum(gpa_addedvalue())>0,gpa_calculation(honors),gpa_calculation(standard))
Numerical Functions
Functions are used to perform operations on values, such as rounding numbers to a specified
number of digits. The functions in this category are listed alphabetically.
Most functions have at least one required argument, though some do not accept any arguments.
Optional arguments are surrounded by braces { }. A brief description and one or more examples
follow each function.
Function name or
alternate function
Function
Description
Examples
Abs (Absolute Value)
abs(number)
Returns the absolute
value of the number.
The result is either a
positive number or
zero.
abs(-4) returns 4
abs(78) returns 78
abs(0) returns 0
Dec (Decimal) or
Frac (Fraction)
dec(number)
Returns the decimal
(fractional) part of a
real number. The
result is always
positive.
dec(22.575) returns
0.575
dec(-4.12) returns
0.12
Exp (Exponent)
exp(number)
Returns e raised to
the power of the
number. The
constant e equals
2.718281828459, the
base of the natural
logarithm.
exp(1) returns
2.71828...
exp(0.707) returns
2.02811...
Fact (Factorial)
fact(number)
Returns the factorial
of the number, equal
to 1*2*3*...*number.
fact(5) returns 120
fact(7) returns 5040
District System Administrator User Guide
District Setup
© 2004 Apple Computer, Inc. All rights reserved.
403
Function name or
alternate function
Function
Description
Examples
If the number is
negative, returns the
#NUM! error value.
Int (Integer)
int(number)
Rounds the number
down to the nearest
integer. If the
number is positive,
returns the integer
equal to or less than
the number. If the
number is negative,
rounds down to the
next lowest whole
number.
int(5.76) returns 5
int(-42.123) returns -
43
Ln (Natural Log)
ln(number)
Returns the natural
logarithm of the
number. If the
number is negative,
returns the #NUM!
error value.
round(ln(2.71828),3)
returns 1
ln(4) returns 1.3863...
Log2 (Log to Base 2)
log2(number)
Returns the
logarithm of the
number to base 2. If
the number is
negative, returns the
#NUM! error value.
log2(43) returns
5.4263...
Log10 (Log to Base
10)
log10(number)
Returns the
logarithm of the
number to base 10.
This is the inverse of
the number E in
scientific notation. If
the number is
negative, returns the
#NUM! error value.
log10(100000)
returns 5
Log
log(number{,base})
Returns the
logarithm of the
number to a base. If
the base is omitted,
uses 10. If the
log(10000) returns 4
log(10000,6) returns
5.1404...
District System Administrator User Guide
District Setup
© 2004 Apple Computer, Inc. All rights reserved.
404
Function name or
alternate function
Function
Description
Examples
number or base is
negative, returns the
#NUM! error value.
Mod (Modulo)
mod(number,divisor) Returns the
remainder when the
number is divided by
the divisor. The
result has the same
sign as the value of
the number being
divided. If the
number or divisor is
a real number, it will
be rounded before
calculating the
modulo.
mod(5,-2) returns 1
mod(23,7) returns 2
Pi
pi()
Returns pi, the ratio
of a circle's
circumference to its
diameter.
pi() returns
3.141592653589793
116
Power
power(number,powe
r)
Returns the result of
the number raised to
a power.
power(2,8) returns
256
power(14,0.5)
returns 3.7417...
Rand (Random)
rand({number})
Returns a random
number between 0
and the number. If
the number is
omitted, the
returned value is
between 0 and 1.
rand() returns
0.8462...
rand(50) returns
31.4896...
Round
round(number,digits
)
Returns a number
rounded to the
specified number of
digits from the
decimal point. If
digits is positive, it
specifies the number
of digits to the right
round(59.72893,3)
returns 59.729
round(115925.45,-3)
returns 116000
District System Administrator User Guide
District Setup
© 2004 Apple Computer, Inc. All rights reserved.
405
Function name or
alternate function
Function
Description
Examples
of the decimal point.
If negative, it
specifies the number
of digits to the left of
the decimal point.
Sign
sign(number)
Returns 1 when the
number is positive, -
1 when it is negative,
and 0 when it is zero.
sign(42) returns 1
sign(-827.32) returns
-1
sign(0) returns 0
Sqrt (Square Root)
sqrt(number)
Returns the positive
square root of the
number. If the
number is negative,
returns the #NUM!
error value.
sqrt(25) returns 5
sqrt(86) returns
9.2736...
Trunc (Truncate)
trunc(number{,digits
})
Truncates the
number by
removing the
decimal (fractional)
part of the number.
If digits is specified,
it specifies the
precision (number of
decimal places) to
truncate.
trunc(548.14687)
returns 548
trunc(3.4583,2)
returns 3.45
Logical Functions
Functions are used to perform operations on values, such as returning a specified number if certain
conditions are met. The functions in this category are listed alphabetically.
Most functions have at least one required argument, though some do not accept any arguments.
Optional arguments are surrounded by braces { }. A brief description and one or more examples
follow each function.
Function name or
alternate function
Function
Description
Examples
And
and(logical1{,logical2
,...})
Returns 1 if all of the
arguments are true
and(1,0,1,43) returns
0
District System Administrator User Guide
District Setup
© 2004 Apple Computer, Inc. All rights reserved.
406
Function name or
alternate function
Function
Description
Examples
,...})
(not zero), or 0 if any
argument is false
(zero).
0
and((5=5),1) returns
1
If
if(logical,true_value,f
alse_value)
Returns the
true_value if the
logical argument is
true (not zero), or
the false_value if the
logical argument is
false (zero).
if(1,100,0) returns
100
if(gpa_count()>20,Lo
ts,Few) returns Few
IsBlank
isblank(text)
Returns 1 if the text
is blank or 0 if it is a
number or contains
text.
isblank(83.2) returns
0 isblank(test)
returns 0 isblank()
returns 1
IsEven
iseven(number)
Returns 1 if the
number is zero or
evenly divisible by 2,
or 0 if it is not.
iseven(42) returns 1
iseven(-17) returns 0
IsLogical
islogical(value)
Returns 1 if the
argument can be
interpreted as a
logical value (0 or 1),
or 0 if it cannot.
islogical(0) returns 1
islogical(gpa) returns
0
IsNumber
isnumber(value)
Returns 1 if the
argument is a
number, or 0 if it is
text.
isnumber(3.412)
returns 1
isnumber(A+)
returns 0
IsOdd
isodd(number)
Returns 1 if the
number is not zero
or evenly divisible by
2, or 0 if it is.
isodd(42) returns 0
isodd(-17) returns 1
IsText
istext(value)
Returns 1 if the
argument is text, or
0 if it is a number.
istext(0) returns 0
istext(gpa) returns 1
Not
not(logical)
Reverses the logic of
the logical value:
Returns 1 if logical is
not(1) returns 0
not(5=4) returns 1
District System Administrator User Guide
District Setup
© 2004 Apple Computer, Inc. All rights reserved.
407
Function name or
alternate function
Function
Description
Examples
false (zero), or 0 if
logical is true (not
zero).
Or
or(logical1{,logical2,..
.})
Returns 1 if any of
the arguments are
true (not zero), or 0 if
all are false (zero).
or(0,0,1,0) returns 1
or((5=4),0) returns 0
Statistical Functions
Functions are used to perform operations on values, such as calculating a sum or an average. The
functions in this category are listed alphabetically.
Most functions have at least one required argument, though some do not accept any arguments.
Optional arguments are surrounded by braces { }. A brief description and one or more examples
follow each function.
Function name or
alternate function
Function
Description
Examples
Average or Avg or
Mean
average(number1{,n
umber2, ...})
Returns the average
(arithmetic mean) of
the numeric
arguments. The
arguments may be
individual numbers
or results of
functions that return
arrays of numbers.
average(12,18,25,15)
returns 17.5
average(gpa_percen
t()) returns 80.5
Count
count(value1{,value2
, ...})
Returns the number
of arguments given.
The arguments may
be individual values
or results of
functions that return
arrays of values.
count(12,18,25,15)
returns 4
count(gpa_percent()
) returns 5
CountOf
countof(search_valu
e,value1 {,value2, ...})
Returns the number
of occurrences of
search_value in the
remaining
arguments. The
countof(3.5,4,3.75,3.5
,3,3, 4,3,2,3.5,2.5,3)
returns 2
countof(A,gpa_grad
e()) returns 1
District System Administrator User Guide
District Setup
© 2004 Apple Computer, Inc. All rights reserved.
408
Function name or
alternate function
Function
Description
Examples
arguments may be
individual values or
results of functions
that return arrays of
values.
e()) returns 1
Distinct
distinct(value1{,value
2, ...})
Returns an array of
the unique values
found in the
arguments. The
arguments may be
individual values or
results of functions
that return arrays of
values.
distinct(4,3.75,3.5,3,3,
4,3,2,3.5,2.5,3)
returns
{4,3.75,3.5,3,2,2.5}
distinct(gpa_grade())
returns {A,B+,B,C+,F}
Geomean
(Geometric Mean)
geomean(number1
{,number2, ...})
Returns the
geometric mean of
the positive numeric
arguments. The
arguments may be
individual numbers
or results of
functions that return
arrays of numbers. If
any argument is
negative, returns the
#NUM! error value.
geomean(12,18,25,1
5) returns 16.8702 ...
geomean(gpa_perce
nt()) returns 79.0972
...
Harmean (Harmonic
Mean)
harmean(number1
{,number2, ...})
Returns the
harmonic mean of
the positive numeric
arguments, the
reciprocal of the
arithmetic mean of
reciprocals. The
arguments may be
individual numbers
or results of
functions that return
arrays of numbers. If
any argument is
negative, returns the
#NUM! error value.
harmean(12,18,25,15
) returns 16.2896 ...
harmean(gpa_perce
nt()) returns 77.5126
...
District System Administrator User Guide
District Setup
© 2004 Apple Computer, Inc. All rights reserved.
409
Function name or
alternate function
Function
Description
Examples
Max (Maximum)
max(number1
{,number2, ...})
Returns the largest
number in the list of
arguments. The
arguments may be
individual numbers
or results of
functions that return
arrays of numbers.
max(12,18,25,15)
returns 25
max(gpa_percent())
returns 96.2
Maxa (Maximum
Alphabetic)
maxa(value1
{,value2, ...})
Sorts the arguments
alphabetically, then
returns the last
value. The
arguments may be
individual values or
results of functions
that return arrays of
values.
maxa(red,white,blue,
green) returns white
Median
median(number1
{,number1, ...})
Returns the median
of the numeric
arguments. The
median is the
number in the
middle; half of the
numbers are greater
than the median,
half are less. If there
is an even number of
arguments, returns
the average of the
two numbers in the
middle.
median(1,2,3,4,5)
returns 3
median(1,2,3,4,5,6)
returns 3.5
median(gpa_gpapoi
nts()) returns 3.333
Min (Minimum)
min(number1
{,number2, ...})
Returns the smallest
number in the list of
arguments. The
arguments may be
individual numbers
or results of
functions that return
arrays of numbers.
min(12,18,25,15)
returns 12
min(gpa_percent())
returns 54.8
Min (Minimum
mina(value1 {,value2, Sorts the arguments
mina(red,white,blue,
District System Administrator User Guide
District Setup
© 2004 Apple Computer, Inc. All rights reserved.
410
Function name or
alternate function
Function
Description
Examples
Alphabetic)
...})
alphabetically, then
returns the first
value. The
arguments may be
individual values or
results of functions
that return arrays of
values.
green) returns blue
Mode
mode(value1
{,value2, ...})
Returns the mode of
the arguments. The
mode is the most
frequently occurring,
or repetitive, value. If
no value repeats,
returns #N/A. In the
case of a uniform
distribution, or
multiple modes,
returns only one
value. The
arguments may be
individual values or
results of functions
that return arrays of
values.
mode(12,18,25,15)
returns #N/A
mode(12,18,25,15,19,
14,18,9,16,20)
returns 18
mode(gpa_gpagrade
()) returns B
Product
product(number1
{,number2, ...})
Multiplies all the
numeric arguments
and returns the
result. The
arguments may be
individual numbers
or results of
functions that return
arrays of numbers.
product(12,18,25,15)
returns 8100
Range
range(number1
{,number2, ...})
Returns the
difference between
the largest and
smallest numeric
arguments. The
arguments may be
individual numbers
range(12,18,25,15)
returns 13
range(gpa_gpapoint
s()) returns 4
District System Administrator User Guide
District Setup
© 2004 Apple Computer, Inc. All rights reserved.
411
Function name or
alternate function
Function
Description
Examples
or results of
functions that return
arrays of numbers.
Stdev (Standard
Deviation)
stdev(number1,num
ber2 {,number3, ...})
Calculates the
standard deviation
of a population
based on a sample
given as a list of
arguments using the
nonbiased or n-1
method. A standard
deviation is a
measure of how
widely values are
dispersed from the
average value
(arithmetic mean).
The arguments may
be individual
numbers or results
of functions that
return arrays of
numbers. If your
data represents the
entire population,
use Stdevp.
stdev(12,18,25,15)
returns 5.56778 ...
stdev(gpa_percent())
returns 15.6962 ...
Stdevp (Standard
Deviation
Population)
stdev(number1,num
ber2 {,number3, ...})
Calculates the
standard deviation
of an entire
population given as
a list of arguments
using the biased or n
method. A standard
deviation is a
measure of how
widely values are
dispersed from the
average value
(arithmetic mean).
The arguments may
be individual
numbers or results
stdev(12,18,25,15)
returns 4.8218 ...
stdev(gpa_percent())
returns 14.0391 ...
District System Administrator User Guide
District Setup
© 2004 Apple Computer, Inc. All rights reserved.
412
Function name or
alternate function
Function
Description
Examples
of functions that
return arrays of
numbers. If your
data represents a
sample of the
population, use
Stdev.
Sum
sum(number1
{,number2, ...})
Adds all the numeric
arguments and
returns the result.
The arguments may
be individual
numbers or results
of functions that
return arrays of
numbers.
sum(12,18,25,15)
returns 70
sum(gpa_potentialcr
edit()) returns 4
Var (Variance)
var(number1,numbe
r2 [,number3, ...})
Returns the variance
of a population
based on a sample
given as a list of
arguments. The
arguments may be
individual numbers
or results of
functions that return
arrays of numbers. If
your data represents
the entire
population, use Varp.
var(12,18,25,15)
returns 31
var(gpa_gpapoints())
returns 2.5138 ...
Varp (Variance
Population)
var(number1,numbe
r2 {,number3, ...})
Returns the variance
of an entire
population given as
a list of arguments.
The arguments may
be individual
numbers or results
of functions that
return arrays of
numbers. If your
data represents a
sample of the
varp(12,18,25,15)
returns 23.25
varp(gpa_gpapoints(
)) returns 2.0110 ...
District System Administrator User Guide
District Setup
© 2004 Apple Computer, Inc. All rights reserved.
413
Function name or
alternate function
Function
Description
Examples
population, use Var.
Text Functions
Functions are used to perform operations on values, such as joining two strings of text together.
The functions in this category are listed alphabetically.
Most functions have at least one required argument, though some do not accept any arguments.
Optional arguments are surrounded by braces { }. A brief description and one or more examples
follow each function.
Function name or
alternate function
Function
Description
Examples
Char (Character)
char(number)
Returns the ASCII
character
corresponding to the
number. The ASCII
set used is the
Macintosh extended
ASCII set.
char(65) returns A
char(92) returns \
Code (ASCII Code)
code(text)
Returns the numeric
ASCII code of the
first character in the
text. The ASCII set
used is the
Macintosh extended
ASCII set.
code(A) returns 65
code(gpa is fun)
returns 103
Concatenate or
Concat
concatenate(text1{,t
ext2,...})
Joins several strings
of text into one
string of text.
concatenate(gpa,is,f
un) returns gpaisfun
concatenate(gpa_co
unt(),,grades) returns
29 grades
Exact
exact(text1,text2)
Returns 1 if both
arguments are
identical in case and
characters, or 0 if
different.
exact(GPA,gpa)
returns 0
exact(Mr. Smith,Mr.
Smith) returns 1
Left
left(text{,num_chara
cters})
Returns the first
(leftmost) character
left(GPA) returns G
District System Administrator User Guide
District Setup
© 2004 Apple Computer, Inc. All rights reserved.
414
Function name or
alternate function
Function
Description
Examples
cters})
or characters in the
text. If
num_characters is
omitted, returns 1
character.
left(Mr. Smith,3)
returns Mr.
Len (Length)
len(text)
Returns the number
of characters in the
text, including
spaces, numbers,
and special
characters.
len(GPA) returns 3
len(Mr. Smith)
returns 8
Lower
lower(text)
Converts any
uppercase characters
in the text to
lowercase.
lower(GPA) returns
gpa
lower(Mr. Smith)
returns mr. smith
Mid (Middle)
mid(text,start_positi
on, num_characters)
Returns a specific
number of
characters from the
text starting at the
position you specify.
mid(GPA,1,1) returns
P
mid(Mr. Smith,3,4)
returns . Smi
Proper
proper(text)
Capitalizes the first
letter and any letter
following a non-
letter in the text.
proper(GPA) returns
Gpa
proper(2-cent's
worth) returns 2-
Cent'S Worth
Replace
replace(text,start_po
sition,
num_characters,new
_text)
Replaces
num_characters
characters of text
with the new_text
starting at the
position you specify.
replace(gpa
codes,4,5,is fun)
returns gpa is fun
replace(Mr.
Smith,1,3,Mrs.)
returns Mrs. Smith
Rept (Repeat)
rept(text,number_ti
mes)
Repeats the text the
specified number of
times.
rept(gpa is fun ,5)
returns gpa is fun
gpa is fun gpa is fun
gpa is fun gpa is fun
rept(-
,average(gpa_gpapoi
District System Administrator User Guide
District Setup
© 2004 Apple Computer, Inc. All rights reserved.
415
Function name or
alternate function
Function
Description
Examples
nts())*4) returns ------
-----
Right
right(text{,num_char
acters})
Returns the last
(rightmost)
characters in the
text. If
num_characters is
omitted, returns 1
character.
right(GPA) returns A
right(Mr. Smith,4)
returns mith
Trim
trim(text)
Removes leading,
trailing, and extra
spaces from the text.
trim( gpa is fun )
returns gpa is fun
Upper
upper(text)
Converts any
lowercase characters
in the text to
uppercase.
upper(gpa is fun)
returns GPA IS FUN
upper(Mr. Smith)
returns MR. SMITH
GPA Functions
Functions are used to perform operations on values, such as returning the number of grades used
to determine a student's GPA. The functions in this category are listed alphabetically.
Most functions have at least one required argument, though some do not accept any arguments.
Optional arguments are surrounded by braces { }. A brief description and one or more examples
follow each function.
Note: See the values listed on the GPA Quick Reference Card to compare the arrays of values used
in the function.
Function name or
alternate function
Function
Description
Examples
GPA_AddedValue
gpa_addedvalue()
Returns a numeric
array listing the
added value for each
grade used in the
GPA calculation. If
used within
gpa_concat() or
gpa_sum(), returns a
single value. See the
gpa_addedvalue()
returns {0,0.02,0,0,0}
District System Administrator User Guide
District Setup
© 2004 Apple Computer, Inc. All rights reserved.
416
Function name or
alternate function
Function
Description
Examples
note in gpa_sum().
GPA_Attempts
gpa_attempts()
Returns a numeric
array listing the
attempts for each
grade used in the
GPA calculation. The
attempts are
determined by
comparing the first
character of the
store code to a
lookup table defined
in District Setup. If
the character is not
found in the lookup
table, a zero is used.
If used within
gpa_concat() or
gpa_sum(), returns a
single value. See the
note in gpa_sum().
gpa_attempts()
returns {1,1,2,2,2}
GPA_Calculation
gpa_calculation(text) Returns the result of
the GPA calculation
method whose
name is specified.
gpa_calculation(wei
ghted) returns 3.254
GPA_Concat
gpa_concat(formula)
Evaluates the
formula once for
every grade used in
the GPA calculation
and returns a
concatenated string
of the results. When
used inside
gpa_concat(), the
following functions
return an individual
value instead of an
array:
gpa_addedvalue(),
gpa_attempts(),
gpa_coursenumber()
gpa_concat(if(left
(gpa_grade()) =B,*,))
returns **
District System Administrator User Guide
District Setup
© 2004 Apple Computer, Inc. All rights reserved.
417
Function name or
alternate function
Function
Description
Examples
, gpa_earnedcredit(),
gpa_gpapoints(),
gpa_grade(),
gpa_gradelevel(),
gpa_percent(),
gpa_potentialcredit()
, gpa_storecode(),
gpa_termid(). A
gpa_concat() or
gpa_sum() function
cannot be used
within the formula.
GPA_Count
gpa_count()
Returns the number
of grades used in the
GPA calculation.
Functionally
equivalent to
count(gpa_grade()),
but faster.
gpa_count() returns
8
GPA_CountSchoolYe
ars
gpa_countschoolyea
rs()
Returns the number
of unique school
years (not grade
levels) for the grades
used in the GPA
calculation.
gpa_countschoolyea
rs() returns 2
GPA_CountUniqueC
ourses
gpa_countuniqueco
urses()
Returns the number
of unique courses
(based on course
number) for the
grades used in the
GPA calculation.
gpa_countuniqueco
urses() returns 6
GPA_CountYearTerm
s
gpa_countyearterms
()
Counts the number
of unique store
codes in each school
year, then returns a
grand total.
gpa_countyearterms
() returns 4
GPA_CourseNumber
gpa_coursenumber() Returns a text array
listing the course
numbers for each
grade used in the
gpa_coursenumber()
returns
{MA1001,SC2001,
FA540,LS105, PE200}
District System Administrator User Guide
District Setup
© 2004 Apple Computer, Inc. All rights reserved.
418
Function name or
alternate function
Function
Description
Examples
GPA calculation. If
used within
gpa_concat() or
gpa_sum(), returns a
single value. See the
note in gpa_sum().
FA540,LS105, PE200}
GPA_EarnedCredit
gpa_earnedcredit()
Returns a numeric
array listing the
earned credit hours
for each grade used
in the GPA
calculation. If used
within gpa_concat()
or gpa_sum(),
returns a single
value. See the note
in gpa_sum().
gpa_earnedcredit()
returns {0,0.5,0.5,1,0}
GPA_GPAPoints
gpa_gpapoints()
Returns a numeric
array listing the gpa
points for each
grade used in the
GPA calculation. If
used within
gpa_concat() or
gpa_sum(), returns a
single value. See the
note in gpa_sum().
gpa_gpapoints()
returns
{4,3.5,3.333,2.5,0}
GPA_Grade
gpa_grade()
Returns a text array
listing the letter
grade for each grade
used in the GPA
calculation. If used
within gpa_concat()
or gpa_sum(),
returns a single
value. See the note
in gpa_sum().
gpa_grade() returns
{A,B+,B,C+,F}
GPA_GradeLevel
gpa_gradelevel()
Returns a numeric
array listing the
grade level for each
grade used in the
gpa_gradelevel()
returns {9,9,9,10,10}
District System Administrator User Guide
District Setup
© 2004 Apple Computer, Inc. All rights reserved.
419
Function name or
alternate function
Function
Description
Examples
GPA calculation. If
used within
gpa_concat() or
gpa_sum(), returns a
single value. See the
note in gpa_sum().
GPA_Percent
gpa_percent()
Returns a numeric
array listing the
percentage for each
grade used in the
GPA calculation. If
used within
gpa_concat() or
gpa_sum(), returns a
single value. See the
note in gpa_sum().
gpa_percent()
returns
{96.2,88.5,84,79,54.8}
GPA_PotentialCredit
gpa_potentialcredit() Returns a numeric
array listing the
potential credit
hours for each grade
used in the GPA
calculation. If used
within gpa_concat()
or gpa_sum(),
returns a single
value. See the note
in gpa_sum().
gpa_potentialcredit()
returns {0,0.5,0.5,1,1}
GPA_StoreCode
gpa_storecode()
Returns a text array
listing the store code
for each grade used
in the GPA
calculation. If used
within gpa_concat()
or gpa_sum(),
returns a single
value. See the note
in gpa_sum().
gpa_storecode()
returns
{Q1,Q2,S1,S1,S2}
GPA_Sum
gpa_sum(formula)
Evaluates the
formula once for
every grade used in
the GPA calculation
gpa_sum(gpa_gpap
oints()
*gpa_potentialcredit
()) returns 5.9165
District System Administrator User Guide
District Setup
© 2004 Apple Computer, Inc. All rights reserved.
420
Function name or
alternate function
Function
Description
Examples
and returns the
numeric total of the
results. When used
inside gpa_concat(),
the following
functions return an
individual value
instead of an array:
gpa_addedvalue(),
gpa_attempts(),
gpa_coursenumber()
, gpa_earnedcredit(),
gpa_gpapoints(),
gpa_grade(),
gpa_gradelevel(),
gpa_percent(),
gpa_potentialcredit()
, gpa_storecode(),
gpa_termid(). A
gpa_concat() or
gpa_sum() function
cannot be used
within the formula.
()) returns 5.9165
GPA_TermID
gpa_termid()
Returns a numeric
array listing the term
ID for each grade
used in the GPA
calculation. If used
within gpa_concat()
or gpa_sum(),
returns a single
value. See the note
in gpa_sum().
gpa_termid() returns
{1004,1005,1001,
1101,1102}
Standards Setup
Before using standards in PowerSchool, understand what your district wants and is expected to
report to a board of education, superintendent, or the state Department of Education (DOE). There
is no need to define benchmarks levels at every grade level if you are not expected to report that
information. For example, the Wyoming DOE requires schools to report student progress at the
fourth-, eighth-, and eleventh-grade levels. Schools in Wyoming often select to have all teachers
match their assignments to only those benchmarks unless their local DOE requires it at every grade
District System Administrator User Guide
District Setup
© 2004 Apple Computer, Inc. All rights reserved.
421
level. Kindergarten through fourth-grade teachers can align to the fourth-grade set of benchmarks;
fifth- through eighth-grade teachers can align to the eighth-grade set; and so on.
This section outlines the procedures to set up standards and benchmarks. Use the following
procedures to set up standards:
•
Set up conversion tables to convert percentage scores given by teachers to standard letter
or number scores.
•
Enter each set of standards. This includes assigning parent relationships, aligning standards,
and creating conversion tables.
How to Create a Conversion Scale
Before entering standards, you must first create at least one conversion scale. Log in to the district
office before performing this procedure.
1. On the start page, choose District from the main menu.
2. Click Standards. The Standards page appears.
3. Click Conversion Scales. The Custom Standards List page appears.
District System Administrator User Guide
District Setup
© 2004 Apple Computer, Inc. All rights reserved.
422
The Standards Conversion Scales page displays with the default scale already created.
However, you must define each scale and enter the cutoffs for each level and for the
converted score.
Note: It is advantageous to leave a default scale in your system for importing purposes.
4. Click New. The New Standard Conversion Scale page appears.
5. Use the following table to select the grade scale type:
Type
Description
Name
Enter a name for the standard conversion scale.
Type
Choose a grade scale type from the pop-up menu:
District System Administrator User Guide
District Setup
© 2004 Apple Computer, Inc. All rights reserved.
423
Type
Description
•
Alphanumeric: Used for letter grades such as A, B, C or
E, S, and N, or descriptive grades such as Excellent,
Satisfactory, and Unsatisfactory.
•
Numeric (2 decimal places): Used for GPA-type grades
such as 4.00, 3.00, and 2.00.
•
Numeric (zero decimal places): Used for simple
numerical grades such as 1, 2, 3, and 4.
Description
Enter a description.
6. Click Submit. The Standards Conversion Scales page appears.
Note: Enter as many conversion scales as needed for the district.
How to Enter Cutoffs
After defining the conversion scale, enter the scale cutoffs. You must log in to the district office
before performing this procedure.
1. On the start page, choose District from the main menu.
2. Click Standards. The Standards page appears.
3. Click Conversion Scales. The Custom Standards List page appears.
District System Administrator User Guide
District Setup
© 2004 Apple Computer, Inc. All rights reserved.
424
4. Click Edit Scale for the scale you want to modify. The Custom Standards List page appears.
5. Click New. The New Standard Conversion Scale Entry page appears.
6. Use the following table to enter information in the fields:
District System Administrator User Guide
District Setup
© 2004 Apple Computer, Inc. All rights reserved.
425
Field
Description
Description
Enter a description of the new standard conversion scale entry.
Cutoff Percent
Enter the cutoff percent. This is the minimum a student must
earn on an assignment to receive this grade.
Translates to
Enter the conversion grade. This must follow the scale rule
previously defined for this scale being alphanumeric or
numeric, with or without decimal places.
7. Click Submit. The Custom Standards List page appears.
Note: Enter as many conversion scale entries as needed for the conversion scale.
Enter Standards
After setting up conversion scales, you can begin entering standards into the system. There are
three methods for entering standards: manually, manually by example, and through an import.
Note: Importing is the easiest way to enter standards into PowerSchool. For more information, see
the section "
Quick Import
."
How to Manually Enter Standards
Complete this procedure for each standard you want to enter manually. You must log in to the
district office before performing this procedure.
1. On the start page, choose District from the main menu.
2. Click Standards. The Standards page appears.
District System Administrator User Guide
District Setup
© 2004 Apple Computer, Inc. All rights reserved.
426
3. Click List Standards. The list of standards appears. The types of standards include National,
State, District, or School. If there are no standards of a given type in the system, that type
does not appear.
4. Click New to create a standard. The New Standard page appears.
District System Administrator User Guide
District Setup
© 2004 Apple Computer, Inc. All rights reserved.
427
5. Use the following table to enter information in the fields:
Field
Description
Name
Enter the name of the standard. This will be used for reporting
purposes.
Identifier
Enter the code used by administrators for reporting and by
teachers for designating to assignments. Must be unique.
Subject Area
Enter the global naming convention. This will be used for
reporting purposes.
Alignment Identifier
Enter an alignment identifier to identify standard alignment to
other types of standards; for example, from district to state or
from state to national.
Calculation Parent
Enter a single identifier for which this standard should be
included in calculations. This value should be similar to the List
Parent field.
District System Administrator User Guide
District Setup
© 2004 Apple Computer, Inc. All rights reserved.
428
Field
Description
List Parent
Enter a hierarchical identifier that always identifies the owning
standard.
Type
Choose National, State, District, or School from the pop-up
menu.
Level
Choose a level from 1 to 6 from the pop-up menu. This field is
used for identification purposes only.
Sort Order
Enter a sort order for the standard, used to determine non-
alphabetical ordering.
Course Number
This field is used to identify which standards should be
presented to a teacher on the Standards Final Grade Entry page
in PowerSchool Teacher.
The standards that list a course number matching the course
number of the teacher's current class are presented for final
grade entry.
This field may contain multiples values separated by commas.
Comments
Select this checkbox to include a comment field for school-
specific standards.
Conversion Scale
Select a previously defined conversion scale; each standard can
have only one.
Assignments
Select this checkbox to allow a teacher to assign a standard
identifier to an assignment.
Description
Enter a description of the standard. This field is used for
reporting purposes only.
6. Click Submit. The Changes Recorded page appears.
How to Manually Enter Standards by Example
Manually enter standards by example to preset many of the required fields for repeated use. You
must log in to the district office before performing this procedure.
1. On the start page, choose District from the main menu.
2. Click Standards. The Standards page appears.
District System Administrator User Guide
District Setup
© 2004 Apple Computer, Inc. All rights reserved.
429
3. Click Custom List Settings. The Custom Standards List Settings page appears.
District System Administrator User Guide
District Setup
© 2004 Apple Computer, Inc. All rights reserved.
430
Note: Use the list settings to search for a particular standard by multiple criteria. However,
after you submit the search, enter new standards using the criteria defined by your search.
4. Use the following table to select a search comparator:
Comparator
Description
(Blank)
Ignore this field.
=
Must be an exact match.
#
Must not be an exact match.
$
Contains.
!$
Does not contain.
5. Use the following table to search for a standard:
Field
Description
Name
Name of the standard.
Identifier
Code used by administrators for reporting and by teachers for
designating to assignments. Must be unique.
Subject Area
Global naming convention.
Description
Description of the standard.
Course Number
Used to send standard identifiers to each teacher's PowerGrade
for school-specific standards.
Type
National, State, District, or School.
Level
Used for identification purposes only.
Assignments
Allows a teacher to assign a standard identifier to an
assignment.
Conversion Scale
Allows you to select a previously defined conversion scale; each
standard can have only one.
Sort Order
Defines how the search results appear.
Columns to Show
Defines what the search displays.
6. Click Submit. The Custom Standards List page appears.
District System Administrator User Guide
District Setup
© 2004 Apple Computer, Inc. All rights reserved.
431
After searching for the specific criteria, the results of your search appear; however, the
results can be blank.
7. Click "New Standard by Example" to create new standards using the criteria you specified in
the search as the initial values for the entry fields. The "New Standard by Example" page
appears.
8. Use the following table to enter information in the fields:
District System Administrator User Guide
District Setup
© 2004 Apple Computer, Inc. All rights reserved.
432
Field
Description
Name
Enter the name of the standard. This will be used for reporting
purposes.
Identifier
Enter the code used by administrators for reporting and by
teachers for designating to assignments. Must be unique.
Subject Area
Enter the global naming convention. This will be used for
reporting purposes.
Alignment Identifier
Enter an alignment identifier to identify standard alignment to
other types of standards; for example, from district to state or
from state to national.
Calculation Parent
Enter a single identifier for which this standard should be
included in calculations. This value should be similar to the List
Parent field.
List Parent
Enter a hierarchical identifier that always identifies the owning
standard.
Type
Choose National, State, District, or School from the pop-up
menu.
Level
Choose a level from 1 to 6 from the pop-up menu. This field is
used for identification purposes only.
Sort Order
Enter a sort order for the standard, used to determine non-
alphabetical ordering.
Course Number
This field is used to identify which standards should be
presented to a teacher on the Standards Final Grade Entry page
in PowerSchool Teacher.
The standards that list a course number matching the course
number of the teacher's current class are presented for final
grade entry.
This field may contain multiples values separated by commas.
Comments
Select this checkbox to include a comment field for school-
specific standards.
Conversion Scale
Select a previously defined conversion scale; each standard can
have only one.
Assignments
Select this checkbox to allow a teacher to assign a standard
identifier to an assignment.
District System Administrator User Guide
District Setup
© 2004 Apple Computer, Inc. All rights reserved.
433
Field
Description
Description
Enter a description of the standard. This field is used for
reporting purposes only.
9. Click Submit. The Custom Standards List page appears.
How to View Standards
View standards in a hierarchical listing. You must log in to the district office before performing this
procedure.
1. On the start page, choose District from the main menu.
2. Click Standards. The Standards page appears.
3. Click List Standards. The list of standards appears. The types of standards include National,
State, District, or School. If there are no standards of a given type in the system, that type
does not appear.
District System Administrator User Guide
District Setup
© 2004 Apple Computer, Inc. All rights reserved.
434
4. Click the small triangle to display the first level of standards in each type. Continue clicking
the triangle to expand the list. Alternatively, click Expand All to expand all levels.
5. Click the name of a standard to view its details. The Edit Standard page appears.
District System Administrator User Guide
District Setup
© 2004 Apple Computer, Inc. All rights reserved.
435
Tests Setup
Before entering test scores for an individual student, create new tests that are available to all the
schools on your system. If the test already exists on your system, you can edit test information, such
as its description or the sort order of test scores.
How to Create New Tests
You must log in to the district office before performing this procedure.
1. On the start page, choose District from the main menu.
2. Click Tests. The Test page appears.
District System Administrator User Guide
District Setup
© 2004 Apple Computer, Inc. All rights reserved.
436
3. Click New. The New Test page appears.
4. Use the following table to enter information in the fields:
Field
Description
Name
Enter the name of the test.
Type
Choose the level of the test from the pop-up menu.
Description
Enter a description for the test that appears on the Test Scores
and student pages menus.
5. Click Submit. The Test Scores page displays the new test. To add test scores, see the section
"
How to Create Test Scores
."
District System Administrator User Guide
District Setup
© 2004 Apple Computer, Inc. All rights reserved.
437
How to Edit Tests
You must log in to the district office before performing this procedure.
1. On the start page, choose District from the main menu.
2. Click Tests. The Test page appears.
3. Click the name of the test you want to edit. The Edit Test page appears.
District System Administrator User Guide
District Setup
© 2004 Apple Computer, Inc. All rights reserved.
438
4. Use the following table to edit information in the fields:
Field
Description
Name
Edit the name of the test.
Type
Choose the level of the test from the pop-up menu.
Description
Edit the description for the test that appears on the Test Scores
and student pages menus.
5. Click Submit. The Test Scores page displays the edited test. To add test scores, see the
section "
How to Create Test Scores
."
How to Delete Tests
You must log in to the district office before performing this procedure.
1. On the start page, choose District from the main menu.
2. Click Tests. The Test page appears.
District System Administrator User Guide
District Setup
© 2004 Apple Computer, Inc. All rights reserved.
439
3. Click the name of the test you want to delete. The Edit Test page appears.
4. Select the checkbox at the end of the warning note.
5. Click Delete. The Test Scores page displays without the deleted test.
Single Student Standards Report
The single student standards report lists a student’s progress for each standard. Before you print the
report, you can determine which particular standards fields you want to appear on it.
For information about running standards reports for more than one student, see the section
"
Standards Reports
."
District System Administrator User Guide
District Setup
© 2004 Apple Computer, Inc. All rights reserved.
440
How to Set Up the Single Student Standards Report
You must log in to the district office before performing this procedure.
1. On the start page, choose District from the main menu.
2. Click Standards. The Standards page appears.
3. Click Display Settings. The Standards Display Settings page appears.
4. Use the following table to enter information in the fields:
Field
Description
Fields to Display on
Student Summary Screen
Select any combination of the following checkboxes to
determine the information you want to appear for each
standard on the Student Summary page:
District System Administrator User Guide
District Setup
© 2004 Apple Computer, Inc. All rights reserved.
441
Field
Description
•
Identifier
•
Name
•
Number of Scores
•
Average Score
•
Translated Average Score
•
High Score
•
Translated High Score
•
Description
Score to display on
stored scores screen
Use the pop-up menu to determine which score to display on
the list page. All scores are viewable on the detail page.
Number of decimal
places in percent scores
Enter the number of digits you want to appear after a decimal
point.
Include the % character
in percent scores
Select this checkbox if you want to include the percentage
character (%) in percent scores.
Suppress display of
scores if no assignments
Select this checkbox if you do not want to display zeros on the
report if there are no associated assignments.
Sort assignment list
Use the pop-up menu to indicate the sort order of the
assignment list:
•
Chronologically
•
Reverse Chronologically
5. Click Submit. The system saves your changes.
How to Access the Single Student Standards Report
1. On the start page, search for and select the student.
2. Choose Standards from the student pages menu. The Standards page appears.
District System Administrator User Guide
District Setup
© 2004 Apple Computer, Inc. All rights reserved.
442
3. Click the triangles to access any level of standards where scores are reported.
4. Click the standard identifier when you reach the level you want.
Note: You can also view stored standard scores by clicking the scores stored on that line.
5. Click the number of scores in the Num Scores column that you opted to show. The Standard
Scores: [Standard] page displays each assignment score that is contributing to this standard
score.
District System Administrator User Guide
District Setup
© 2004 Apple Computer, Inc. All rights reserved.
443
Test Scores Setup
Test scores are scores associated with a particular test. Use the test score fields when entering
scores for individual students. Before creating test scores, identify or create the appropriate test. For
more information, see the section "
Tests Setup
."
How to Create Test Scores
You must log in to the district office before performing this procedure.
1. On the start page, choose District from the main menu.
2. Click Tests. The Test page appears.
3. Click Edit Scores next to the test you want to edit. The Test Scores: [Test Name] page
appears.
4. Click New. The New Test Score: [Test Name] page appears.
District System Administrator User Guide
District Setup
© 2004 Apple Computer, Inc. All rights reserved.
444
5. Use the following table to enter information in the fields:
Field
Description
Name
Enter the name of the test score
Sort Order
Indicate the order for the test score.
Note: Alternatively, leave the Sort Order field blank and set the
sort order from the Test Scores: [Test Name] page. For more
information, see the section "
How to Edit Tests
."
Description
Enter a description for the test to appear on the Test Scores
page.
6. Click Submit. The Test Scores: [Test Name] page displays the new test score.
How to Edit Test Scores
You must log in to the district office before performing this procedure.
1. On the start page, choose District from the main menu.
2. Click Tests. The Test page appears.
District System Administrator User Guide
District Setup
© 2004 Apple Computer, Inc. All rights reserved.
445
3. Click Edit Scores next to the test you want to edit. The Test Scores: [Test Name] page
appears.
4. Skip to Step 6 to edit a test score. To change the sort order of the test scores, enter the
order of each test scores in the Sort Order fields.
5. Click Submit.
6. Click the score name for the test score you want to edit. The Edit Test Score: [Test Name]
page appears.
District System Administrator User Guide
District Setup
© 2004 Apple Computer, Inc. All rights reserved.
446
7. Use the following table to edit information in the fields:
Field
Description
Name
Edit the name of the test score
Sort Order
Indicate the order for the test score.
Note: Alternatively, leave the Sort Order field blank and set the
sort order from the Test Scores: [Test Name] page. For more
information, see the section "
How to Edit Tests
."
Description
Edit a description for the test to appear on the Test Scores
page.
8. Click Submit. The Test Scores: [Test Name] page displays the edited test score.
How to Delete Test Scores
You must log in to the district office before performing this procedure.
1. On the start page, choose District from the main menu.
2. Click Tests. The Test page appears.
District System Administrator User Guide
District Setup
© 2004 Apple Computer, Inc. All rights reserved.
447
3. Click Edit Scores next to the test. The Test Scores: [Test Name] page appears.
4. Click the score name for the test score you want to delete.
5. Select the checkbox at the end of the warning note.
6. Click Delete. The Test Scores: [Test Name] page displays without the deleted test score.
Other
Other District Setup Functions
Other district setup functions include setting up CIP codes for vocational courses and defining
settings, such as student photo dimension defaults.
To perform any of the following procedures, you must first switch schools to the district office. See
the section "
How to Change Schools
."
District System Administrator User Guide
District Setup
© 2004 Apple Computer, Inc. All rights reserved.
448
How to Add a CIP Code
Classification of Instructional Program (CIP) codes are used by schools in some states to identify
courses as part of a state-managed vocational program. Set up CIP codes at the district level in
order to enter CIP codes for appropriate courses offered at each school.
1. On the start page, choose District from the main menu.
2. Click CIP Setup.
3. Click New. The CIP Edit page appears.
4. Use the following table to enter information in the fields:
Field
Description
Name
Enter the name of the CIP code.
Codes
Enter the six-digit CIP code.
5. Click Submit. The CIP Setup page displays the new code.
District System Administrator User Guide
District Setup
© 2004 Apple Computer, Inc. All rights reserved.
449
How to Edit a CIP Code
1. On the start page, choose District from the main menu.
2. Click CIP Setup.
3. Click the name of the CIP code to be edited. The CIP Edit page appears.
4. Use the following table to enter information in the fields:
Field
Description
Name
Enter the name of the CIP code.
Codes
Enter the six-digit CIP code.
5. Click Submit. The CIP Setup page displays the edited code.
District System Administrator User Guide
District Setup
© 2004 Apple Computer, Inc. All rights reserved.
450
How to Delete a CIP Code
1. On the start page, choose District from the main menu.
2. Click CIP Setup.
3. Click the name of the CIP code to be deleted. The CIP Edit page appears.
4. Click Delete. The Selection Deleted page appears.
How to Set Up Miscellaneous District Settings
1. On the start page, choose District from the main menu.
2. Click Miscellaneous. The Miscellaneous page appears.
District System Administrator User Guide
District Setup
© 2004 Apple Computer, Inc. All rights reserved.
451
3. Use the following table to enter information in the fields:
Field
Description
Number of digits in
course numbers
Enter the number of digits that are used for course numbers.
Dimensions to display
student photos in
Enter the default measurements, in pixels, for displaying
student photos on each student page. In the W and H columns,
enter the width and height (in pixels) of the student photos.
Note: The recommendation is 200 W by 300 H.
Password required to
delete a section
If you want to limit users' ability to delete a course section,
enter a password. Then, only users who know the password can
delete course sections. Otherwise, leave this field blank.
Password required to
override a section's
maximum enrollment
If you want to limit users' ability to override the maximum
number of students who can enroll in a course section, define a
password. Then, only users who know the password can
override the maximum enrollment numbers for course sections.
Otherwise, leave this field blank.
Name of district that
parents see on login
screen
Enter the name of the school district. The name entered here
appears in PowerSchool Parent.
District System Administrator User Guide
District Setup
© 2004 Apple Computer, Inc. All rights reserved.
452
Field
Description
Allow importing in
district office mode
Though it is not recommended, select this checkbox to allow
imports to occur at the district level.
Note: Selecting this checkbox is recommended only when
necessary. Importing data at the district level can cause serious
data problems when not performed properly.
Disable searching on
lunch status
Select this checkbox to disallow searching on lunch statuses,
such as Free or Exempt. A student's lunch status, such as free or
reduced, can be considered sensitive information. You may
want to select this checkbox to protect the privacy of students
and staff.
Disable meal price
Select this checkbox to hide meal prices on the screen when
serving breakfast or lunch. You may want to select this
checkbox to protect the privacy of students and staff. For more
information, see the section "
Serve Breakfast or Lunch
."
Disable remote support
Select this checkbox if you do not want PowerSchool users,
including PowerSchool Technical Support staff, to be able to
remotely access your PowerSchool server. If you want to be
able to remotely access your PowerSchool server, deselect this
checkbox..
Do not show the lunch
balance on
parent/student pages
Select this checkbox to hide students' balances (lunch and fees)
in PowerSchool Parent Access and PowerSchool Teacher.
Note: You can select this checkbox if your school/district does
not use PowerLunch to track student lunch balances.
Enable auto-update for
state reports
If PowerSchool generates your state reports, this function
updates these reports from the reporting engine. Select this
checkbox to automatically retrieve any state reporting updates.
4. Click Submit. The Changes Recorded page appears.